As promised, today I’m sharing a low-key version of that wedding cake I recently posted. So here it is, just in time for gingerbread season—my cardamom gingerbread rose cake, with rose cream cheese glaze! It has an incredibly tender crumb, a robust spiced ginger and rose flavor, and a delightful cream cheese glaze that smooths out all that fragrance.
You might notice that this rose cake’s flavors and design are pretty much identical to my cardamom rose gingersnaps. Those cookies are perfect for sharing with friends, family, and coworkers. But this cake is a lovely way to end a big holiday dinner. And best of all, it’s actually pretty simple to make. You don’t even need a stand mixer or any special baking or decorating experience to pull it off. And I’ve included some instructions for making it ahead, so it’s ideal for entertaining.


making this rose cake ahead
- You can bake the cakes a few weeks ahead of serving. But even if you just make them a day or two ahead of time, you should store them in the freezer rather than the refrigerator. The fridge tends to dry baked goods out, while the freezer preserves them without drying them out.
- To freeze the cake layers: Let them cool completely, wrap in plastic wrap, seal in a bag, and try to squeeze out as much air as possible before freezing. But careful not to crush the cakes—they’re fragile! Alternatively, feel free to bake the cakes the day before serving, and keep them at room temperature.
- You can make the frosting a few days ahead of time, and keep it in the refrigerator. Make sure it’s tightly sealed so it doesn’t take on any weird fridge smells. This glaze actually freezes a bit better than most cream cheese frostings. But I wouldn’t necessarily recommend freezing it because it sometimes gets grainy and doesn’t look quite as good. But luckily it’s super easy to throw together.
- You can crumple the rose petals weeks ahead of time.
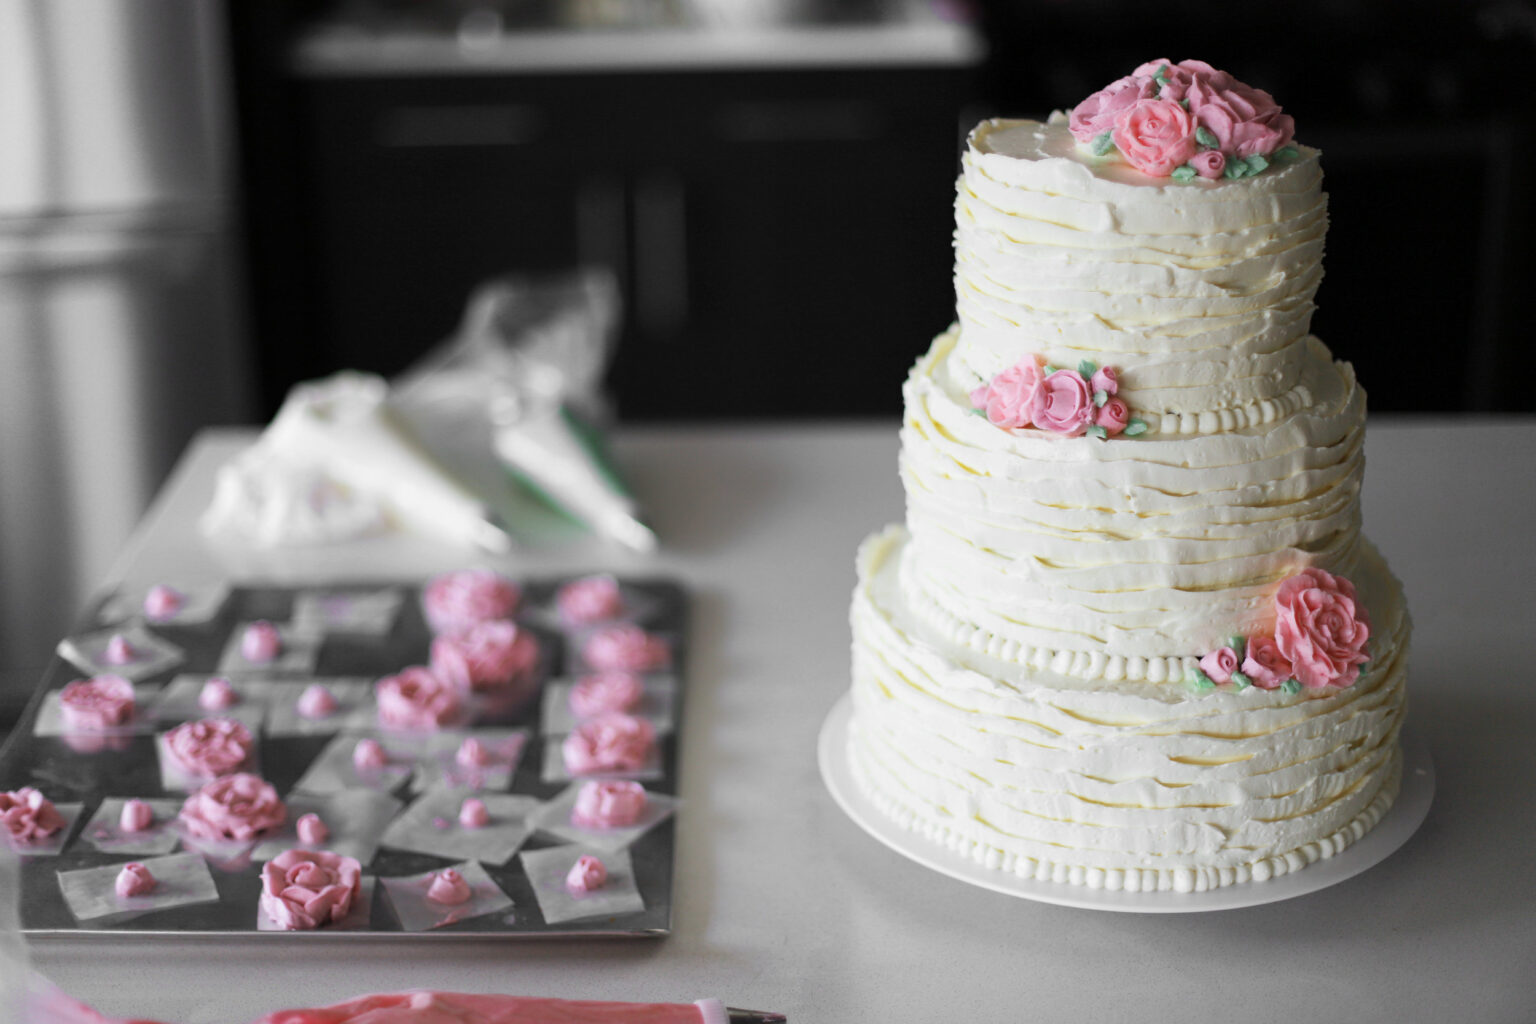
- Up to a couple hours before serving, you can assemble the cake, ice it, and decorate with rose petals. The decorating only takes a couple minutes, and is really easy to do at the last minute while entertaining. You won’t need to bring out a rotating turntable or any cake decorating gear.


some tips on decorating
Most of these tips are in the recipe below, but I thought I’d add a little more detail, in case you want to know more about how to get the look in these photos:
- Make sure the glaze is the right consistency. It needs to be pourable, but thick. If you thin it out too much, it won’t cling correctly, and it will just run off the sides. It’s totally fine to make more of a thick cream cheese frosting instead. But in that case, you’ll make swooshes on the surface (rather than pouring it), like the cake in this post. The consistency will depend on how strong your rosewater is. If it’s weak, you might need to add the full amount called for in the recipe, which means you shouldn’t have to thin the glaze out any more. If it’s strong, you might only add a teaspoon, which means you can thin the glaze out further with some leftover buttermilk, or leave it as is and swoosh it.
- When encouraging the glaze down the sides of the cake, remember that less is more. It will always drip down further and wider than you want it to, and more of the glaze should end up on the cake than on the pedestal.
- Carefully separate the rose petals, making sure you use just the pink ones (save brown bits for tea). The best way to do this is to squeeze the stem part of the bud to crush it slightly. The outer petals will then easily fall away. Once you’ve harvested all the pink petals, further crush the bud between your fingers to release the seeds and pollen from the inside of the bud. These little black dots add a lot of nice contrast and give the cake a less froufrou look (although there’s nothing wrong with going full froufrou!).
- Sprinkle the petals over the cake, rather than carefully placing them. Sprinkle from about 10 inches above the cake, and keep your hand moving as you go.
- Careful not to add too much food coloring to the cream cheese glaze. Since dried rose petals are usually a deeper shade of pink, using a more pastel shade for the glaze gives the cake more contrast.


cardamom gingerbread rose cake


loosely adapted from a Cook’s Illustrated recipe
- Prep Time: 30 minutes
- Total Time: 90 minutes
- Yield: 10 servings
Ingredients
for the cardamom rose gingerbread cake:
- butter for greasing the pans
- 250g (1 3/4 cup) all purpose flour
- 21g (1/4 cup) cocoa powder
- 14g (2 tablespoons) ground ginger
- 6.5g (1 1/2 teaspoons) baking powder
- 3g (1/2 teaspoon) baking soda
- 2.5g (1 teaspoon) ground cinnamon
- 3g (1 1/4 teaspoons) cardamom
- 5.5g (3/4 teaspoon) salt
- 240g (1 cup) buttermilk
- 170g (1/2 cup) molasses
- 300g (1 1/2 cups) sugar
- 150g (3/4 cup) vegetable oil
- 3 large eggs (140g)
- 30g (2 tablespoons) fresh grated or puréed ginger
- up to 45g (3 tablespoons) rosewater (add 1 tablespoon at a time)
for the rosewater cream cheese glaze and decoration:
- 227g (8 oz) package cream cheese, softened at room temperature
- 57g (4 tablespoons) butter, softened at room temperature
- 210g (1 1/2 cups) powdered sugar
- up to 22g (1 1/2 tablespoons) rosewater (add 1 or 2 teaspoons at a time)
- a few drops pink food coloring (optional)
- additional buttermilk (as needed)
- edible crumbled dried rose buds* (optional)
Instructions
- Bake the cake layers: Preheat the oven to 350° F/180° C convection.** Butter two 8-inch cake rounds, line them with parchment rounds and then butter the parchment.
- Sift together the flour, cocoa, ground ginger, baking powder, baking soda, cinnamon, cardamom, and salt.
- In a stand mixer, fitted with the paddle attachment (or in a mixing bowl with a whisk), combine the buttermilk, molasses, and sugar. Then add the vegetable oil, eggs, fresh ginger, and 1 tablespoon of rosewater at a time. Mix and taste between rosewater spoonfuls, and add more as necessary (different brands vary significantly in strength. Too much will taste soapy).***
- Add the dry ingredients to the wet ingredients, and mix at low speed just until it comes together (do not over-mix). Fold 3 or 4 times with a rubber spatula, scraping the bottom of the bowl to make sure it’s fully incorporated. Pour into the parchment-lined rounds, and bake for about 22 minutes. They’re done once they’re no longer wobbly in the center, and a toothpick inserted in the middle comes out clean with just a few crumbs.
- Let them cool in the pans for 10 minutes. Run a knife around the pans’ edges to loosen the cakes. Be very careful when you invert the cake—it has a very delicate crumb. Place a plate over one pan, flip the whole thing in 1 swift motion, and carefully remove the pan. Place a cooling rack over the inverted cake on the plate, and carefully flip it again so it’s right-side-up on the rack. Repeat with the other one, and let them cool completely.
- Make the glaze: Beat the cream cheese and butter together until they lighten a little, about 3 to 5 minutes. Add the powdered sugar and a little rosewater, and beat together. Taste, and continue adding rosewater until you’re happy with the flavor (careful not to overdo it).
- Once you’re happy with the flavor, take a look at the consistency. It should be very thick, but pourable, like perfectly tempered chocolate. If you need to thin it out slightly (probably because you went with a smaller amount of rosewater), add a teaspoon of buttermilk (or milk) at a time, until you reach the right consistency, but careful not to let it become thin or runny. Or, if you like it on the spreadable side, simply swoosh it on top instead of glazing the cake.
- Once you’re happy with the consistency, add a couple drops of pink food coloring, and keep mixing in more drops until it’s a pale pink color (careful not to make it too bright—I used 6 drops of pink to get this color. Use much less if you’re using red).
- Once the cakes are cool, carefully shave off the slight hump of 1 cake with a serrated knife. Place that layer cut-side-up on a plate or cake pedestal. Top with about 1/3 of the glaze, and spread into a thin layer. Place the second layer bump-side-up. Top with the remaining glaze, encouraging it to drip down the sides a little. Sprinkle with rose petals and seeds, and serve.
Notes
* When I crumble the rosebuds, I like to also use the little black seeds that fall out. They add some nice contrast to the pale icing and colorful rose petals. Some rose buds will have yellowish-brown petals on the inside—I just use the outer pink ones for decorating (sometimes with a little yellowish-brown), and save the scraps to make tea.
** If you don’t have convection, you may need to bake them slightly longer. Keep an eye on them, and take out of the oven once they’re no longer wobbly in the center.
*** If you don’t want to eat raw egg, wait to add the eggs until after you’ve tasted it, but keep in mind it should taste a little rosier without them. The cake has rosewater in both the frosting and the cake, so it’s better to under- than over-do it, and you can always sprinkle the finished cakes with a few drops if you didn’t add enough.
Note on the pan size: This recipe has never overflowed during testing and it should not overflow on you if you use 2 standard 8 inch pans. But if yours does overflow, something has gone wrong with your ingredient ratios, oven temperature, or pan depth. If you’re making this for the first time and worried it might overflow, you can place a baking sheet on the rack one level down from the rack you’re baking on.