Now that there are so many excellent flour blends on the market, gluten free baking has become much more straightforward. But when you need to replace something like semolina, all purpose flour blends don’t really cut it. If you’re not sure exactly what I mean, take ma’amoul for instance. Ma’amoul showcases semolina’s distinctive texture—when hydrated and kneaded, it becomes simultaneously chewy, buttery, and just a tiny bit gritty. So to make ma’amoul gluten free, you can’t simply replace the semolina with a standard gluten free flour blend.
When I first started brainstorming a replacement, I immediately thought of almond meal and cornmeal grits/polenta, the two grittiest gluten free flours out there. In the end, I settled on cornmeal, because it tends to have that simultaneously gritty and moist texture (while almond meal mostly just adds crumbliness when it’s not in an eggy batter).


I posted a little bit about developing this recipe on instagram, and if you were following along, you might’ve noticed that I was really excited about my first try making these with cornmeal, which went pretty well. And I knew I was onto something good when Yasmeen from Wandering Spice messaged me to say she’s used polenta to make gluten free ma’amoul before.
As you might expect, usually when something goes well on the first try, it only takes one or two more experiments to get it perfect. But for some reason this one took a lot more trial and error to really get it right. I initially had a lot of trouble hydrating my cornmeal enough to create the right texture, and I worried that doing much more than soaking the cornmeal would lose that little bit of grittiness.
Eventually I figured out a method that works really well, which I’ve detailed in the recipe below. Or feel free to read on if you want to hear more about my cornmeal experiments.


While semolina hydrates after a quick soak, I learned first hand that grits/polenta absolutely does not. I tried an overnight soak, I tried a hot milk soak, I tried soaking them for an entire 24 hours, and nothing quite did the trick. The resulting ma’amoul were always a little too gritty. Cooking the cornmeal beforehand seemed like the only way to proceed, but I didn’t want to cook it so much that it lost all texture, and I also didn’t want to cook it in too much liquid, or else the dough wouldn’t be the right consistency (but grits need a lot of liquid otherwise they quickly seize up and become difficult to work with).
The solution lied in the clarified butter, a key ma’amoul ingredient. By cooking the grits for 3-5 minutes in a big pool of clarified butter and milk, they absorb just the right amount of moisture without seizing or turning to mush (plus you don’t have to worry about an overnight soak). The butter lets them stay relatively liquid without setting up, and by the time they plump up as much as they should, you add some cold milk to slow the cooking process. Mix in the gluten free flour until it forms a dough, and you’ve got the perfect texture for ma’amoul.


Also, I’m so excited to share these cookies as part of Cosette’s virtual cookie exchange! Check out the hash tag on instagram (#virtualcookieparty2018) for more, and be sure to check out the recipes below for more holiday baking inspiration, including Cosette’s classic ma’amoul. Some of the links will go live later today, and I’ll keep adding links as more are added throughout the day.
Ma’amoul Cookies by Cosette’s Kitchen
Fruit Cake Shortbread by Amisha from the Jam Lab
Star anise dark muscvado sugar shortbread by Majed Ali
Pistachio and Rose Shortbread by Mai from Almond and Fig
White Chocolate Cherry Macadamia Cookie by Healthy Little Vittles
Gingerbread Coconut Llama Cookies by Baking The Goods
Sans Rival Macaron by Rezel Kealoha
Ginger Cardamom Tea Cookies by Candice Walker
Chocolate Dipped Lace Oatmeal Cookies by Emily Baird
Ghoraybeh cookies by Heifa Odeh
Spicy Chile Gingerbread Cookies by Kate Ramos
Brown Sugar Macaroons by Katherine Turro
Mint chocolate sandwich cookies with bourbon-vanilla cream by Well Seasoned (Ari Laing)Gingerbread Cardamom Cookies by Sift & Simmer
Chocolate Pistachio Biscotti by Ashley Cuoco
Chocolate Ginger Cookies by Georgie
Biscochitos (New Mexican Sugar Cookies) by Bebe Carminito
Chocolate dipped orange shortbread cookies by Mimi Newman

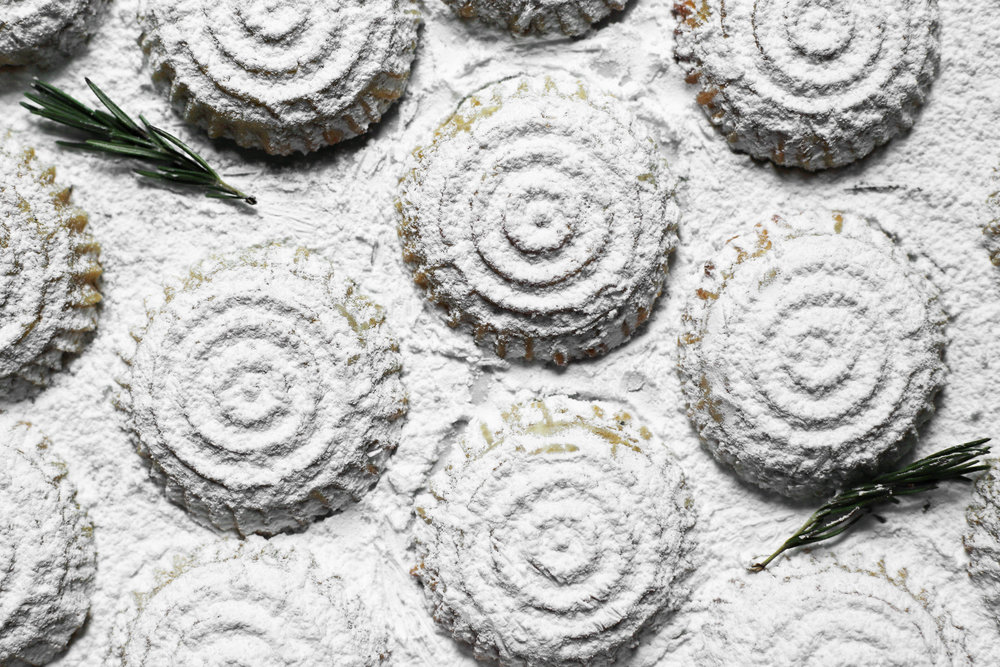
rosemary cornmeal fig ma’amoul (gluten free)


- Prep Time: 60 minutes
- Total Time: 90 minutes
- Yield: about 40 cookies
Ingredients
for the dough:
- 140 grams (1 1/4 sticks/5 ounces) unsalted butter (to make 110g clarified butter/ghee)
- 518g (2 1/4 cups) cold whole milk, split into 288g (1 1/4 cup) and 230g (1 cup)
- 125g (3/4 cup) polenta
- 70g (1/3 cup) sugar
- 270g (2 cups) gluten free all purpose flour blend*
- 2g minced rosemary (1 teaspoon)
- 1/2 teaspoon salt (2.5g)
for the filling:
- 580g (1 lb 4.5 oz) dried figs
- 14g (1 tablespoons) butter, broken into 10 to 15 small pieces
- 58g (1/4 cup) water (divided in half)
- 1/4 teaspoon salt
- 1g (1/2 teaspoon) rosemary
to stuff, bake, and decorate:
- the dough (above)
- the filling (above)
- a ma’amoul mold**
- powdered sugar
Instructions
- Make the dough: Start by clarifying the butter (see my clarified butter post for specific instructions and a video—use less butter than the video says, since this recipe only calls for starting out with 1 1/4 sticks). Melt the butter in a small saucepan over medium heat. Once the butter has melted, reduce the heat to medium-low and continue to simmer. Keep an eye on the temperature and adjust it as necessary, so that the butter solids don’t brown. Remove from heat as soon as the simmering has quieted down a bit, but before it goes silent (about 7 minutes). Use a spoon to carefully skim off any solids from the surface, and then slowly pour the liquid into a measuring cup, leaving behind any of the solids left at the bottom of the pot. You should end up with 110g (just over 1/2 cup) clarified butter (or feel free to skip this step and start out with 110g store-bought ghee).
- Bring the 288g (1 1/4 cup) milk to a simmer over medium heat, stirring occasionally to make sure it doesn’t scorch.
- Once the milk comes to a simmer, pour in the hot clarified butter, cornmeal, and sugar. Cook for about 3 minutes, stirring frequently, until it thickens significantly and pulls away from the sides of the bowl. The polenta should be unpleasantly al dente, and there should be no completely hard grains.
- Remove the saucepan from heat, add the second addition of milk (230g/1 cup) and stir into the cornmeal dough until it is fully incorporated and thinned out. Move it to a mixing bowl, and then stir in the gluten free all purpose flour, rosemary, and salt, and knead together with a wooden spoon until it forms a tender dough. Let the dough rest for about 20 to 30 minutes to make sure it’s totally hydrated (while you work on the filling). If it’s too wet after resting, add a little more gluten free flour. If it’s too dry, make little indentations with your fingers across the surface, add a bit more milk, and let it soak it up for a few more minutes (using a scale to measure ingredients takes out a lot of the guesswork, but all flour blends work a little differently, so make sure you keep an eye on the dough).
- Make the filling: Preheat the oven to 400° F (204° C).
- Prep the dried figs by trimming away any stems.
- Place the figs in a skillet, dot with butter, and sprinkle with 2 tablespoons water. Roast for 10 minutes, just until they soften slightly and take on a little more color.
- Let cool for a few minutes, and then transfer to a food processor, add the salt, rosemary, and 2 more tablespoons water (if necessary) and purée. If your dried figs are very moist, you may not need all the water, but I find that most brands need it—add it gradually if you’re unsure.
- Roll the date paste into about 40 balls. Oil your hands as you work to keep the dates from sticking to you.
- Stuff and bake the Ma’amoul: Roll the ma’amoul dough into the same number of balls as the filling (about 40). If it seems a little dry, feel free to add a tablespoon of milk at a time until it’s a nice consistency.
- Preheat the oven to 450° F (230° C) convection.***
- Stuff the dough: Flatten a dough ball in the palm of your hand. Place a filling ball in the center, and fold the sides up over it. Make sure the whole thing is covered pretty evenly, then roll the whole thing into a smooth ball. Repeat with the remaining ones.
- Lightly oil your ma’amoul press (re-oil if necessary, but you’ll usually only need to do this once). Press a stuffed ball into the mold, and gently flatten it, making sure you work it into the nooks of the mold. Once it’s flattened, release it from the mold by pressing the release button, or whacking it against a cutting board (I slam it on a cutting board once, then rock it back and forth once or twice until it falls into my hand). Place the ma’amoul on parchment-lined sheetpans.
- Bake for about 12 minutes, just until they turn golden all over and brown in spots. Let them cool, dust with powdered sugar, and then serve. These are best the day you make them, but can be made a few hours ahead of time. They freeze pretty well, if you have any left over.
Notes
* The one I used to develop and test this recipe was Bob’s Red Bill gluten free 1-to-1 baking flour. Namaste also makes a good all purpose gluten free flour. Make sure you find a flour that has xanthan gum in the blend, which will give the dough enough elasticity to hold together without crumbling or cracking. You’ll also want to make sure it’s neutral-flavored (stay away from blends with a lot of chickpea flour, which has a more distinctive flavor than rice flour).
** If you don’t have a ma’amoul mold, no worries. Shape them into a ball with your hands, and then carefully flatten them between your two palms, patting the sides to make sure they stay closed and don’t crack. Then you can get creative decorating them with forks, tongs, and other objects. If you are using a mold, the best one to use is the flat round one. The ones that form tall mounds are usually used for waln
ut and pistachio-filled ma’amoul, and the flat ones are usually for dried fruit paste filled ma’amoul.
*** If you’re not using a convection oven, you may need to slightly increase the temperature and/or cook them just a minute longer.