walnut kleicha

- Prep Time: 1 hour
- Total Time: 3 hours
- Yield: about 4 dozen cookies, depending on how big you make them
Ingredients
for the dough:
- 1 tablespoon instant or active dry yeast
- 1 teaspoon sugar
- 1 tablespoon vegetable oil
- 1/2 cup 115° F water
- 30 ounces all purpose flour (about 6 1/2 cups)
- 1 1/2 teaspoons salt
- 1 cup sugar
- 2 1/4 sticks butter (9 ounces), just melted (not hot)
- 1 cup 115° F whole milk
filling and baking
- 2 cups coarsely ground/finely chopped walnuts (from 6 3/4 ounces)
- 1/2 cup sugar (4 ounces)
- 1/2 teaspoon cardamom
- 1/4 teaspoon salt
- 2 large room temperature eggs, beaten (for the egg wash)
- (optional: sesame seeds for sprinkling)
Instructions
- Make the dough: Combine the yeast, sugar, vegetable oil, and water in a large bowl. Stir together until the yeast dissolves, cover with plastic wrap and a kitchen towel, and leave at room temperature for about 15 minutes.
- Once the starter is very foamy, add the flour, salt, sugar, melted butter, and whole milk, and stir together with your hand. The dough will start to form a shaggy blob, which will come together into a dough after a minute of kneading in the bowl. Continue kneading in the bowl for a couple more minutes, until it smooths out quite a bit more, but don’t worry about getting a perfectly smooth ball of dough.
- Cover the bowl with plastic wrap, wrap the bowl in a towel, and leave it in a warm room temperature and/or insulated place to proof for 1 hour (e.g., on top of the refrigerator, over an unlit gas stove, or in an off oven).
- Make the filling: Stir together the walnuts, sugar, cardamom, and salt. Set this filling aside.
- Move the dough to the counter and divide into 2 pieces. Roll one piece out to about 1/8-inch thickness. Work on a non-porous, smooth surface, so you won’t need flour to keep the dough from sticking. Once the dough is rolled out thinly (about 1/8 inch), let it rest for a few minutes until it no longer quickly shrinks when you lift it off the counter.
- Once the dough has rested, use an approximately 3 1/2 inch round cookie cutter to stamp circles out of the dough. Once the rounds are stamped out, collect the scraps into a ball, and let them rest while you fill the rounds. Fill like so: hold a round in the palm of your hand, and make sure it hasn’t shrunk back up (flatten it with your fingertips if you need to). Spoon almost 1 tablespoon of filling onto one side of the dough, leaving a border around the edges. Fold the other side over, and crimp it shut (fold one corner over while pinching the edge you’re creating, then fold the next little bit over and pinch it, continuing down the edge until it’s done).
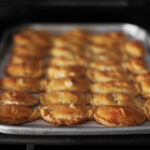
- Once you’re done filling the first batch, preheat the oven to 375° F while you let them rise on a parchment-lined sheet pan for about 15 minutes (they should pretty much be shoulder to shoulder, like in the photos above, and they won’t rise very noticeably in the 15 minutes). Brush with egg wash (save the extra), dock each with a fork about 2 or 3 times, and then bake for about 25 minutes total. Halfway through baking, pull them out of the oven, brush with egg wash again (and dock them again if they’re too puffy), and let them bake the rest of the way, until they’re deeply golden brown.
- While the first batch is in the oven, repeat with the remaining dough and filling, until you run out (pace yourself while you work). Store at room temperature for up to 12 hours, or the freezer for up to 3 months.
Find it online: https://cardamomandtea.com/297/kleicha/