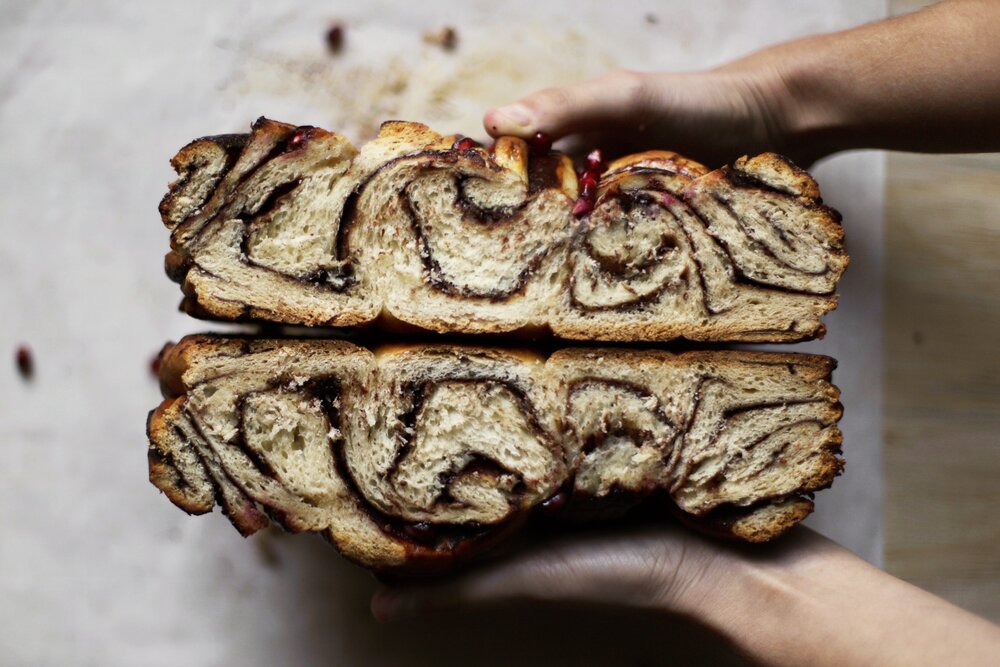
[Jump to the chocolate babka recipe, which includes step-by-step braiding photos to make a round loaf.]
My husband, Simon, is Jewish-American, with ancestral roots in Poland and Russia. We love celebrating each other’s holidays, and Rosh Hashanah has always been one of my favorites to cook for. Sometimes it’s a big gathering with all our friends. And other times it’s just the two of us. Right now, we’re in the middle of another international move (🤭 more on that soon…). So this year it was just the two of us celebrating way too early, because we’re currently on vacation in Korea, waiting to fly to our new home. But back before I packed up my entire kitchen and stand mixer, I baked a chocolate babka.
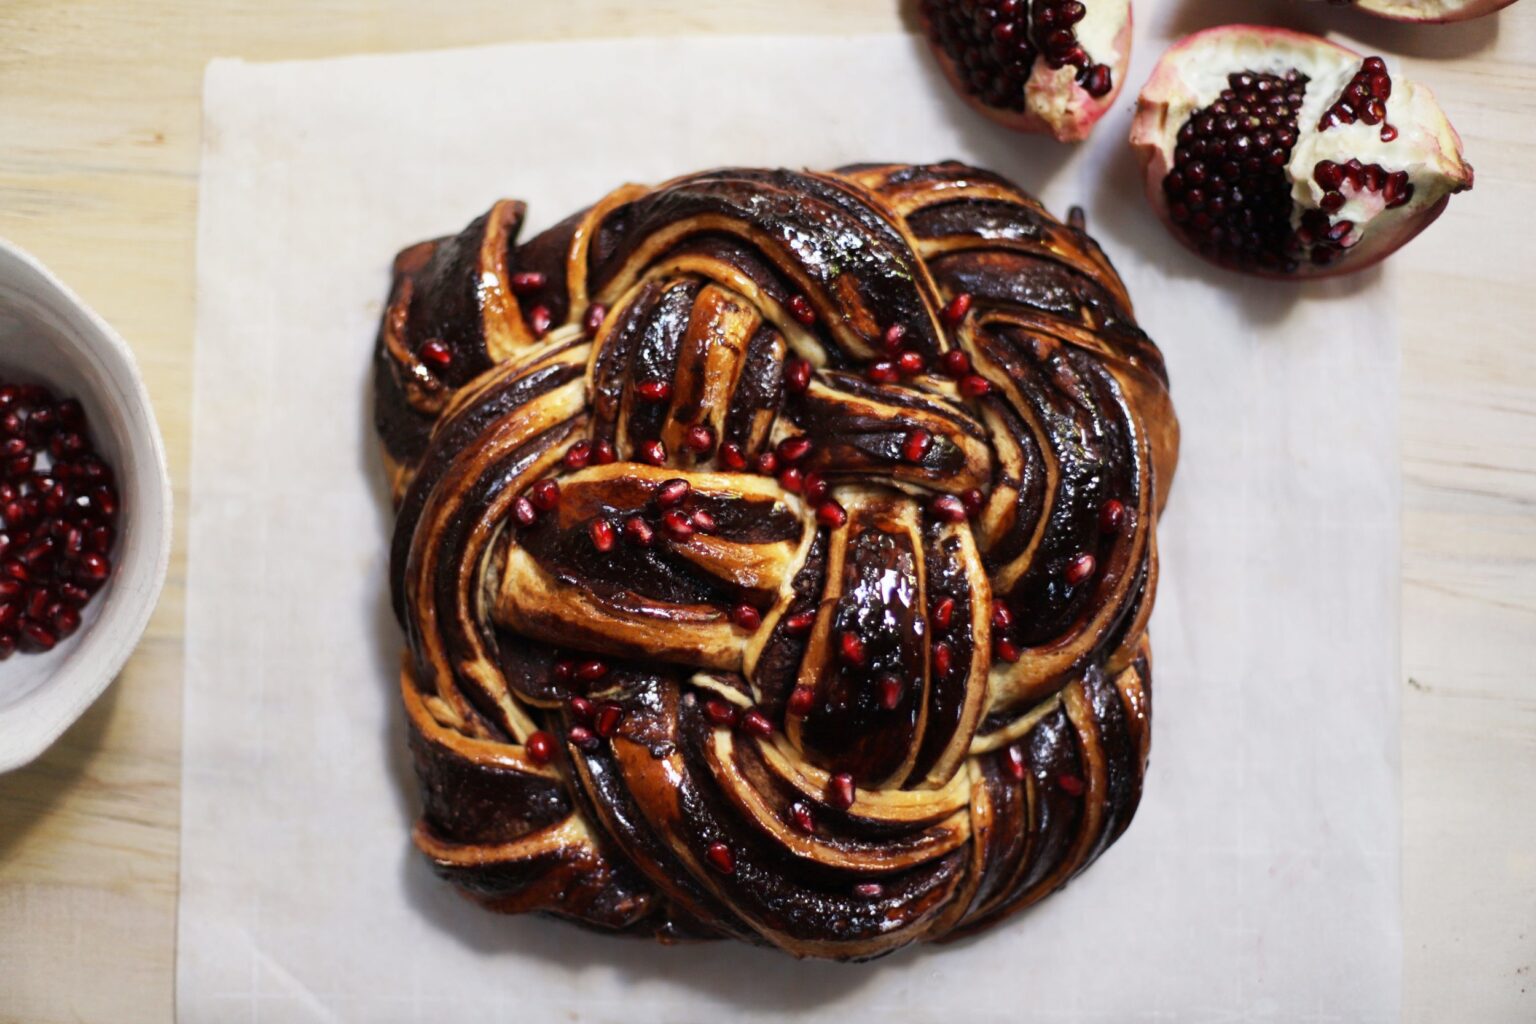
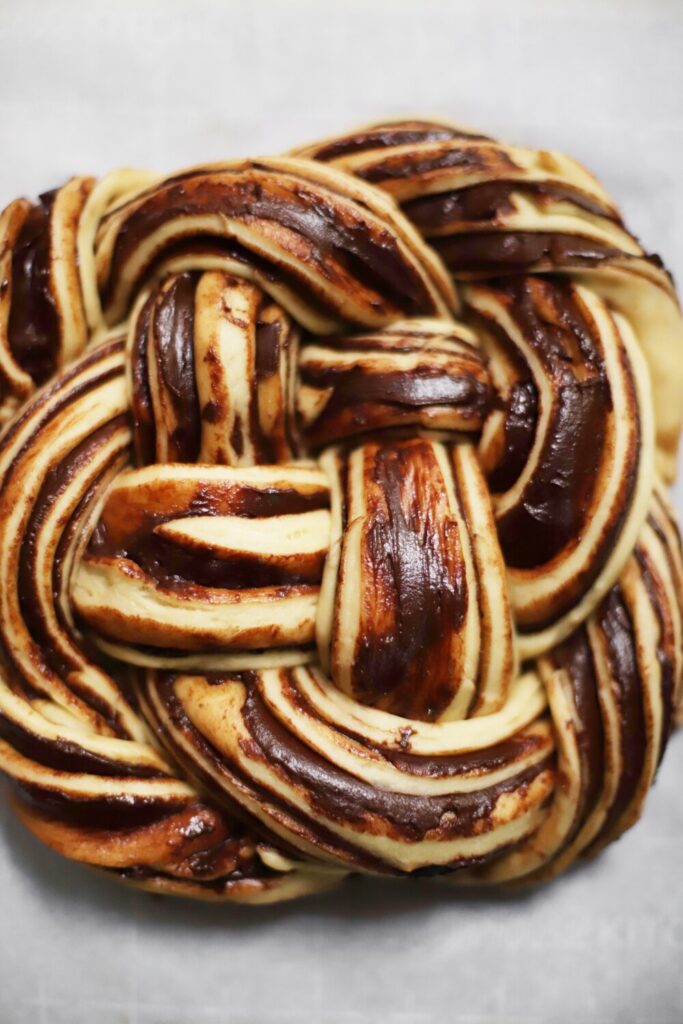
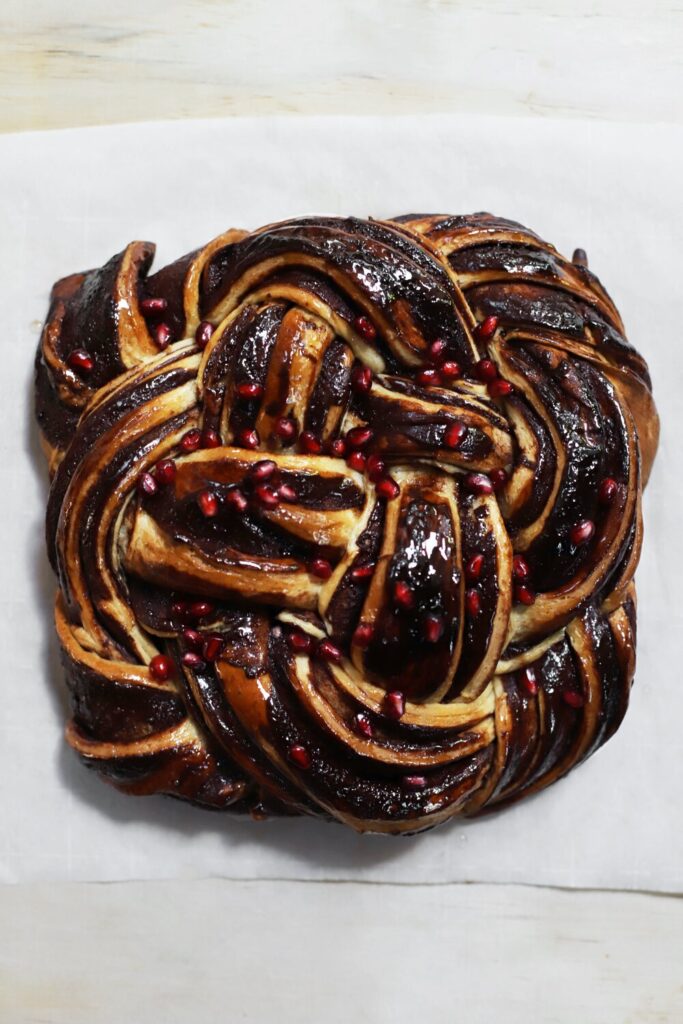
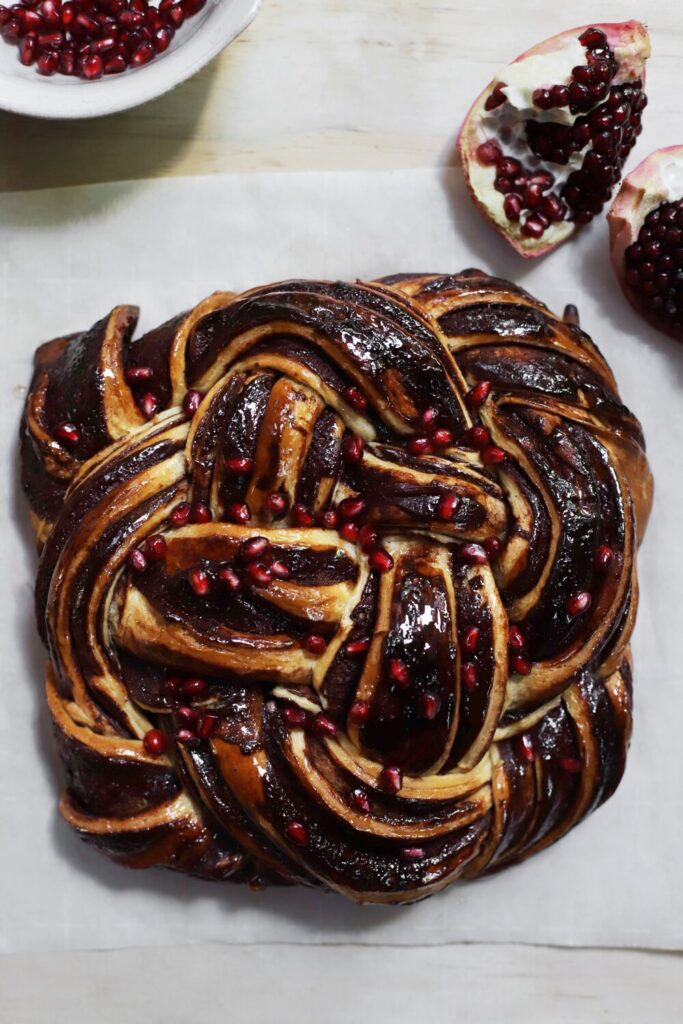
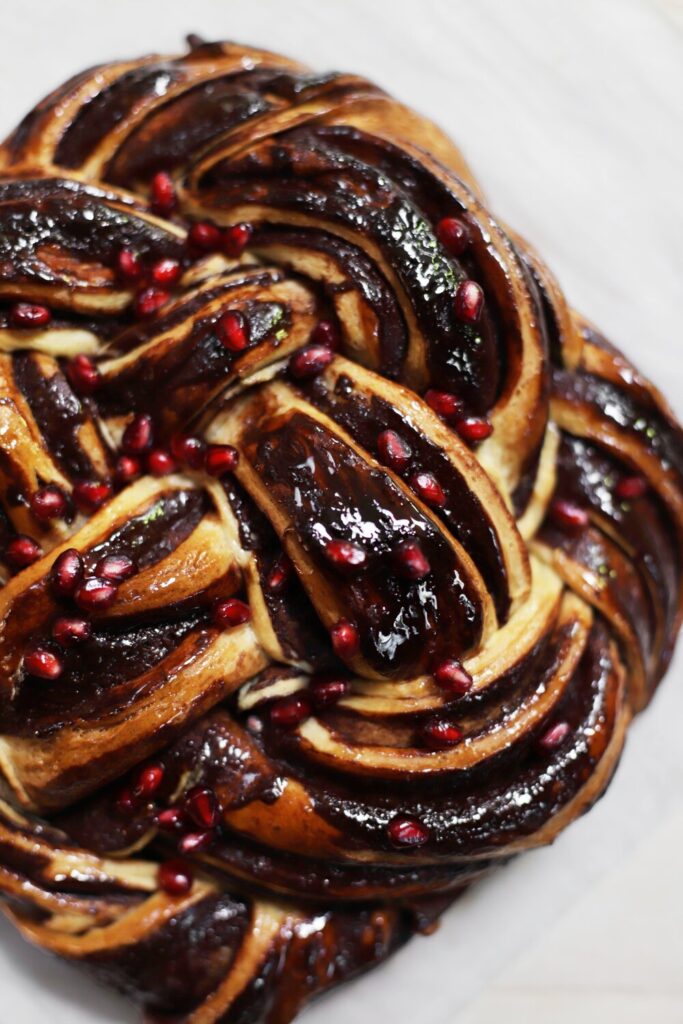
Pomegranate seeds are an essential part of the Jewish new year, so a chocolate loaf with both pomegranate seeds and molasses felt like the perfect way to celebrate. It’s chocolatey, tangy, and a little sweet, and it’s braided round-challah-style, which looks super complicated, but is actually a lot easier than it seems. I’ve even put together step-by-step braiding photos to make it super straightforward to learn how.
I also want to wish a happy Rosh Hashanah to my Jewish-Assyrian friends and family in particular. Eastern Orthodoxy (an early denomination of Christianity) is an important and beautiful part of Assyrian identity. But it’s also important to remember that some of us come from families with multiple religions and ethnicities under one roof, and many of us embody multiple identities.
So here’s to twice the traditions, twice the celebrations, and all the love!
An early shanah tovah to all, and eidukhen howie breekhah ❤️
chocolate babka with pomegranate

- Prep Time: 1 hour 15 minutes
- Total Time: 4 1/2 hours
- Yield: 8 to 10 servings
Ingredients
for the dough:
- 175g whole milk (3/4 cup)
- 6g dry active yeast (2 teaspoons)
- 100g sugar (1/2 cup)
- 3 large eggs, at room temperature (160g total)
- 600g all purpose flour (4 2/3 cups), divided into 500g and 100g
- 7g salt (1 1/4 teaspoons)
- 115g softened butter (1 stick)
for the filling:
- 40g butter (3 tablespoons)
- 130g dark chocolate chips (at least 60 % cacao) / 3/4 cup
- 75g pomegranate molasses (about 3 tablespoons)
- 1 pinch salt (about ⅛ teaspoon)
for the syrup and topping:
- 50g sugar (1/4 cup)
- 45g water (3 tablespoons)
- (optional) pomegranate arils for sprinkling (about 2 tablespoons)
Instructions
- For the dough: Preheat the oven to 180°F (80°C). Once it preheats, turn it off and open the door open a crack before you start making the dough.
- Microwave the milk until it’s about 115°F (45°C). Add the yeast to the bowl of a stand mixer (fitted with the hook attachment), stir in the warm milk, and let it sit for about 5 minutes.
- Add the sugar, eggs, 500g of the flour, and salt to the stand mixer. Let the mixer run at low speed with the hook attachment, just until everything is incorporated into a very shaggy dough. Add the butter 1 tablespoon at a time with the mixer running at low speed, allowing each tablespoon to disappear completely before adding more.
- Once all the butter has been added, gradually add the last 100g of flour 1 tablespoon of the time with the mixer still running on low. Once the dough pulls away from the sides of the bowl, stop adding flour (I add exactly 100g, but you might need more or less if you don’t measure precisely with grams). It’s ok if the dough pools at the very bottom of the bowl.
- Increase speed to medium, and knead the dough for about 7 minutes, until it’s smooth and elastic.
- Lightly oil a mixing bowl and your hands. Scrape the dough into the bowl, and use your hands to shape it into a ball (tuck itself under its bottom to smooth out the surface). Leave it in the bowl with the seam-side facing down.
- Cover the bowl of dough with plastic wrap, place it in the oven (again, make sure the oven heat is off and that it has cooled down for at least 10 minutes), leave the door open a crack, and let it proof for about 1 hour. The dough is done rising once it’s noticeably larger, and has approximately doubled in size. While it’s rising, make the filling.
- For the filling: Melt the butter in a small saucepan over medium heat. As soon as it almost completely melts (and no longer), remove from heat, add the dark chocolate, and start stirring it together.
- Once the chocolate has melted, add the pomegranate molasses and salt, and give it another stir. Let it cool to room temperature before using it (it should be spreadable like room temperature frosting).
- Fill and braid, using the instructions following this recipe.
- Cover loosely with plastic wrap, and let it rise for about 45 minutes at room temperature, until it’s puffed up slightly (it will take less time if your room is warmer than 70°F. It shouldn’t double in size, just about 1.25 to 1.5x its original size).
- Once you’re almost ready to bake preheat the oven to 350°F (175°C).
- Bake for 35 minutes uncovered.
- Loosely tent with aluminum foil and continue to bake for another 30 to 45 minutes, until its internal temperature reads 200°F (93°C). If you want the top to brown more, remove the foil for the last 10 minutes. While it’s baking, make the syrup.
- For the syrup: Place the sugar in a small saucepan and cover with the water. Set over medium-high heat and bring to a simmer. Simmer for about 1 minute until the sugar dissolves (no longer, or it’ll turn into candy). Let it cool down as the babka bakes.
- As soon as the babka comes out of the oven, brush with the cooled syrup, and then top immediately with pomegranate arils. Let it cool to room temperature (or at least 40 minutes) before slicing and serving.
Notes
Storage: Promise me you will not put this bread in the refrigerator. It has a lot of butter and flour, so it will start to stale almost immediately in the fridge. Without the pomegranate arils, it will last at room temperature for several days. The pomegranate arils will shorten its room temperature shelf life to just 1 or 2 days. But it keeps wonderfully in the freezer for 3 months, either frozen as an entire loaf of cut into individual pieces (wrapped tightly, in either case).
rolling and braiding a round chocolate babka
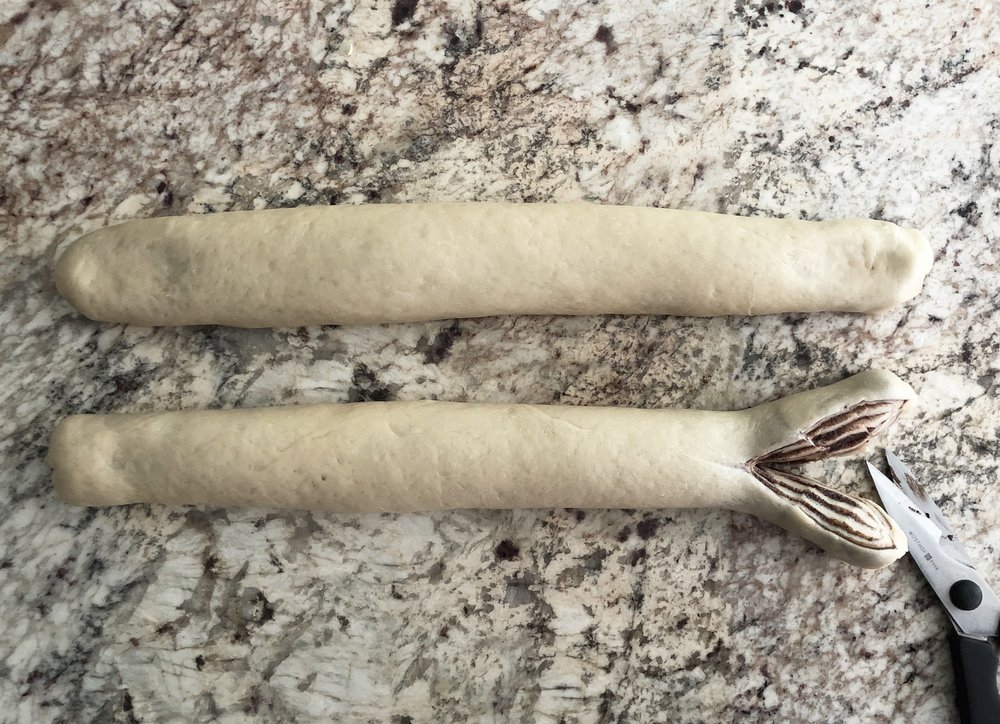
rolling and splitting the logs into 4 strips
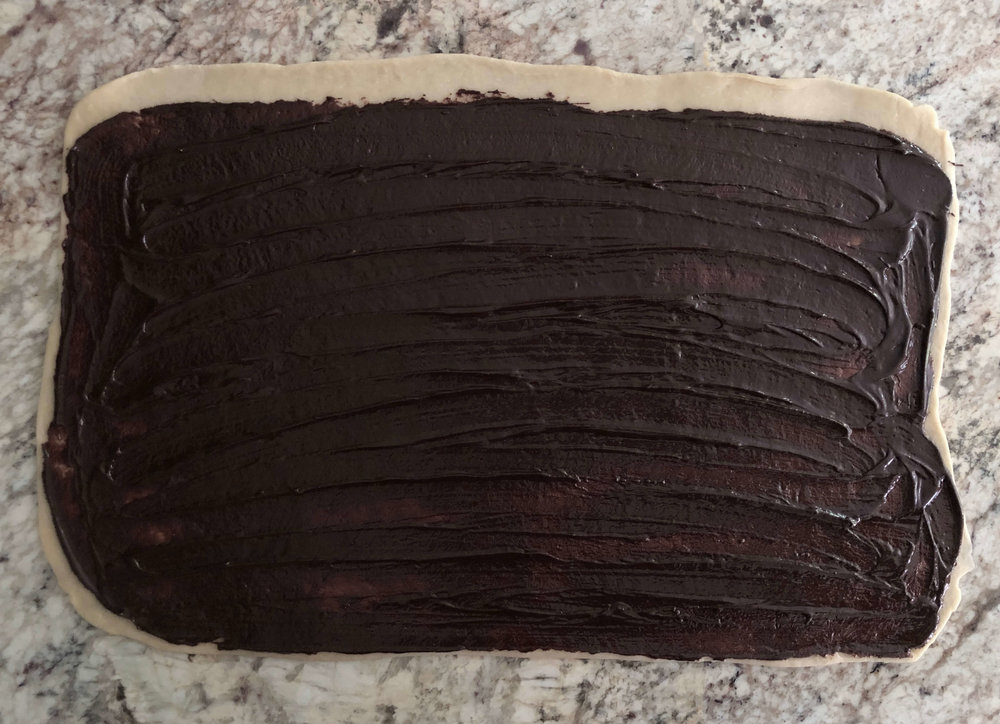
- On an unfloured smooth surface, divide the dough into 2 equal pieces. Shape each into a smooth ball. Roll out the first ball into a 12×19-inch rectangle, about 1/8-inch thick (let the dough rest to relax if it fights you, and make sure you roll it out all the way or you won’t be able to use all the filling). To get a rectangular shape, pull the corners out between rollings.
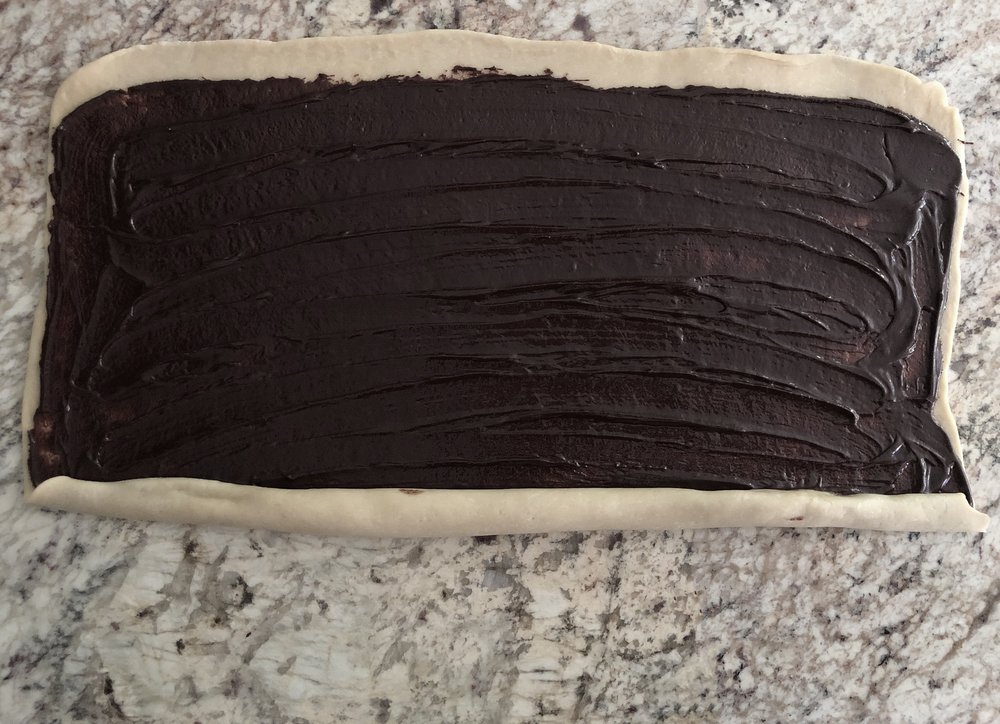
- Once the first dough is rolled out, evenly spread half the filling over its surface, leaving a border of 1/2-inch on one of the longer sides and 1/8 inch on all the other sides, and brush a tiny bit of water on the side with the large border. Tightly roll it up from the chocolatey long side to the bare long side. Pinch it closed, and then pinch the ends closed too. Repeat with the other half of the dough and filling.
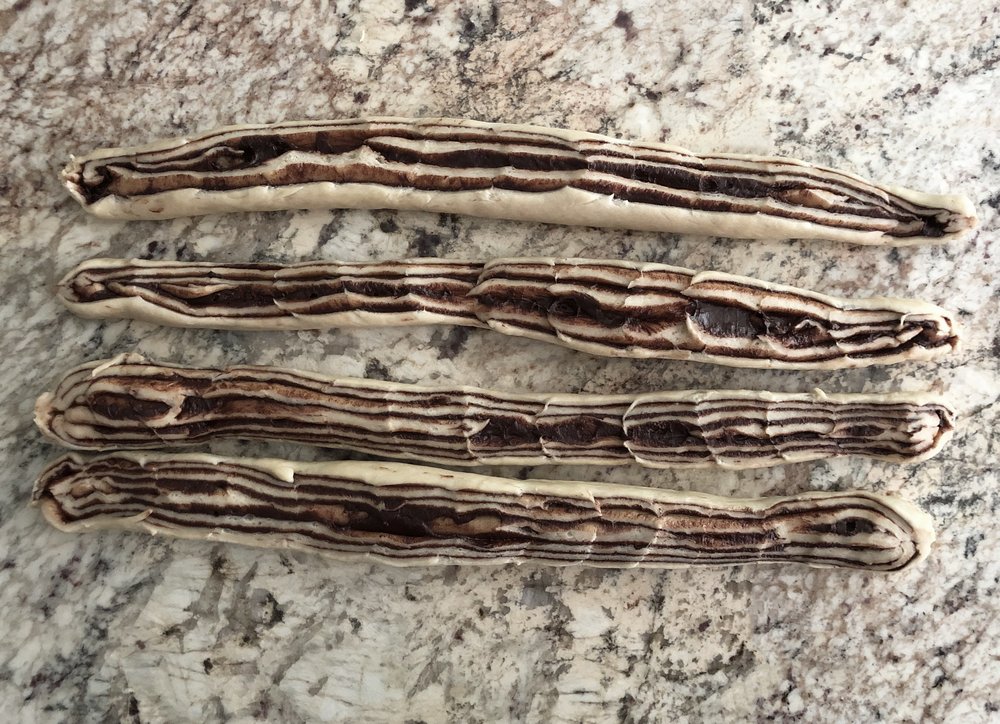
- Let the 2 logs rest for 5 minutes, and then use scissors to slice each log open lengthwise, leaving 4 strips of dough (2 from each log). Line a sheet pan with parchment.
braiding the chocolate babka loaf
All strips should be facing cut-side-up at all times. Think of them as always having 4 sets of parallel partners—when you twist them, each strip should join up with a new partner. If a strip is coming from under another one, it should get folded over its partner. If a strip is coming from over another one, it should be folded under its partner. But if this makes no sense to you, just follow the images and directions below, and you’ll be just fine.
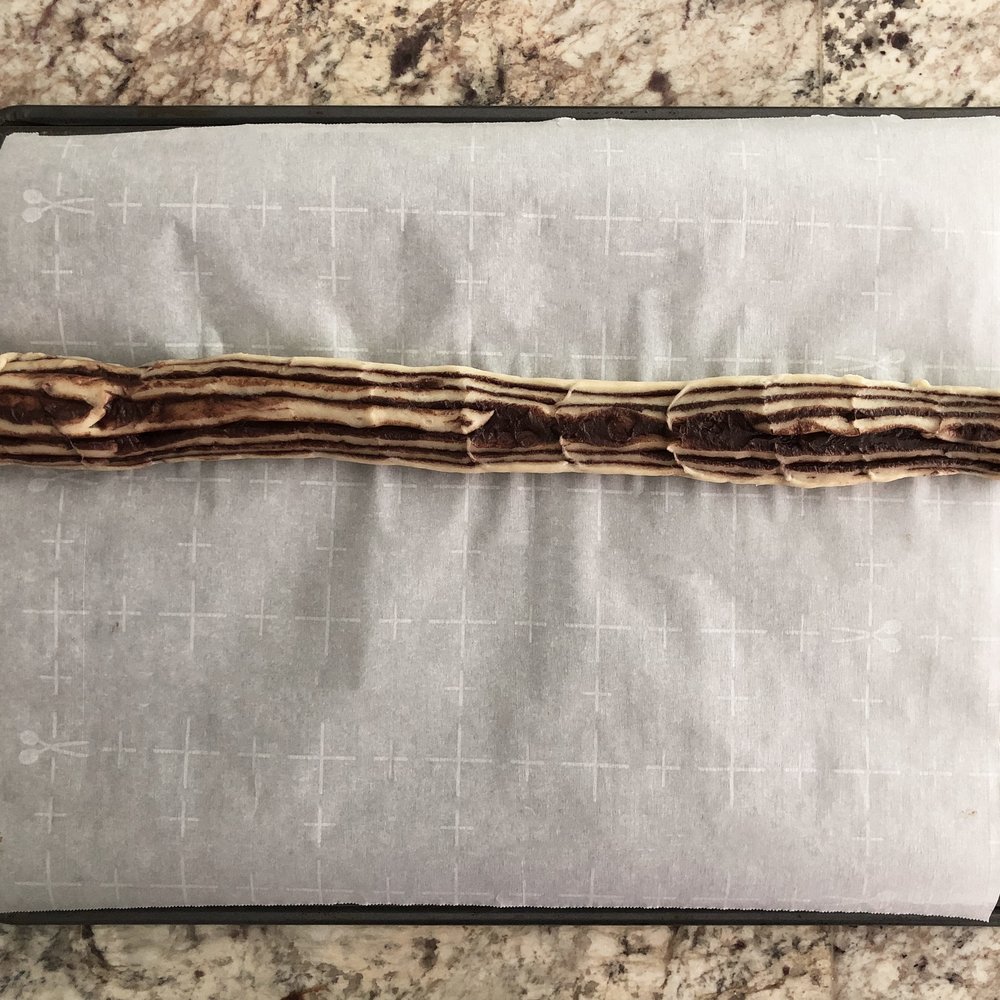
Place the first strip horizontally on a parchment-lined pan. 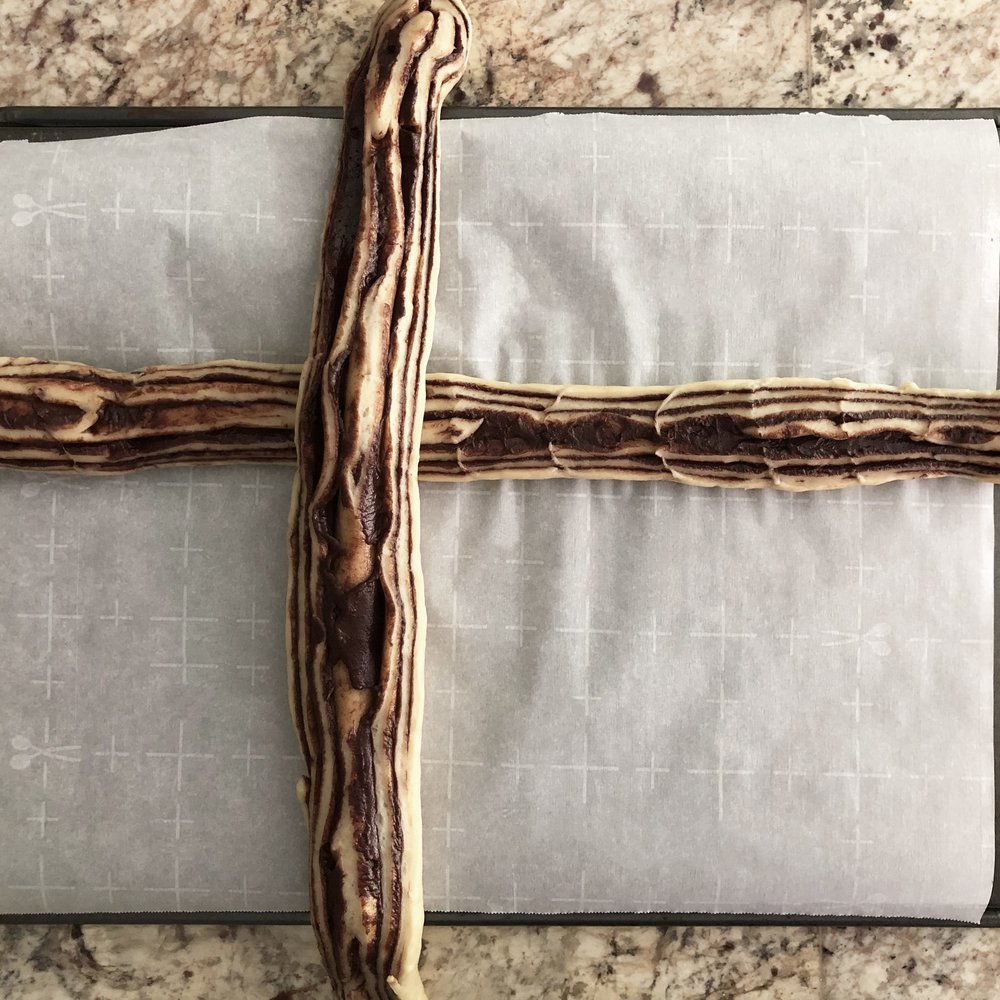
Place a second strip perpendicular to make a big plus sign. 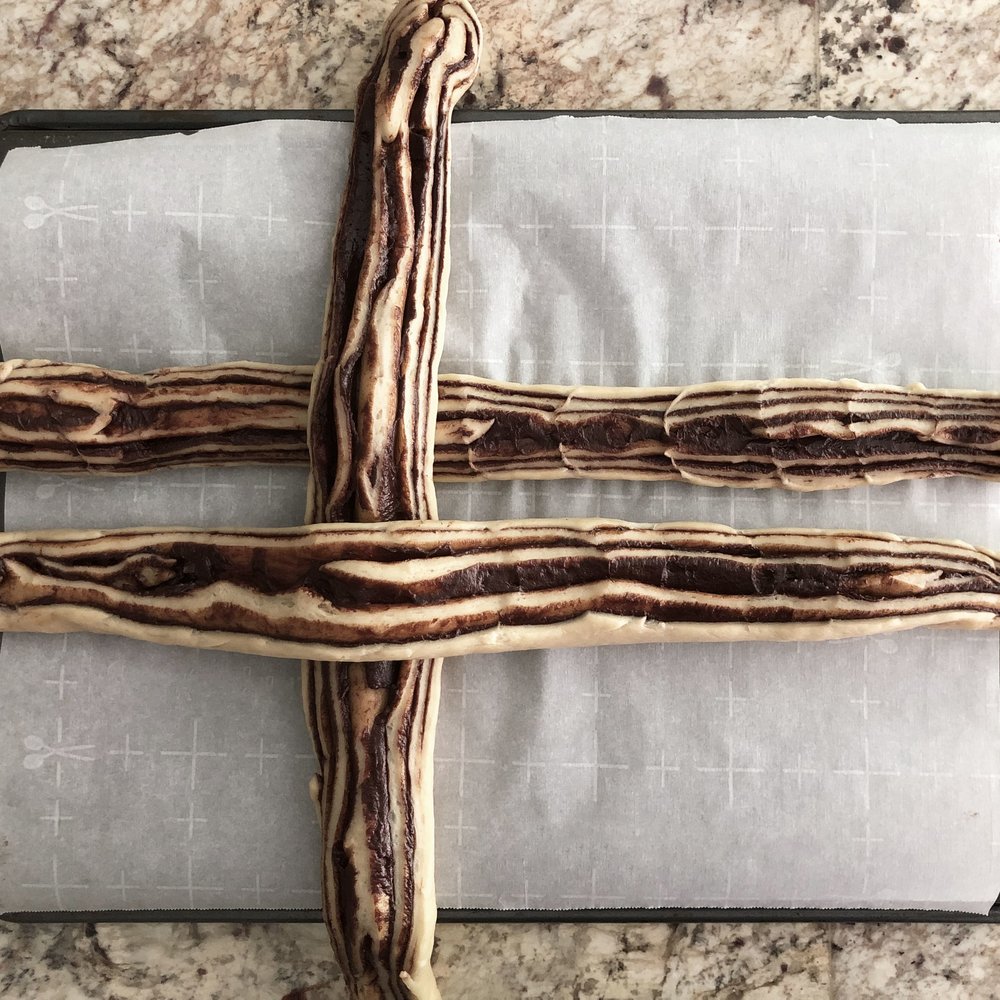
Lay a third strip horizontally and below the first strip. 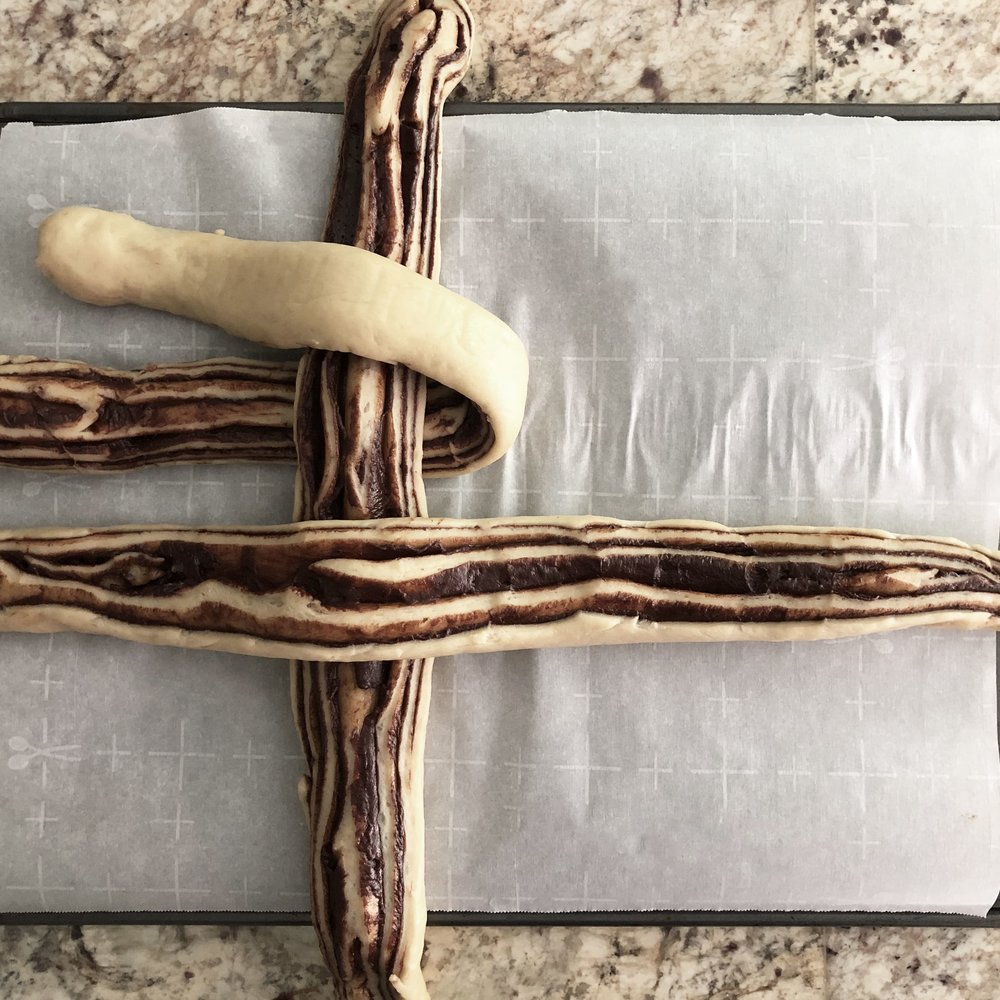
Momentarily fold back the right side of the first strip. 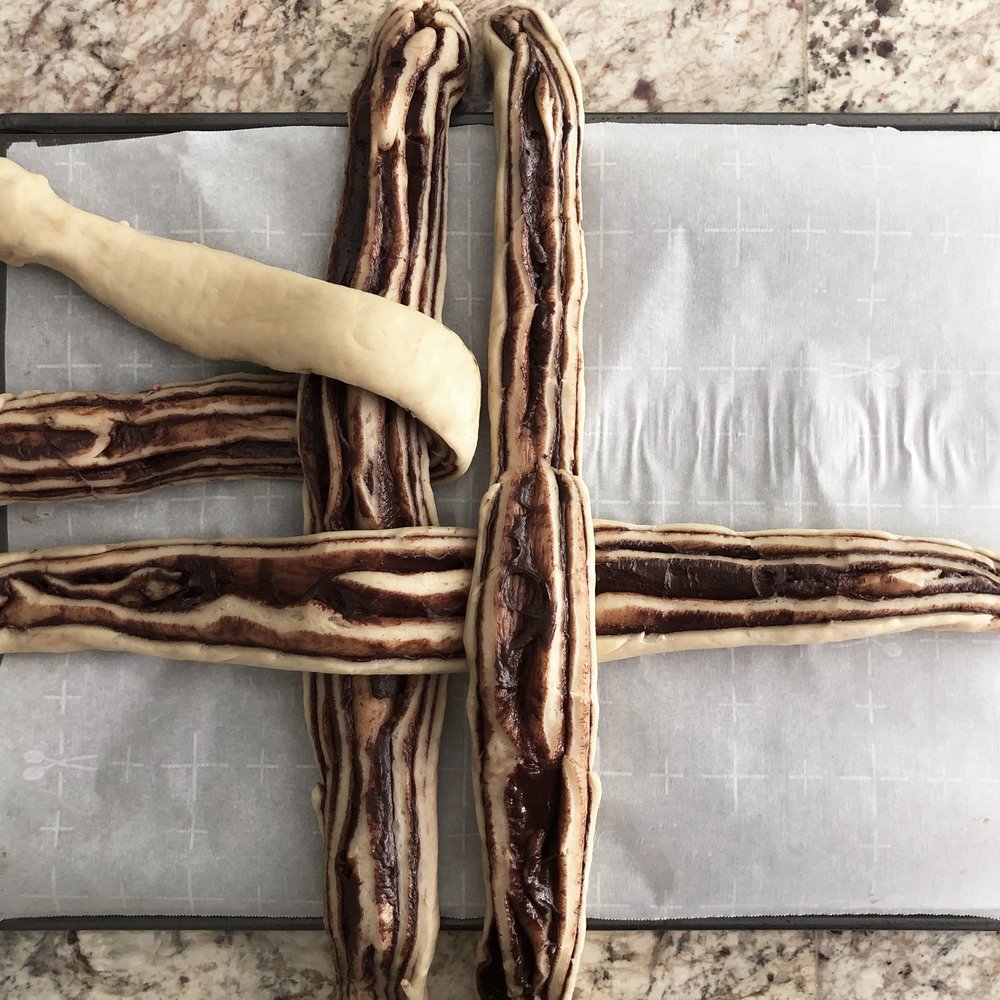
Place a fourth strip vertically next to the second one. 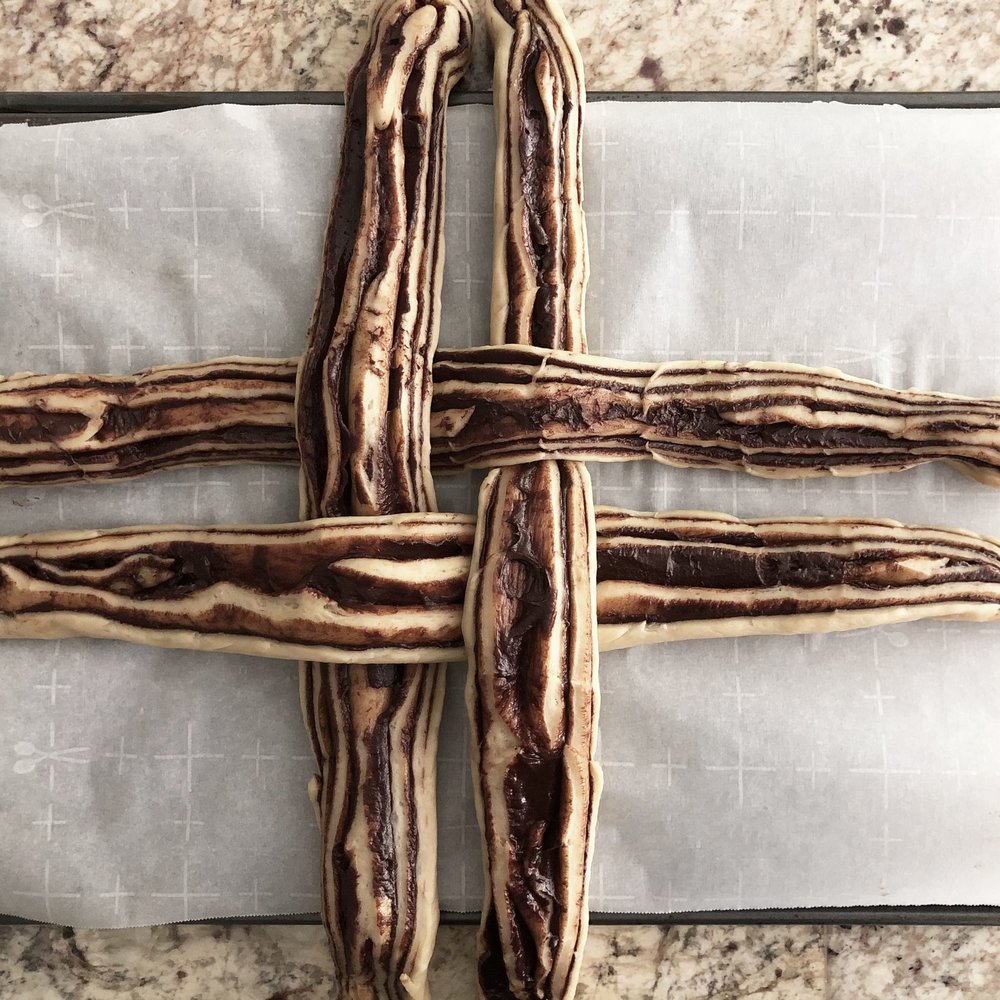
Lay the first strip back over the fourth one to make an interlocking # sign. 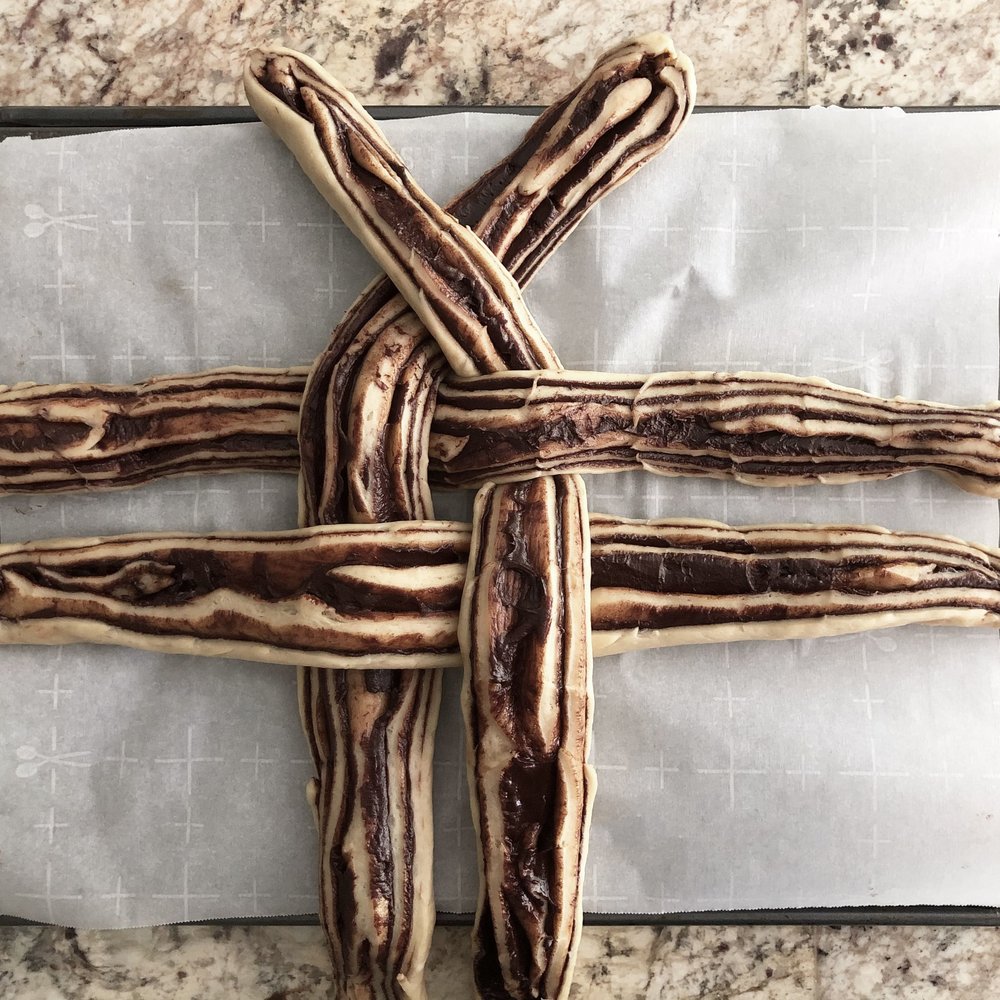
Take the top 2 strips, and cross right over left; allow them to criss cross away from each other at an approximate right angle. 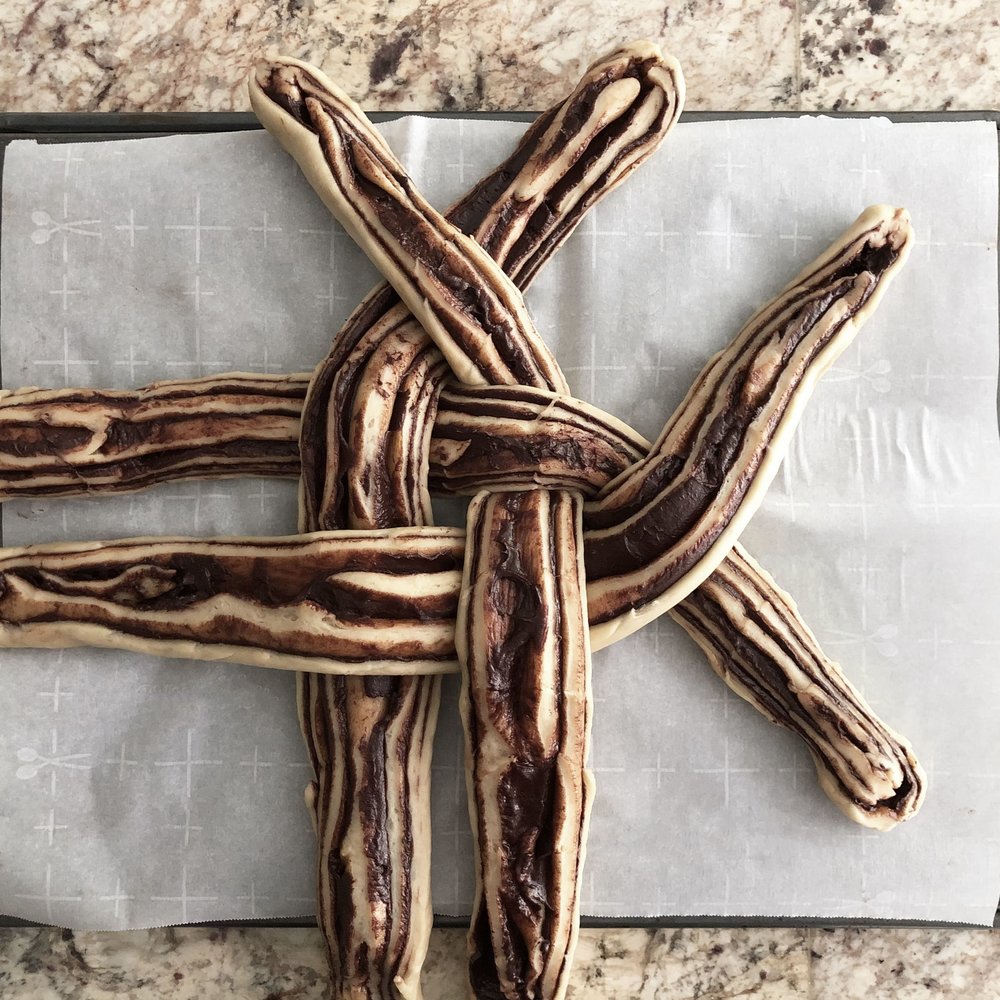
Continue with the other 3 pairs, being sure to cross in the same direction every time (top one points counter-clockwise). 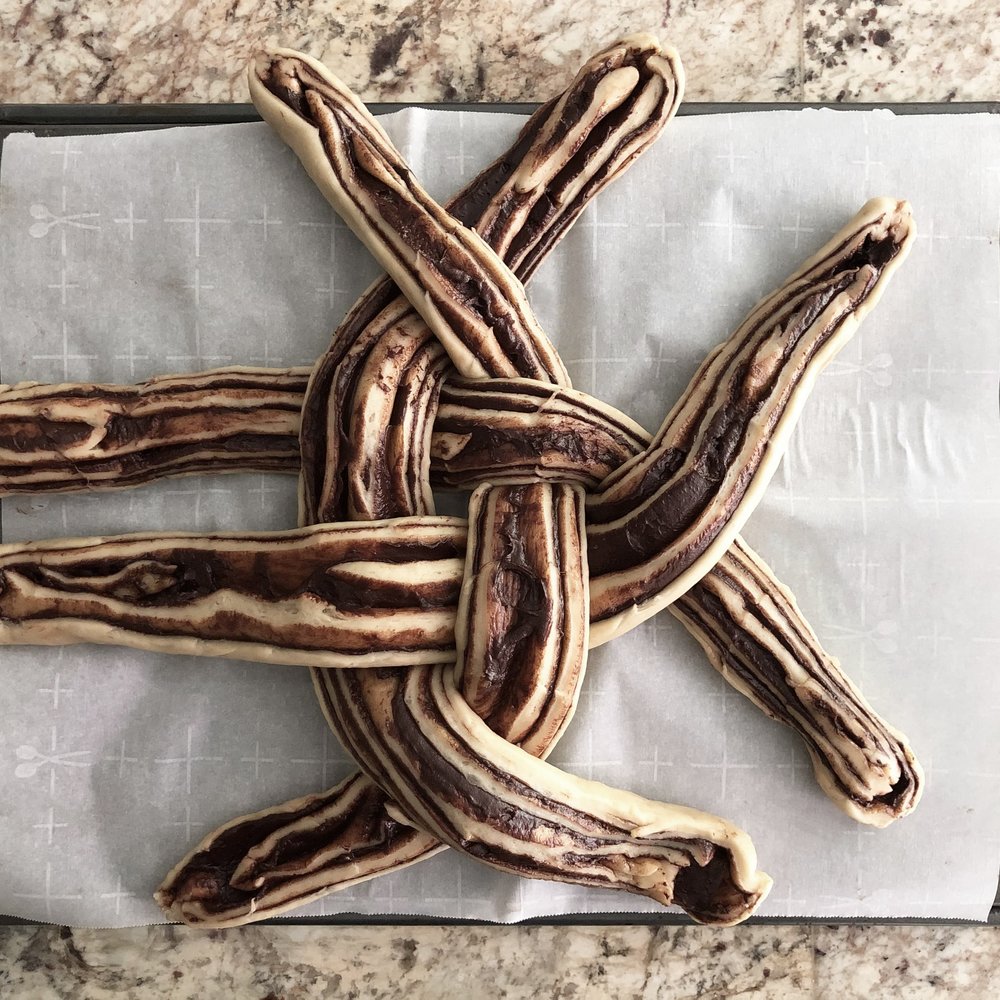
I’m working clockwise while crossing over in a counter-clockwise direction (just keep your crossing consistent) 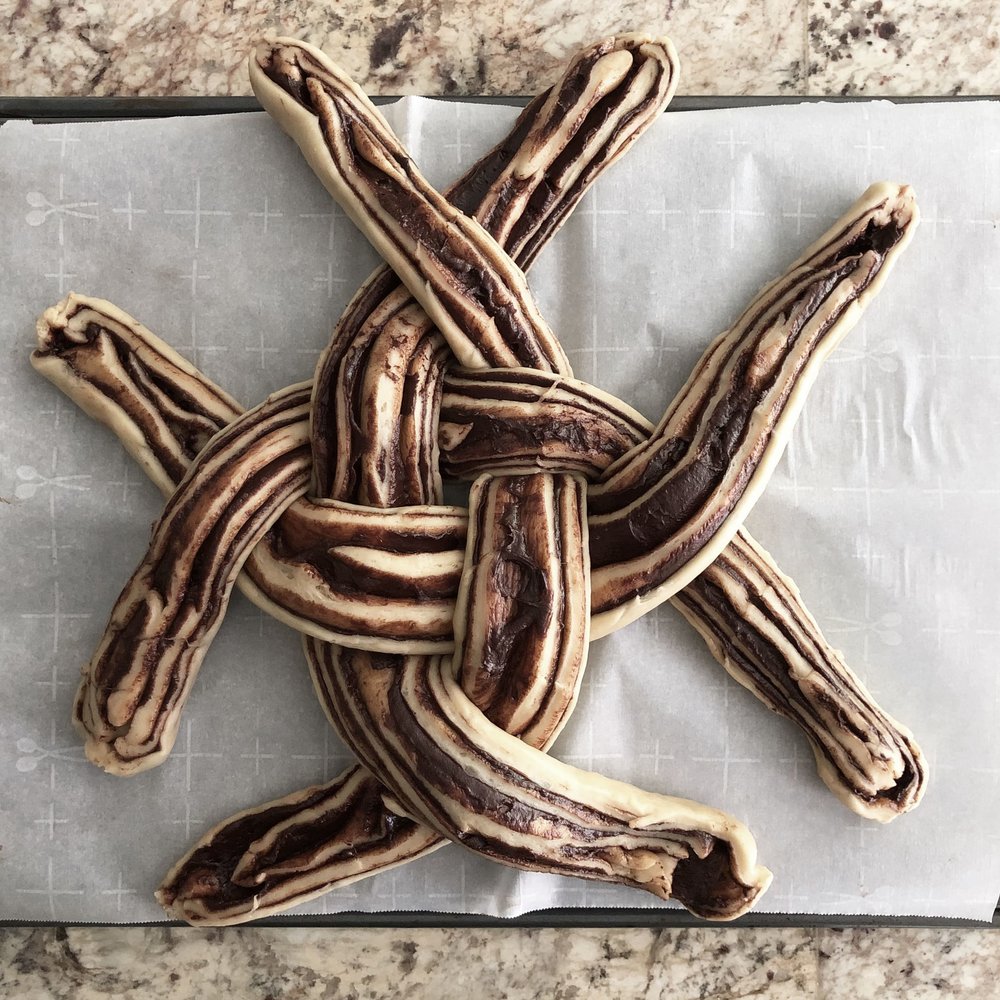
Once you’ve made all 4 criss-crosses, each strip will have met up with a new parallel partner. 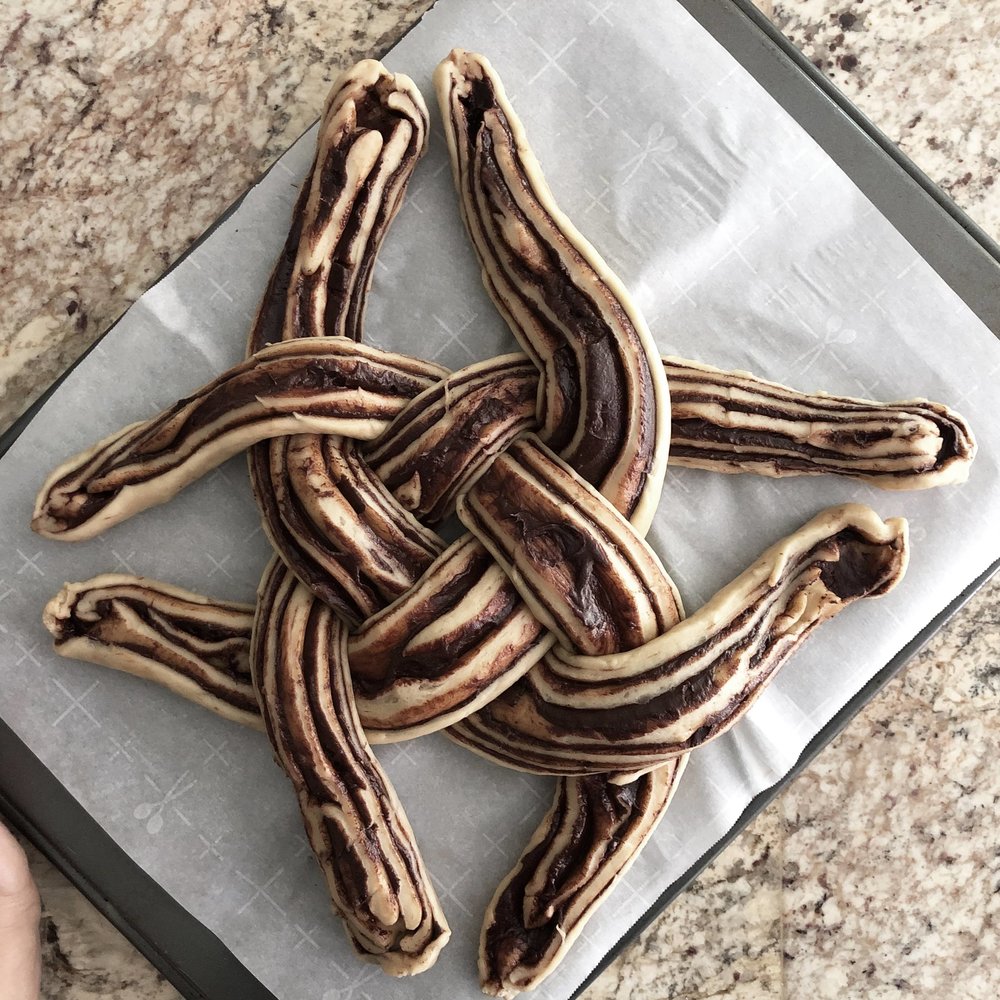
Turn the sheet pan 45°. The new pairs are now pointing toward 12, 3, 6, and 9:00, like when you started. 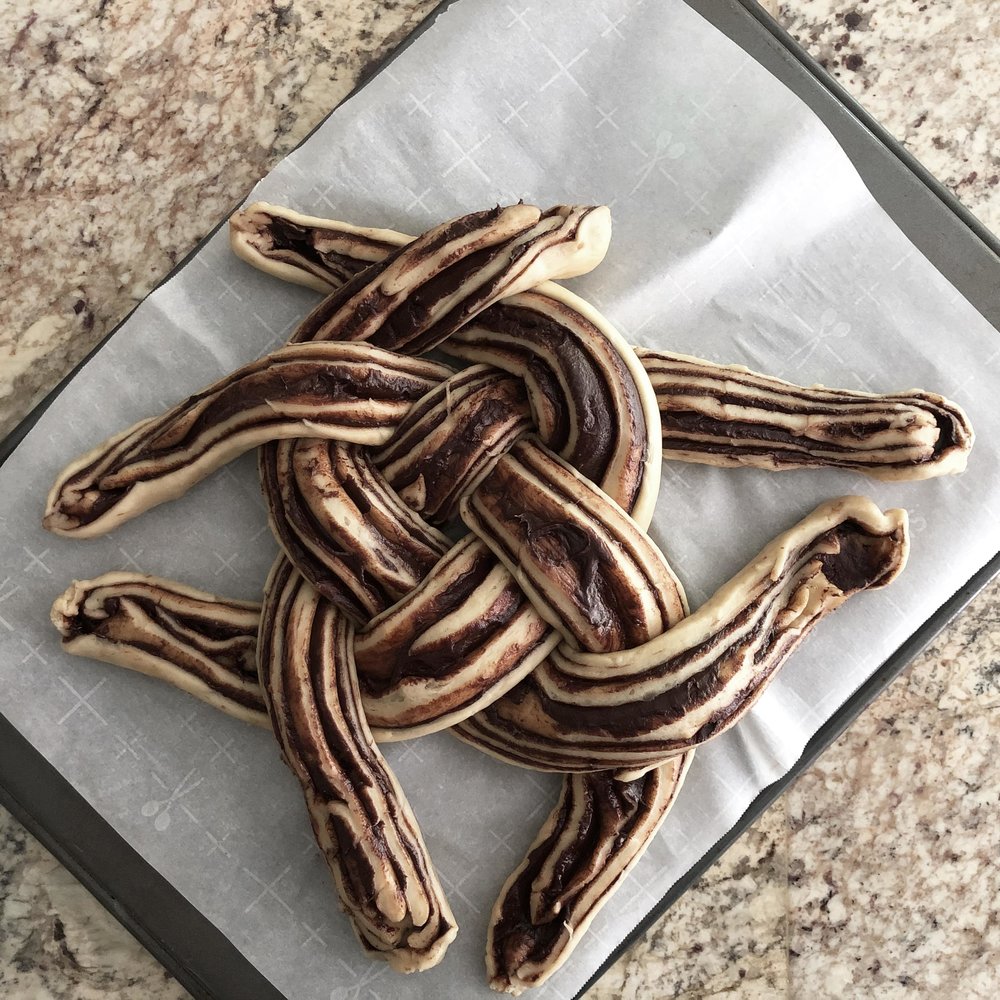
Cross the ones on top, but this time going left over right. 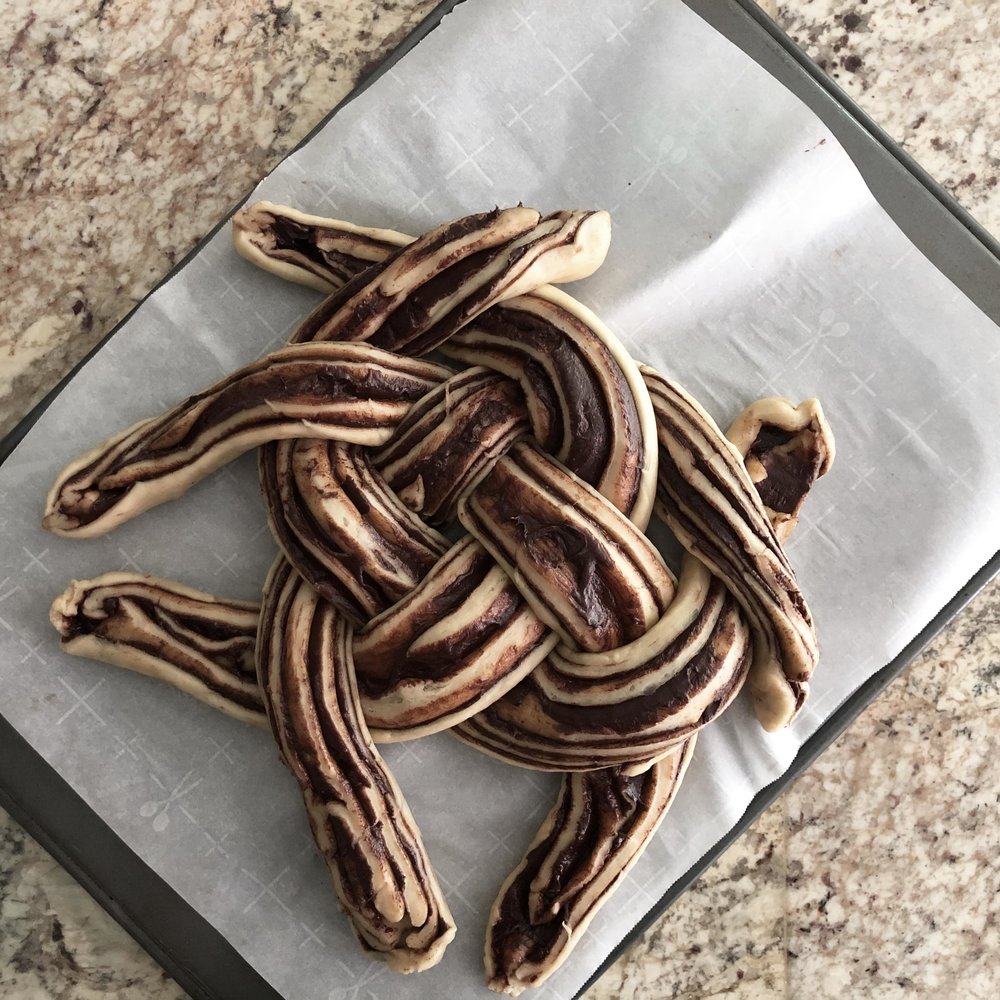
Continue with the other 3 pairs, crossing in the same direction every time (top one points in a clockwise direction this time). 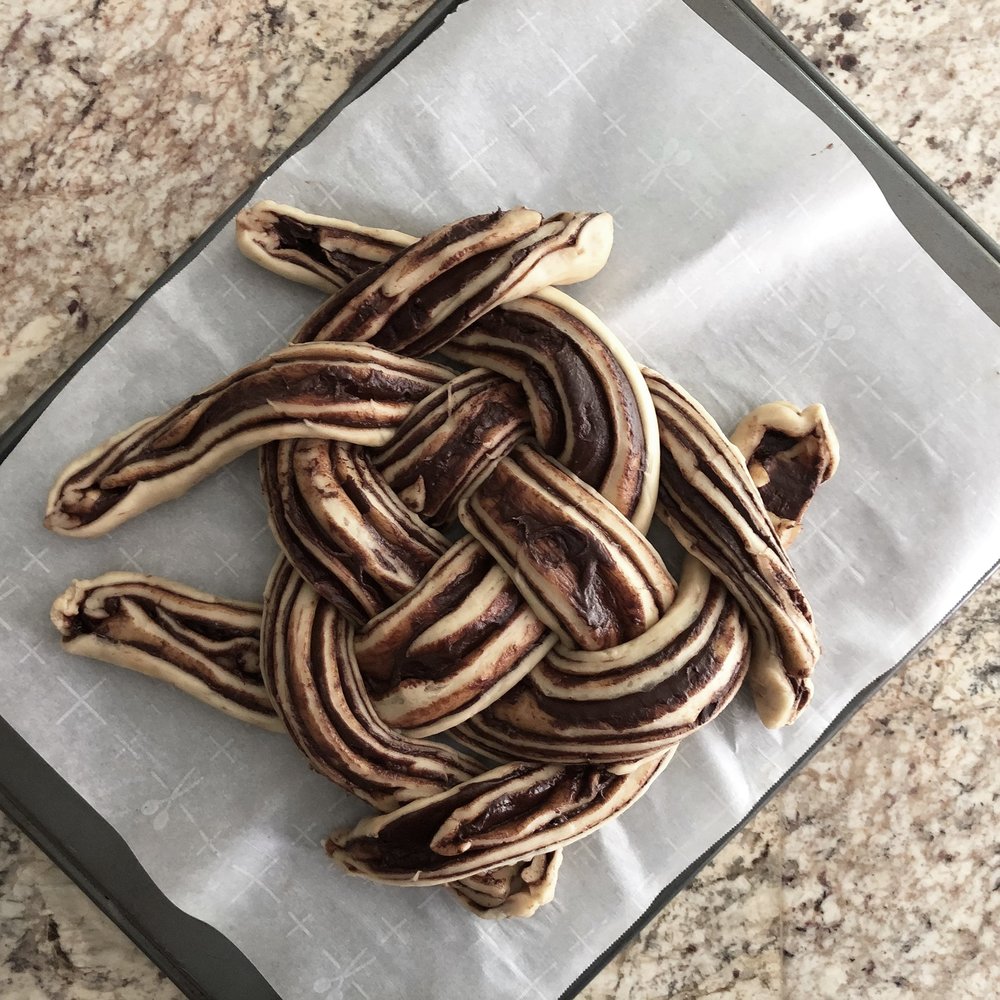
Here we go, moving from one to the next clockwise again, but this time also crossing over in a clockwise direction. 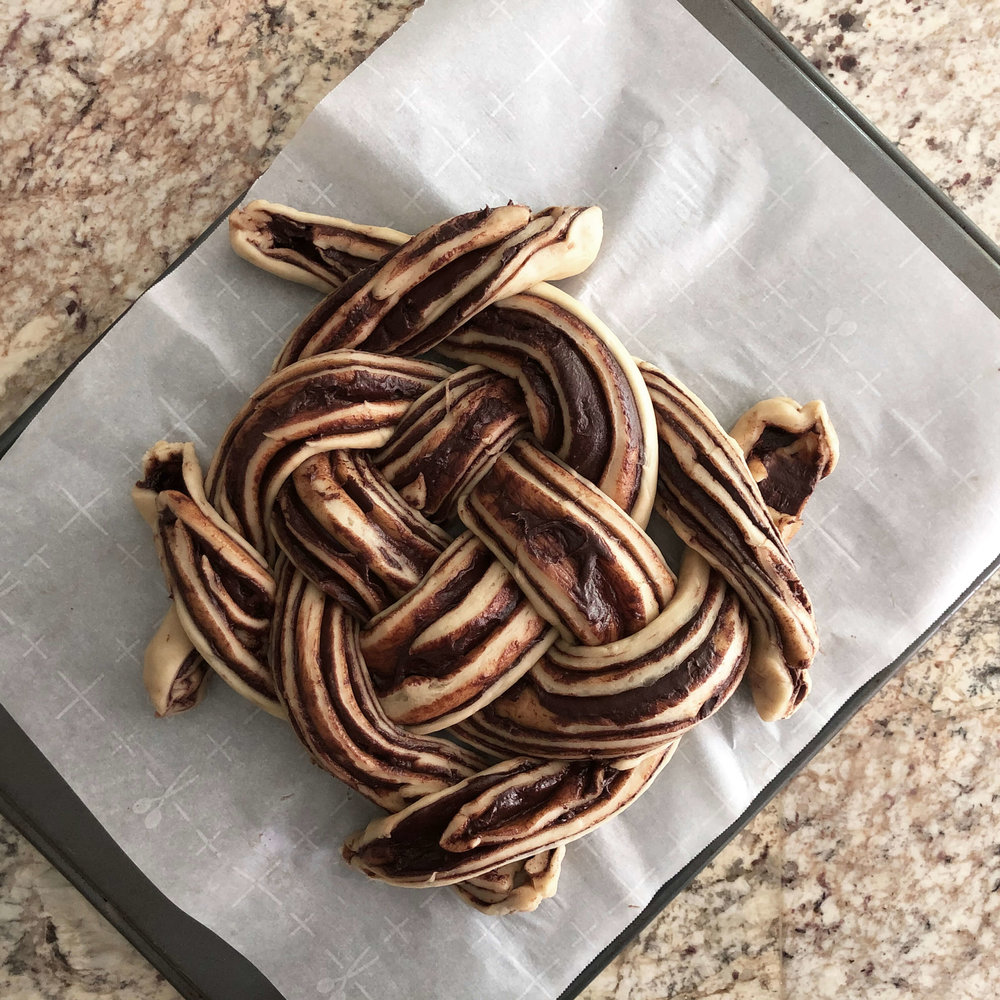
After this second pass, you’ll end up with a bunch of little stubs (if they’re long, you can do 1 more round of twisting). 
Tuck these stubs under the loaf to make a neat round/square loaf.