• Skip to primary navigation
  • Skip to main content
  • Skip to primary sidebar
  • Skip to footer
Cardamom and Tea
  • Blog
  • Recipes
  • About
  • Cookbooks
    • Piecemeal
    • A Dish for All Seasons (my first cookbook)

sweet potato corn chowder with sumac oil

September 5, 2019 by Kathryn Pauline Leave a Comment

If you ask me, early fall is the best time for corn chowder. It’s just starting to cool down enough that a warm bowl of soup doesn’t sound like absolute torture, and summer veggies are still super fresh and in season. While you can absolutely make this soup in the cooler months ahead with frozen corn, it’s a little extra delicious this time of year because fresh ears make a huge difference if you know how to get every bit of flavor out of them.

One of the greatest (but also weirdest-sounding) tricks for getting the most out of an ear of corn is “milking the cob.” After you slice all of the kernels off, you use the side of your knife to scrape every last bit into the pot. At the end of the day, there’s nothing special about this stuff—it’s just a little extra corn. But it blends right in with the broth to give the soup a deeper corn flavor. You could always purée a quarter cup or so for a similar effect if you’re using frozen kernels instead (not that I’d ever ask you to go to the trouble—that sounds like a pain). But there’s something extra nice about eking out every last bit of an ingredient.

Oh and while we’re on the subject of cutting corn off the cob, don’t miss the video by the recipe below, which demonstrates the absolute easiest way to cut corn off the cob without making a big mess (no bunt pan or any special equipment required).

This particular corn chowder is special for a couple reasons: first, it’s drizzled with a little bit of sumac oil. Sumac goes perfectly with corn (try my corn and sumac salad if you have any doubt), and gives it that extra little bit of brightness. Also, I love to substitute sweet potatoes in place of regular potatoes in just about any corn chowder I make, including this one. I used to make another variation on this recipe all the time when I was in grad school: just drizzle on some sriracha instead of sumac oil, and sprinkle a little shredded sharp cheddar on top before serving. Either way, so good!

Print

sweet potato corn chowder with sumac oil

Print Recipe

5 Stars 4 Stars 3 Stars 2 Stars 1 Star

No reviews

  • Prep Time: 15 minutes
  • Total Time: 30 minutes
  • Yield: 6 servings

Ingredients

for the chowder:

  • 5 ears corn (can substitute 700g/1.5 lb frozen corn)
  • 2 tablespoons extra virgin olive oil (25g)
  • 2 cups chopped green onions (115g)
  • Salt to taste
  • 3 tablespoons flour (25g)
  • 1 teaspoon black pepper (2g)
  • 1 teaspoon turmeric (2g)
  • 2 quarts chicken stock (1800g), or 6 cups if you want it to be more of a stew
  • 2 cloves garlic, crushed through a press (10g)
  • 2 medium-large sweet potatoes, peeled and 1/2-inch diced (415g)
  • 1 cup half-and-half (240g)

for the sumac oil and toppings:

  • 3 tablespoons sumac (25g)
  • 3 tablespoons extra virgin olive oil (35g)
  • Cilantro leaves

Instructions

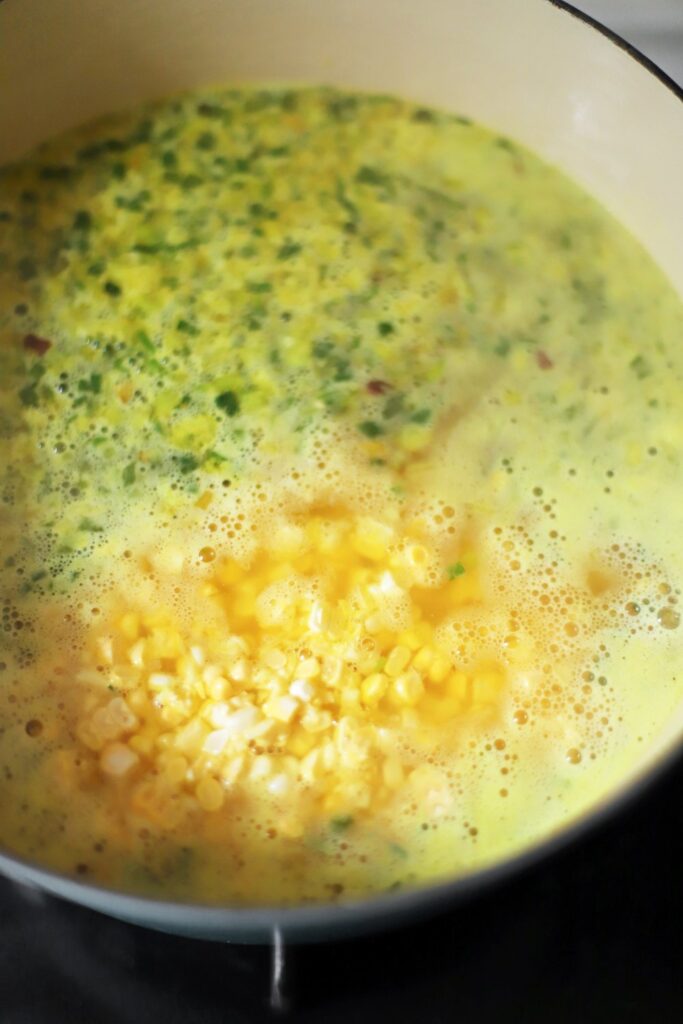
  1. Slice the corn off the cobs (see above video), and use the side of your knife to scrape the stripped cobs over the bowl of corn (safely scrape away from yourself). If you’re using frozen, don’t worry about this step.
  2. Heat a large stockpot or dutch oven over medium heat for a few minutes. Add the olive oil, followed immediately by the green onions, and a little salt to taste (about 1/4 teaspoon). Cook for about 3 to 5 minutes, just until the whites soften a bit.
  3. Add the flour, black pepper, and turmeric, and cook for about 2 minutes, stirring constantly. Add the stock and garlic, and stir together. Bring to a boil over high heat, and then add the sweet potatoes and corn. Give it a couple minutes to come back up to a simmer, and then drop the heat down to about medium low, just to maintain a simmer. Cover and cook for about 10 minutes, until the sweet potatoes are tender. Taste as it simmers, and season if necessary (this will vary, depending on how salty your stock is).
  4. Add the half-and-half, give it a stir, taste it, and adjust the seasoning if necessary.
  5. In a small bowl, combine the sumac and olive oil, and give them a stir immediately before drizzling.
  6. Top each bowl with some cilantro and sumac oil. If the sumac oil settles, give it a gentle stir to let some of it float back up to the surface (a good trick is to pour it over the back of a spoon close to the surface of the bowl, to keep it from sinking).

Notes

Making it ahead: The soup keeps really well in the refrigerator for a few days, and stores beautifully in the freezer for 3 months (the sweet potatoes will soften and dissolve a bit, but they add good body and flavor to the broth). Make the sumac oil just before serving.

find us on instagram and let us know what you made!

Filed Under: dinner, every recipe, lunch, soups and stews, vegetarian, weeknight Tagged With: cilantro, corn, sumac, summer, sweet potato, turmeric

pomegranate chocolate cream pie

August 29, 2019 by Kathryn Pauline Leave a Comment

Ok well, it’s August 29, and this my official last pie of summer. I mean, don’t worry—I totally have one in the works for Thanksgiving, but fall and summer desserts have a very different vibe. The days of bright red strawberry pies and cherry galettes will yield to persimmons and apples, and we’ll all finally lose the patience to let them cool on the windowsill, because on a chilly November day, a disastrously runny yet warm slice of apple pie sounds a million times better than a perfectly set room temperature one.

But here between seasons, this pomegranate chocolate cream pie is the perfect thing for easing into the fall. It’s chilled, so you don’t have to leave your oven on for over an hour waiting for the center to get bubbly on a warm August day. But it’s also got a little preview of the fall flavors ahead. If pomegranates aren’t yet available where you are, feel free to skip the topping of fresh arils. The real flavor comes from pomegranate molasses, an ingredient that’s more traditionally used in savory dishes, but also works wonderfully with some sweets, and is conveniently available year-round.

Pomegranate molasses is one of those funny cases where store-bought is actually better than homemade, because manufacturers add a bit of extra acidity that’s hard to replicate when you reduce down pomegranate juice at home. That sweet tanginess works perfectly with chocolate, as anyone who’s ever had one of those addictive “chocolate covered pomegranate-açaí-blueberry (but actually just candy)” thingies can confirm. This is basically the chocolate cream pie version of one of those.

I tried a couple different formulas while developing this recipe, and at the end of the day, the chocolate filling is best sweetened entirely with pomegranate molasses and dark chocolate. Any added sugar and it’s too cloyingly sweet, but any less pomegranate molasses and its flavors and acidity are lost.

Hope you enjoy a slice during this last little bit of warm weather!

Print

pomegranate chocolate cream pie

Print Recipe

5 Stars 4 Stars 3 Stars 2 Stars 1 Star

No reviews

  • Prep Time: 35 minutes
  • Total Time: 4 1/2 hours
  • Yield: 8 servings

Ingredients

for the crust:

  • 200g all purpose flour (about 1 1/2 cups)
  • 3.5g salt (1/2 teaspoon)
  • 130g cold unsalted butter, cut into chunks (9 tablespoons)
  • 60g cold yogurt (1/4 cup)
  • 15g cold water (1 tablespoon)

for the filling:

  • 30g cornstarch (3 tablespoons)
  • 1/2 teaspoon salt
  • 165g pomegranate molasses (1/2 cup)
  • 2 large eggs (110g)
  • 590g whole milk (2 1/2 cups)
  • 60g heavy whipping cream (1/4 cup)
  • 30g unsalted butter (2 tablespoons)
  • 200g chopped dark chocolate (at least 72% cacao) (1 1/3 cups)

for the topping:

  • 20g sugar (1 1/2 tablespoons)
  • 230 cold heavy whipping cream (1 cup)
  • 1 pinch of salt
  • chocolate shavings*** and pomegranate arils**** for topping

Instructions

The crust:

  1. Place the flour, salt, and butter in a food processor fitted with the blade attachment. Pulse several times, until the butter blends into the flour, and there aren’t any lumps bigger than a tic tac. Add the yogurt, and pulse 2 or 3 times to distribute. Drizzle in the water.* Pulse a few times until it can be squeezed together into a pliable and smooth dough (don’t over-process). Shape the dough into a ball, flatten the ball into a disc, cover with plastic wrap, and refrigerate for 30 minutes.
  2. On a lightly floured surface, roll the chilled dough out to between 1/8- to 1/4-inch thick; it should be wider than the pie pan (about 13-13.5 inches). Rotate occasionally as you work, but try not to handle the dough too much.
  3. Once it’s rolled out, gently wrap it around your rolling pin to transfer it to the pie pan. Unroll it onto a 9-inch pie pan and gently press the dough into place so it’s in contact with the entire pan. Use scissors to trim some of the excess off, but leave about 3/4-inch of dough hanging past the edge of the pan. Go back and fold the edge under itself so it still overhangs by just about 1/8-inch (you shouldn’t be able to see the pan from above). Crimp, let it sit at cool room temperature for 10 minutes, then refrigerate for 90 minutes.
  4. Preheat the oven to 400°F (205°C) convection once the dough is almost done chilling.
  5. Once the pie shell is ready to bake, dock it all over with a fork, and bake for about 20 minutes total, until golden brown. About 5 minutes into baking, check on it to see if it’s sliding or puffing too much on the bottom. Take it out and dock it again with a fork to make it collapse, and nudge it back into place if it’s shrinking/sliding. Put it back in the oven, and check on it again after another 5 to 10 minutes, repeating if it’s puffing up again. Or feel free to use pie weights instead if you’re not super experienced with pie dough (see note). **

The filling and toppings:

  1. Combine the cornstarch, salt, pomegranate molasses, and eggs (off the heat) in a medium saucepan. Whisk together until there are no more lumps. Stir in the whole milk and 1/4 cup heavy cream, and whisk together until completely combined. Set over medium-high heat, and bring to a simmer while stirring constantly.
  2. Once bubbles start to break the surface, cook for 1 minute (keep stirring), and then remove from heat. Immediately add the butter and chocolate, and stir until both the butter and chocolate have melted completely and incorporated into the filling.
  3. Immediately pour it into the baked pie shell, and let it chill in the refrigerator for at least 3 hours before continuing.
  4. While you’re waiting on the pie to chill, place the sugar in the bowl of your stand mixer (or a stainless steel bowl), and place it along with the whisk attachment (or a regular whisk) in the refrigerator to chill.
  5. When the pie is ready to come out of the refrigerator, whip the cream: add the 1 cup heavy whipping cream and a pinch of salt to the sugar, and beat at medium-high speed, until it reaches soft- to medium-peaks (don’t beat it all the way to stiff peaks unless you plan to pipe it).
  6. Top the pie with the whipped cream, not quite spreading it all the way out to the edges, and making little swooshes on the surface with a small offset spatula or knife.
  7. Top with chocolate shavings and pomegranate arils, and refrigerate until you’re ready to serve it. It keeps very well in the refrigerator for a few days, although the whipped cream may start weeping after the first 24 hours (don’t make it more than 12 hours ahead of time for special guests, but enjoy the leftovers for days).

Notes

* If you measured precisely in grams, you can add the water all at once. If you’re using volume, you should add the water in 2 installments, and you might even need to add a bit more to get it to hold together (volume is less precise).

** To prevent shrinking and puffing in the first place, you can use pie weights. If you go the pie weight route, you don’t need to do the whole thing with the folded-under crust, and you don’t need to let it rest in the refrigerator for so long. I hate pie weights, and always use this method to avoid them, but some might find this technique more trouble than it’s worth, and it’s totally a matter of preference. If you use pie weights, your pastry won’t be as flaky and puffy, and you’ll need to bake it for a few minutes without the weights to make sure the bottom browns. If you’re new to baking, you might want to try using weights, because it’s a little easier and failproof.

*** For big, bold shavings, make sure your bar of chocolate isn’t too cold. I like to microwave mine for about 10-20 seconds, not to melt it, but just to help it soften very slightly and take the room temperature chill off. A slightly warmed bar of chocolate will let you shave off bigger pieces, and those pieces will look velvety rather than chalky. Simply drag your knife across the surface at a 45 degree angle (carefully, away from yourself), or use a veggie peeler.

**** The easiest way to seed a pomegranate is under water.

find us on instagram and let us know what you made!

Filed Under: every recipe, sweets Tagged With: chocolate, pies, pomegranate, pomegranate molasses, whipped cream

  • « Go to Previous Page
  • Page 1
  • Interim pages omitted …
  • Page 82
  • Page 83
  • Page 84
  • Page 85
  • Page 86
  • Interim pages omitted …
  • Page 183
  • Go to Next Page »

Primary Sidebar

Kathryn Pauline smiling

Welcome! I’m Kathryn Pauline, cookbook author, recipe developer, and photographer.

Footer

read our privacy policy

© 2017 - 2026 Kathryn Pauline