If you’ve ever wanted to make hummus from dried chickpeas without much effort, welcome! This recipe is for anyone who loves the super-creamy end result of hummus made from dried chickpeas, but who doesn’t want to have to remember to soak beans overnight or buy an Instant Pot.
But why bother?
Growing up Middle Eastern in the 90s, I only ever found hummus at my family’s table. But these days, you can find it anywhere from airport kiosks to supermarkets. There’s really no need to ever make your own. But when it’s completely unnecessary to make something, that’s usually the most fun time to go all in on the from-scratch version. It’s easier than you might think (especially if you make this particular recipe). And it’s the only way to get hummus that’s this light and creamy.
Read on to learn more about the “hows” and “whys,” or jump to the recipe if you’re ready to hit the ground running.


How to make the best (and easiest) hummus using dried chickpeas
The big secret? Using baking soda. It saves you from two chores: soaking chickpeas overnight and peeling their husks away. Here’s why it works:
1) Skip the overnight soak:

When I cook chickpeas for salads or stews, I soak them overnight so they’ll keep their shape. But when you want your chickpeas to turn to mush, soaking isn’t worth it. And with hummus, the mushier, the better!
This strategy works because baking soda helps chickpeas cook more quickly. This will vary, depending on how old your chickpeas are as well as how large they are. Older, larger chickpeas will take longer. Mine cooked in 95 minutes.
2) Forget peeling:

For very smooth hummus, many recipes recommend peeling every chickpea by hand. Sure, it doesn’t take quite as long as you might think it would, but it is a bit of a pain.
But lucky for us, when you thoroughly cook chickpeas in a generous amount of baking soda, their skins slip away naturally. After about 30 minutes, skim them off with a spider skimmer or small mesh sieve, and you’re done.
How to make your hummus taste like the real deal
If you want your hummus to taste like it was made in a Middle Eastern kitchen, there are several things you must keep in mind. These tips apply whether you’re starting with canned or dried chickpeas.
If you follow the recipe at the end of this post, you can’t go wrong. But here’s why each element matters, and some advice on what to watch for when searching for a good recipe:
1) Use enough lemon.
This is the number 1 thing most recipes get wrong. You must use enough lemon. If your hummus is not tangy, you’re just staring down a heap of mashed chickpeas. Avoid any recipe that calls for just a tablespoon or two (unless it yields a very small batch).
2) Use enough liquid in general.
The lemon juice does not just add acidity; it also adds moisture. But even with a generous amount of lemon juice, you still need to add quite a bit of water as well. Hummus should not be the texture of play-dough. It should be smooth and creamy.
In the recipe in this post, our chickpeas will absorb a lot of water during cooking, so you may not need to add more water. If your hummus is stodgy rather than creamy, add one tablespoon at a time.
3) Use enough tahini.
You’re probably noticing a trend here—”use enough ___”—and that’s because making a good batch of hummus is all about balance. Tahini gives hummus its silky texture. Too little tahini, and your hummus will be watery; too much, and it becomes a heavy paste. Just the right amount of tahini will bind with the water and lemon juice to create a perfectly velvety texture.
4) Use fresh garlic or garlic powder. They’re both great!
Many restaurants use garlic powder, which is my trick to getting hummus that tastes like it’s from my favorite shawarma place. But fresh garlic is classic and also works great. You can’t go wrong—use whichever you prefer.
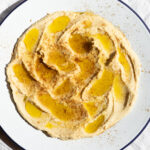
5) Plate it with style (and plenty of olive oil)
Hummus is not meant to be scooped from a big soup bowl. Spread it thinly on a deep plate or shallow bowl so that every bite gets some olive oil and spices. Swirl a spoon over the surface to make little indentations, pour on the oil, and finish with za’atar or paprika. This particular swirl pattern is what my family always does, and I love it:


Hummus from Dried Chickpeas (the easy way)

- Yield: just under 2 cups (450g)*
Ingredients
- 1 cup [180g] dried chickpeas
- 2½ quarts [2.4 liters] water**
- 2 tsp [10g] baking soda
- 1 large garlic clove
- ¼ cup [60g] lemon juice
- ¼ cup [60g] tahini
- ½ tsp salt
- Additional boiling water, as needed
To serve:
- Extra virgin olive oil
- Za’atar or paprika
Instructions
- Place the chickpeas, 2½ quarts water, and baking soda in a small stock pot or dutch oven.
- Bring to a boil over high heat. Once boiling, reduce heat to medium-low to maintain a simmer.
- After about 30 minutes of simmering, wave a spider skimmer or fine mesh sieve through the water over the surface of the chickpeas, and discard the husks that gather on it (repeat 2-3 times). Periodically add more boiling water as the level lowers.
- Simmer for a total of about 40 to 120 minutes (mine took 95 minutes), until chickpeas have cooked through completely. They will be very mushy.
- Drain your chickpeas over a fine mesh strainer. Let them cool for a few minutes.
- Place drained chickpeas in a food processor. Add a clove of garlic, lemon juice, tahini, and salt. Blend until completely smooth. If it is thick and stodgy, add a tablespoon of water at a time until it thins out to the right consistency.
- Spread hummus on a deep plate or shallow bowl. Make little dents and swirls on the surface with the back of a spoon. Drizzle with olive oil and sprinkle with za’tar or paprika.
Notes
* A note on doubling: To double this recipe, cook your chickpeas in a much larger stockpot or dutch oven. Double everything, including the water and baking soda.
** I recommend measuring the water, otherwise your baking soda solution may end up being way too strong or too weak.
Video note: If you don’t see the video for this post after scrolling up, please disable ad block and try reloading the page.