• Skip to primary navigation
  • Skip to main content
  • Skip to primary sidebar
  • Skip to footer
Cardamom and Tea
  • Blog
  • Recipes
  • About
  • Cookbooks
    • Piecemeal
    • A Dish for All Seasons (my first cookbook)

shish kebab over an open fire

September 25, 2017 by Kathryn Pauline 2 Comments

Every once in a while, I suggest you make a particular spice blend for a particular recipe. I’ve covered yellow curry powder, za’atar, and baharat, three very important spice blends for making Assyrian food, as well as Middle Eastern food in general. But I’m pretty sure that the most annoying thing you can do as a food blogger is tell someone to make a complicated ingredient for one recipe, and then never give them any ideas for using up the rest of the jar.

And not to braaaag, but I kind of pride myself on not doing this (feel free to check out the above posts for more ideas). But really, it’s mostly just that I end up with a lot of left over jars of spice mix after tinkering with my recipes to post them, and I’m someone who pours water in my conditioner bottle when there are a few drops left, so I’m not about to let spice blends go to waste.

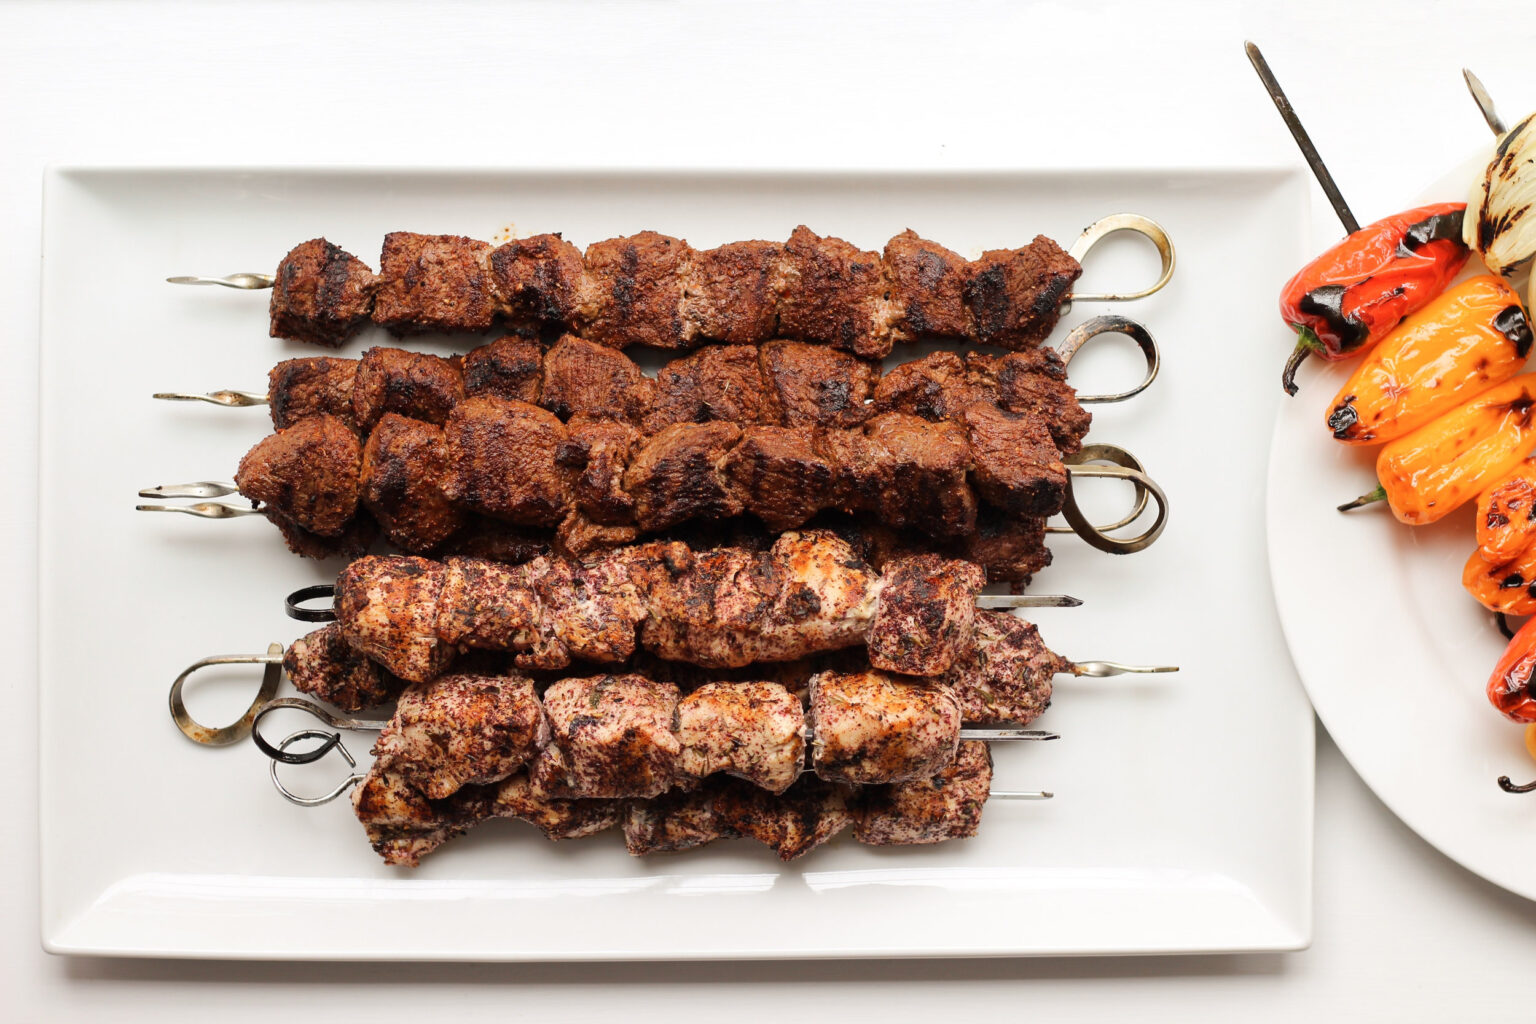
So this post is barely a recipe. It’s more of a suggestion, or really two suggestions. First of all, it’s finally fall (hooray!), so if you’re looking for something fun to do with family or friends, why not cook something tasty over an open fire? I don’t eat meat very often, and so when I do, I like to make it special. Cooking outside is a wonderful way to make dinnertime more of a mindful experience, instead of a mindless chore.

Secondly, if you’re like me, and don’t eat meat every day, why not try to add as much delicious flavor as possible to make it more of an occasion when you do? While not 100% traditional (at least in my family), za’atar perfectly compliments chicken, and baharat brings out the delicious umami flavor of beef. That’s pretty much all you need to know, but I’ve written up a recipe for those of you who prefer to learn how to play a new game by reading the instruction booklet instead of hearing an explanation (there’s always someone at every game night, and different learning styles are a beautiful thing).

Print

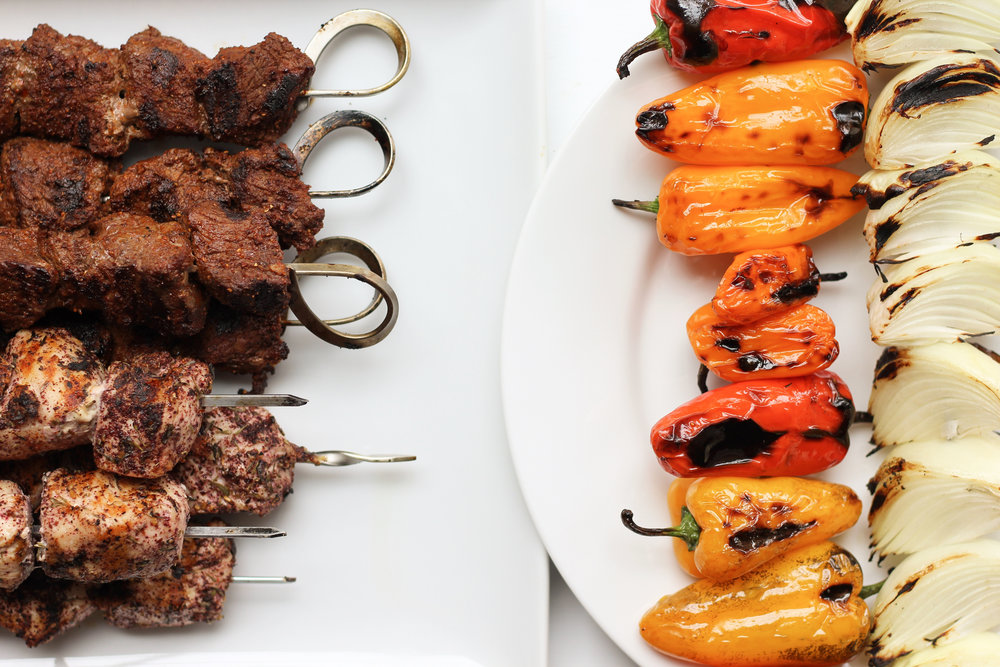
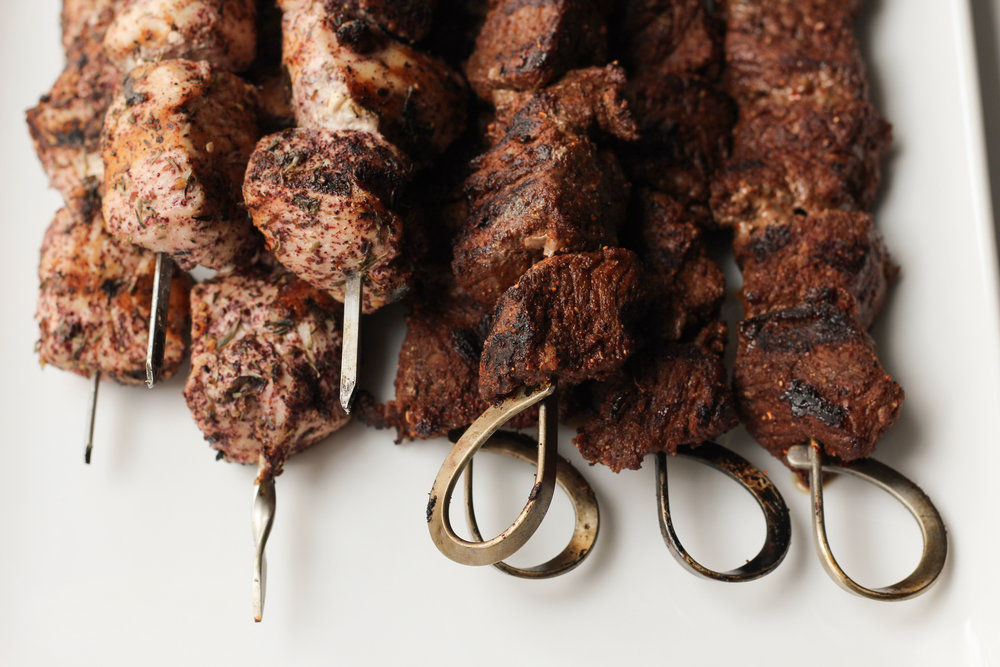
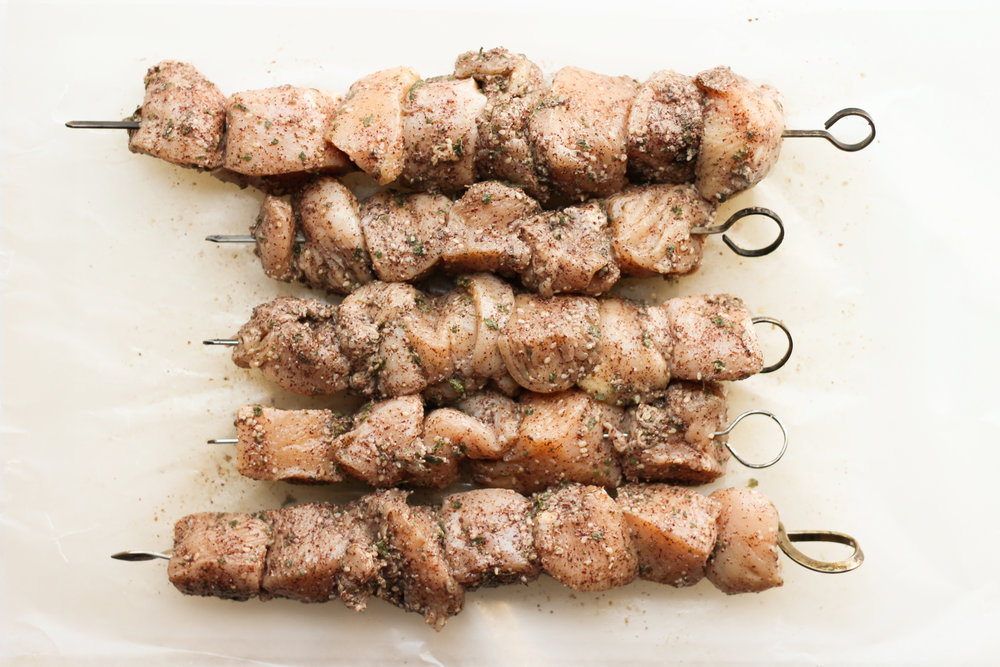
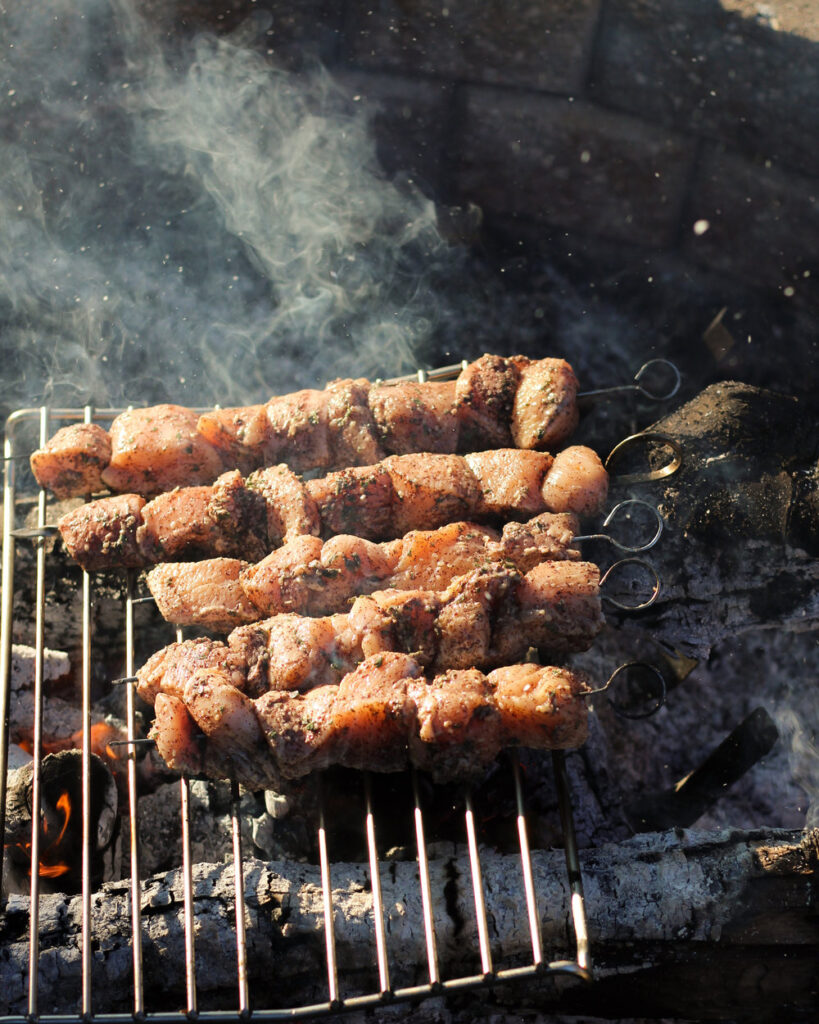
Chicken and za’atar kebab

Print Recipe

5 Stars 4 Stars 3 Stars 2 Stars 1 Star

No reviews

Ingredients

1 1/2 tablespoons olive oil
2 tablespoons za’atar
2 pounds chicken breast, cut into medium chunks
1 1/2 teaspoons salt (more or less to taste)
optional: peppers and onions + oil to coat + salt

Instructions

  1. Combine the olive oil and za’atar. Season the chicken with the salt, and then coat it in the za’atar oil. Skewer the chicken and let it marinate in the refrigerator while you prepare the fire (or for at least 30 minutes). If you’re using peppers and onions, skewer them separately from the chicken, coat them in oil, and season them with salt to taste.
  2. Once the fire has burned down to hot coals with a few very low flames, place a rack a few inches above the fire and let it heat for a couple minutes (either use a rack that has legs, or prop it up with a square of logs around the fire). Add the chicken and cook, rotating as it sears and cooks through. Cook the onions and peppers until softened and blistered. Watch the chicken closely to prevent it from burning, and keep an eye out for hot spots over the fire.
  3. Cooking times vary from fire to fire, but it should take somewhere between 10 to 15 minutes to cook through. When cooking chicken on an open fire, it’s important to err on the side of hot coals rather than high flames. It may take longer than 10 to 15 minutes if the coals have really burned down, but it will still be very delicious. Because you dry-brined it, it shouldn’t dry out very easily.

find us on instagram and let us know what you made!

Print

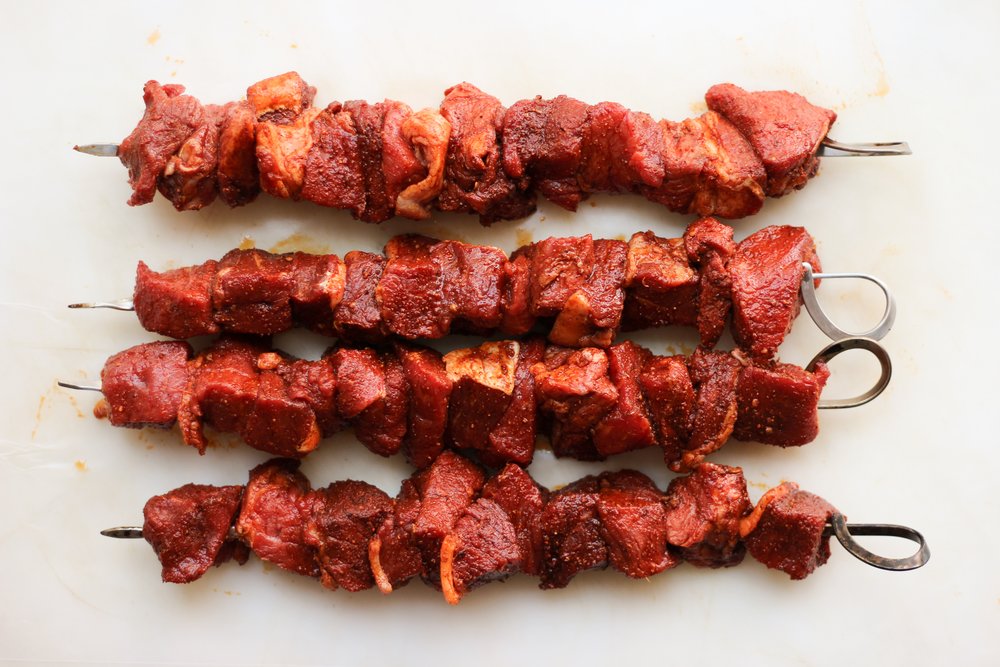
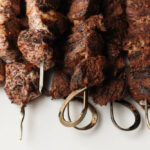
Beef and baharat kebab

Print Recipe

5 Stars 4 Stars 3 Stars 2 Stars 1 Star

No reviews

Ingredients

1 1/2 tablespoons olive oil

2 tablespoons baharat

2 pounds sirloin, cut into medium chunks

1 1/2 teaspoons salt

optional: peppers and onions + oil to coat + salt

Instructions

  1. Combine the olive oil and baharat. Season the sirloin with the salt, and then coat it in the spice oil. Skewer the sirloin and let it marinate in the refrigerator while you prepare the fire (or for at least 30 minutes). If you’re using peppers and onions, skewer them separately from the beef, coat them in oil, and season them with salt to taste.
  2. Once the fire has burned down to hot coals with some low flames, place a rack a few inches above the fire and let it heat for a couple minutes (either use a rack that has legs, or prop it up with a square of logs around the fire). Add the beef and cook, flipping it once it has developed a nice sear. Cook the onions and peppers until softened and blistered. Watch the sirloin closely to prevent it from burning, and keep an eye out for hot spots over the fire. Cook it to your preferred doneness.
  3. With the chicken (above), it’s ok to let the coals burn down a little further, but it’s important to see a few low flames for cooking steak if you want the inside to stay medium-rare, and the outside to have a nice sear. It should take about 6 to 8 minutes total (3 to 4 minutes per side), so keep a close eye on it.

find us on instagram and let us know what you made!

Filed Under: dairy free, dinner, every recipe, family recipes, gluten free, main courses Tagged With: baharat, beef, chicken, grilling

quince granola

September 20, 2017 by Kathryn Pauline 2 Comments

Certain foods are so married to the time of year in which they are harvested, there’s just no point in trying to enjoy them out of season. Fresh grape leaves, for instance, can be salted, dried, or pickled, and then eaten in prakhe/dolma all winter long. But (if you ask me!) it’s impossible to beat the flavor of freshly foraged grape leaves in mid spring. And so, I don’t bother with preserved grape leaves, instead feasting on them all spring long, and then spending the rest of the year dreaming of their return (alright, alright, while occasionally dipping into a frozen stash when I get desperate, tricking myself into thinking they taste the same).

But at its best, instead of a desperately wistful attempt to capture another season, preservation can be like spinning straw into gold. Take quince, for instance. Have you ever tried quince raw? I hadn’t until recently. I was visiting my grandmother last fall, and we bought a quince at the grocery store. I had never eaten one raw before, and she said it was her father’s favorite fruit. So when we got home, I tried a slice, and I immediately had the sensation that my whole mouth had been stuffed full of sawdust.

I normally love sour fruit, and I would never begrudge my great grandfather or anyone else their love of raw quince (indeed, it is traditionally eaten raw in many cultures), but in this unprecedented moment, I had finally found a fruit I did not enjoy.

But quince paste and quince preserves, on the other hand? I can’t seem to get enough of the stuff. Quince paste looks and tastes like a buttery, super-set, caramelized spoonful of the best apple-flavored orange marmalade of your life (if that makes any sense). And while it’s about to become quince season, thanks to quince paste’s preservational virtues, you don’t have to wait to enjoy this recipe for quince granola.

I definitely like my granola to be tastier than a virtuous muesli with raw almonds and no added sugar, but not quite as crazy as some sugar-coated monstrosity with nutella and sprinkles. But to be honest, I usually make mine a little more on the muesli side. Don’t get me wrong–I eat a little something delicious, sweet, and completely nutrient-free just about every day (does it have to be nutrient free? no, but for some reason it’s just more enjoyable that way. For the record, it’s usually one of these). But I try not to blow it all on breakfast. So this granola isn’t entirely sugar free, but it’s high in fiber, low in added sugar, and (most importantly), high in flavor.

I know it kind of sounds like quince paste is the whole reason for this post, but if you can’t find it (usually sold in fancy schmancy supermarkets), you can substitute orange marmalade in its place. That’s actually how I used to make this granola way back before I tried using quince, and if you go the orange marmalade route, it’s especially good sprinkled with mini chocolate chips if you’re into the whole orange-chocolate thing.

Here are the exact ingredients for this more budget-friendly (but also delicious) orange-chocolate version: 4 cups oats, 1 3/4 cups sliced almonds, 3/4 cup coconut, 1 tablespoon brown sugar, 1/4 cup oil, 1/2 cup + 1 tablespoon orange marmalade, 1 teaspoon orange zest, 1 teaspoon salt, 1/2 cup mini chocolate chips (sprinkled on top at the end of the process, after it’s cooled off a little).

Print

quince granola

Print Recipe

5 Stars 4 Stars 3 Stars 2 Stars 1 Star

No reviews

  • Prep Time: 20 minutes
  • Total Time: 90 minutes
  • Yield: about 8 to 10 cups

Ingredients

3 cups rolled oats (gluten free oats, if necessary)
3/4 cup slivered almonds
1/2 cup pistachios
3/4 cup unsweetened coconut flakes
1/2 cup pine nuts
1/2 cup diced apricots
1/2 cup diced dates
2 tablespoons olive oil
2 tablespoons unsalted butter *
2 tablespoons honey *
2 tablespoons maple syrup
1/2 cup quince paste
1 teaspoon fine sea salt, or to taste

Instructions

  1. Preheat the oven to 425° F.
  2. Shake the oats into a thin layer on a rimmed baking sheet. Roast the oats until light golden brown, about 7 to 10 minutes. Set aside in a large mixing bowl.
  3. Combine slivered almonds and pistachios on the baking sheet, shaking out into a single layer. Roast in the oven until golden, about 3 to 4 minutes. Set aside in the mixing bowl.
  4. Combine the coconut flakes and pine nuts in a single layer on the baking sheet. Keeping a close eye on them, roast for about 2 minutes, just until the coconut flakes turn light brown. Set aside in the mixing bowl.
  5. Reduce the oven’s heat to 180° F, and line the sheet pan with parchment paper.
  6. Add the apricots and dates to the mixing bowl.
  7. Use an 8-quart stockpot to combine olive oil, butter, honey, maple syrup, quince paste, and salt. Use a sturdy whisk to break up the quince, and simmer these ingredients until everything melts, no longer than 3 minutes. Remove from heat.
  8. Mix the oat mixture into the stock pot until everything is very evenly coated.
  9. Immediately empty the mixture onto the parchment-lined sheet pan, and let it sit in the oven at 180° F for about 45 minutes to 1 hour, just until the mixture dries out and hardens. Keep an eye on it and check in every once in a while to see how it’s doing.
  10. Let it cool at room temperature, and then break up into chunks and store in a bag or jar.

Notes

* To make this vegan, you can use more maple syrup and olive oil instead of honey and butter.

find us on instagram and let us know what you made!

Filed Under: breakfast, dairy free, every recipe, gluten free, vegan, vegetarian Tagged With: almonds, apricot, coconut, dates, granola, nuts, oats, pine nuts, pistachio, quince

  • « Go to Previous Page
  • Page 1
  • Interim pages omitted …
  • Page 151
  • Page 152
  • Page 153
  • Page 154
  • Page 155
  • Interim pages omitted …
  • Page 183
  • Go to Next Page »

Primary Sidebar

Kathryn Pauline smiling

Welcome! I’m Kathryn Pauline, cookbook author, recipe developer, and photographer.

Footer

read our privacy policy

© 2017 - 2026 Kathryn Pauline