• Skip to primary navigation
  • Skip to main content
  • Skip to primary sidebar
  • Skip to footer
Cardamom and Tea
  • Blog
  • Recipes
  • About
  • Cookbooks
    • Piecemeal
    • A Dish for All Seasons (my first cookbook)

vegetarian shepherd’s pie

November 7, 2019 by Kathryn Pauline 6 Comments

While I do eat meat these days, I’ve been the vegetarian at Thanksgiving a few times in my life. And honestly, it’s usually a total non-issue. As long as you’re not in a “bacon bits on everything!!!” kind of house, it’s usually pretty easy to cobble together a vegetarian-friendly plate just from all the delicious sides. So if you’re having a vegetarian friend or family member over this year, you probably won’t actually need to do much to accommodate. But it can be such a lovely gesture to have a vegetarian dish that feels like more of a main. Especially one that’s not tufurky… yeesh. This vegetarian shepherd’s pie is just the thing!

While you can totally use something like Quorn or Impossible as a substitute for ground beef or lamb, Assyrians have been veganizing classic meat-based dishes for a long, long time. We traditionally spend a large part of the year fasting from all animal products. My family typically uses a combination of walnuts and mushrooms in place of minced beef. I just love the flavor and richness they add in this vegetarian shepherd’s pie.

I also added a few other ingredients that often go with the mushroom/walnut “soma” (vegan) mix, like parsley, cilantro, and baharat. And I’ve gone ahead and added a whole bunch of cheese and butter to this one, so while it’s not actually vegan, it can be easily veganized with plant-based butter and cheese substitutes.

Looking forward to sharing more of my Thanksgiving favorites this month, including an apple pie with a design inspired by one of my favorite artists, and a brussels sprouts salad perfect for throwing together the day before and forgetting entirely until serving.

Print

Vegetarian Shepherd’s Pie

Print Recipe

5 Stars 4 Stars 3 Stars 2 Stars 1 Star

No reviews

  • Prep Time: 30 minutes
  • Total Time: 45 minutes
  • Yield: 6 servings

Ingredients

  • 3 medium russet potatoes (700g), can substitute yukon gold
  • 1/2 cup sour cream or creme fraiche (115g)
  • 2 tablespoons unsalted butter (30g) (for the potatoes)
  • 2/3 cup shredded cheddar cheese (80g) (optional)
  • Salt, to taste
  • 4 tablespoons unsalted butter (55g) (for the filling), divided in half
  • 3/4 pound mushrooms, chopped (340g)
  • 1 medium onion, chopped (180g)
  • 4 medium carrots, 1/2-inch diced (300g)
  • 1 cup coarsely chopped walnuts (100g)
  • 3 tablespoons flour (25g)
  • 4 cloves garlic, crushed through a press or finely minced (20g)
  • 1 tablespoon + 1 teaspoon baharat blend (8g)*
  • 1/4 cup tomato paste (60g)
  • 2 cups vegetable broth (470g)
  • 1 cup frozen peas (125g)
  • 1/2 cup chopped cilantro (20g)
  • 1/2 cup chopped parsley (20g)

Instructions

  1. Peel and chop the potatoes into a large dice. Cook them in boiling water (about 9 minutes) or the microwave, until a butter knife can be easily inserted. Place in a mixing bowl, add the sour cream and 2 tablespoons butter, and mash together with a potato masher until they are light and fluffy.
  2. Once the mashed potatoes are fluffy and cooled slightly, fold in the cheese, and salt (about 1/2 teaspoon).
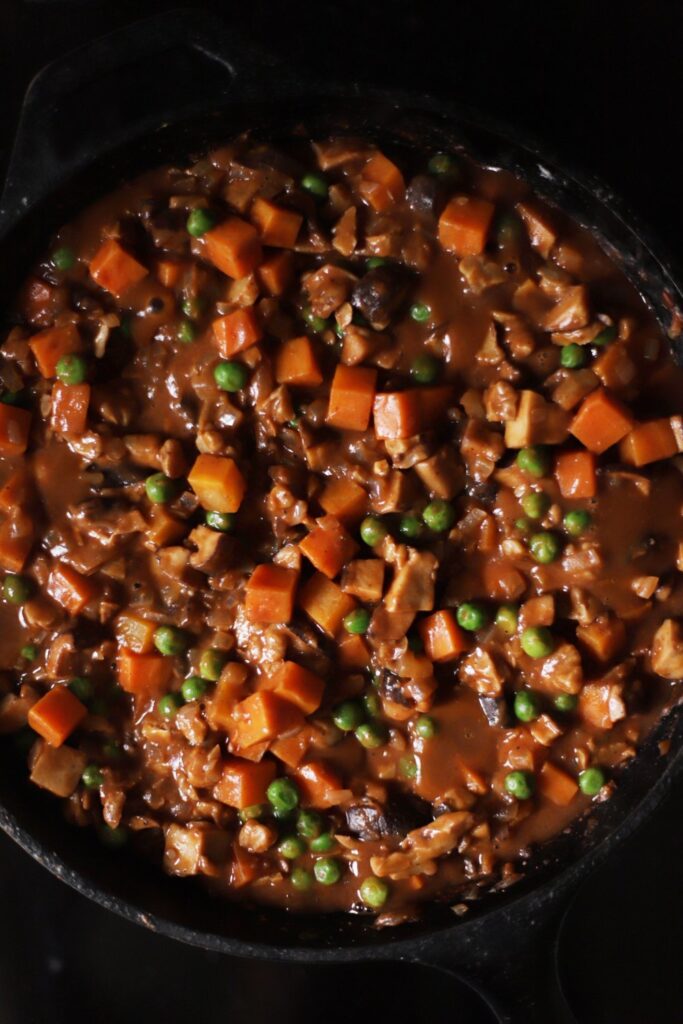
  3. Place 2 tablespoons butter in a 10 to 12 inch cast iron skillet** over medium-high heat. Once the butter melts, add the mushrooms, season to taste (about 1/4 teaspoon) and cook stirring occasionally, until they are lightly brown, their juices evaporate, and they reduce in size by about half (about 5 to 10 minutes). Remove to a bowl.
  4. Preheat the oven to broil.
  5. Add 2 more tablespoons butter to the empty skillet, followed by the onions, carrots, and walnuts, season to taste (about 1/4 teaspoon more), and lower the heat to medium. Cook stirring occasionally until the onions become translucent and the carrots soften slightly (about 10 minutes). If you like super soft carrots, cook them for an additional 5 to 10 minutes, until they soften completely.
  6. Sprinkle on the flour, garlic, and baharat, and stir for about 1 minute. Add the mushrooms back in and stir.
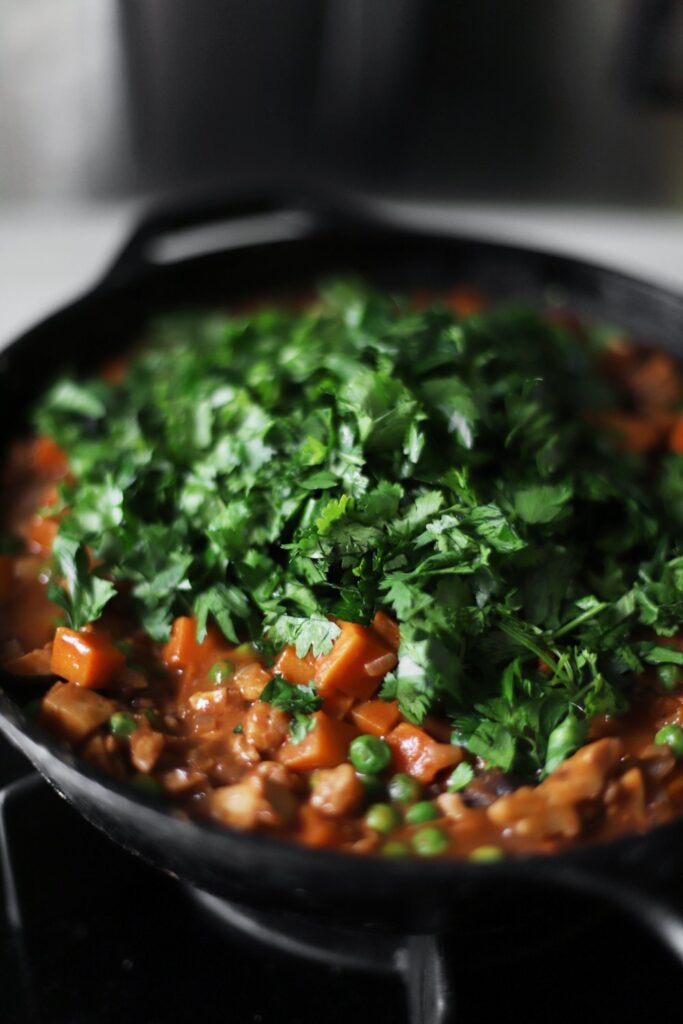
  7. Add the tomato paste, vegetable broth, and frozen peas, and scrape up any bits from the bottom of the skillet with a wooden spoon. Bring to a simmer. Once it comes to a simmer it will thicken significantly. Immediately add the cilantro and parsley. Stir everything together and remove from heat.
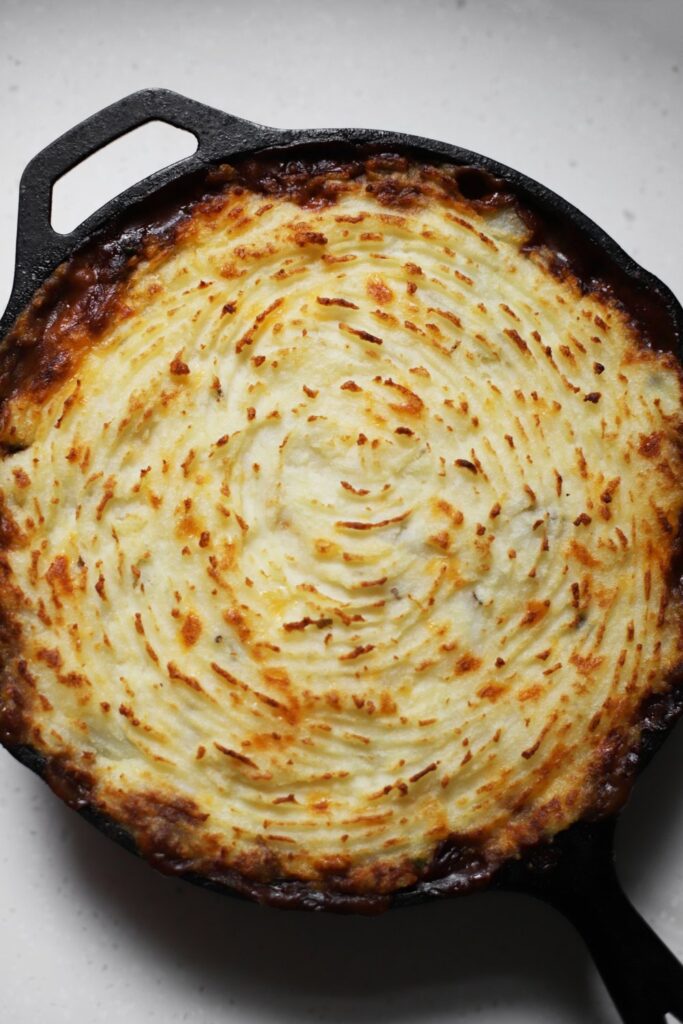
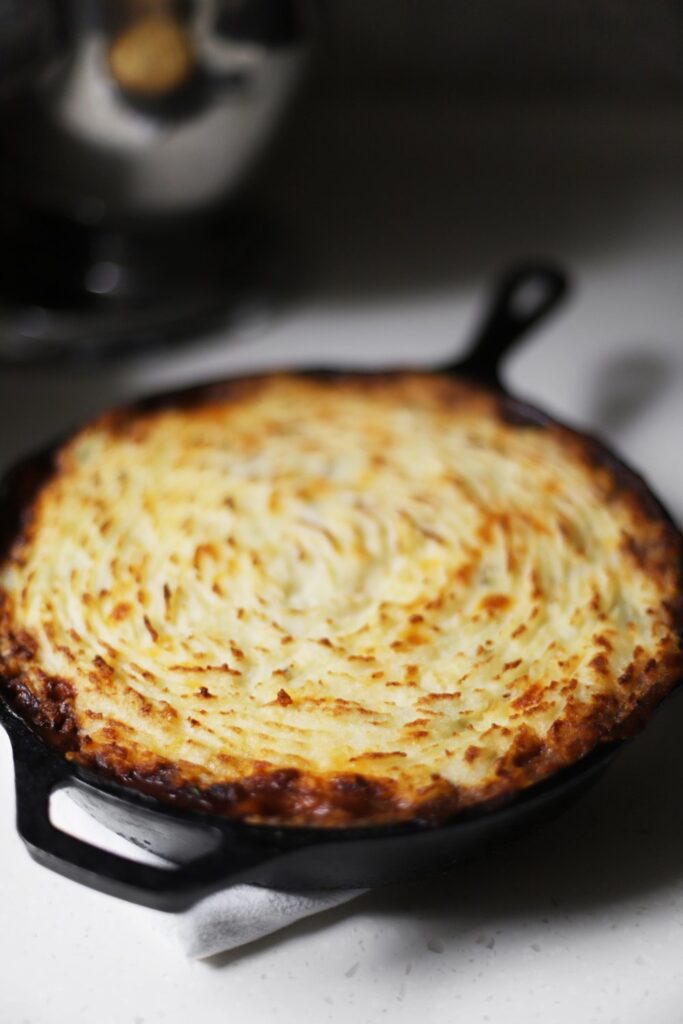
  8. Smooth out the filling so it’s completely level/tamped down, and top with the cheesy mashed potatoes, use a fork to make a pattern on the surface, and place under the broiler until the top is golden brown and toasty (about 5 minutes in my broiler, but it varies a lot from oven to oven—keep a close eye on it). If the skillet is super full, place on a sheet pan to catch any drips.

Notes

* If you don’t have a baharat blend handy, and don’t feel like making one, simply use 1 teaspoon black pepper, 1 teaspoon cumin, 1 teaspoon coriander, 1 teaspoon paprika, and a pinch of cinnamon.

** If you don’t have a cast iron skillet, you can totally use another ovenproof skillet of a similar size. If you don’t have an ovenproof skillet, you can make the filling on the stove, and then transfer it to a casserole dish to broil with the potato topping.

To make ahead: The best way to make this ahead is to make the potato topping and the filling separately. Once the filling is thickened and bubbly, add a couple extra tablespoons of water to thin it out slightly, and stash in the refrigerator in a resealable container. Make the potato topping, and store it separately in the refrigerator in a resealable container. Once you’re ready to put it all together, place the filling in a cast iron skillet over medium heat, and bring it up to a simmer. Microwave the potatoes for a minute or so just to take the chill off. Once the filling is simmering and the potatoes are warm, spread them over the surface as in the recipe, and proceed as usual. Alternatively, if you’re really short on time the day you plan to serve, you can totally make the whole thing ahead the day before, and then reheat it before serving—it won’t be quite as wonderful, but it’ll still be delicious.

find us on instagram and let us know what you made!

Filed Under: dinner, every recipe, lunch, main courses, side dishes, vegetarian Tagged With: baharat, carrots, cilantro, fall, herbs, mushroom, parsley, peas, potatoes, walnut, winter

frosted brownies with pistachio and orange blossom

October 31, 2019 by Kathryn Pauline 4 Comments

Well, I’m glad I finished kitchen-testing these frosted brownies a few weeks ago, because a recent disaster has rendered my kitchen ovenless for the next several weeks.

We moved into our new apartment a couple weeks ago, and our kitchen is finally coming together! All our stuff showed up from Hong Kong on Monday, and it’s so nice to have my stand mixer back. Then yesterday, just as we finally finished unpacking the very last box, just as I finished recipe developing for a deadline, and literally the second I idly thought “ooh, I should share some photos of our new kitchen!”… the glass door to our brand new oven exploded!

I was roasting squash, and standing on the other side of the room when it happened. Oh well! Luckily, I finished working on this brownie recipe long before all the drama, and I’m so excited to share it with you today! I’ll keep my fingers crossed that your oven door doesn’t explode in the pursuit of these frosted brownies.

I mean, thankfully squash was the only victim in my case. If it had been this particular brownie batter, I might’ve actually cried.

What makes these frosted brownies so special?

  • They are frosted with an easy orange blossom cocoa cream cheese frosting (two flavors I love pairing). You can absolutely leave out the orange blossom water for a bomb sheet of classic brownies. The recipe absolutely stands on its own.
  • The batter is also infused with orange blossom water, and laced with pistachios for a little crunch and color. (But again, feel free to leave out the orange blossom water. And feel free to use walnuts in place of pistachios)
  • I used my favorite brownie method—beat eggs together with sugar until light and a little fluffy, fold in the oils, then fold in the dry stuff, and bake until perfect.

I don’t love brownies that are either too light and cakey or too dense and fudgy. So these ones are somewhere in the middle. They’ve got a killer crust (grab a corner piece while you can!) and a chewy center, and the amount of frosting called for in this recipe is no laughing matter. I’ll just leave you with photo evidence and the recipe.

Enjoy!

Print

frosted brownies with pistachio and orange blossom

Print Recipe

5 Stars 4 Stars 3 Stars 2 Stars 1 Star

5 from 1 review

  • Prep Time: 15 minutes
  • Total Time: 2 hours
  • Yield: 16 brownies

Ingredients

for the brownies:

  • butter for greasing the pan
  • 130g flour (1 cup)
  • 60g cocoa powder (2/3 cup), preferably dutch-process
  • 113g melted unsalted butter (1 4-oz stick/8 tablespoons)
  • 53g canola oil (1/4 cup)
  • 30g orange blossom water (2 tablespoons), optional
  • 3 large eggs (155g)
  • 350g sugar (1 3/4 cup)
  • 3g salt (1/2 teaspoon)
  • 80g coarsely chopped raw pistachios (1/2 cup), optional

for the frosting:

  • 40g cocoa (1/2 cup)
  • 175g powdered sugar (1 1/2 cups)
  • 56g unsalted butter (4 tablespoons), softened at room temperature
  • 227g cream cheese (1 8 oz stick), softened at room temperature
  • 23g orange blossom water (1 1/2 tablespoons), optional
  • 1 tablespoon finely ground pistachio for sprinkling, optional

Instructions

  1. For the brownies: Preheat the oven to 350° F convection (177° C).
  2. Butter an 8×8-inch pan (20×20 cm), and line with parchment (all the way around if you’d like, or just the bottom).
  3. Sift together the flour and cocoa powder. Set aside.
  4. Mix together the butter, canola oil, and orange blossom water. Set aside.
  5. Combine the eggs, sugar, and salt in the bowl of a stand mixer with the whisk attachment (or stainless steel bowl with a hand mixer). Beat at medium speed for about 3 minutes, just until it’s paler and thickened.*
  6. Add the butter mixture to the egg/sugar mixture, and fold together to combine.
  7. Once combined, add the flour/cocoa mixture, and fold together until it’s about halfway mixed. Add the 1/2 cup chopped pistachios and continue to stir together until there are no large clumps of flour (don’t over-mix).
  8. Pour into the pan, smooth out the top, and bake for about 35 minutes, until a toothpick or paring knife inserted into the center comes out clean.
  9. Let it cool at room temperature for about 20 minutes, then freeze for about 1 hour in the pan, until the entire thing is completely chilled (but not yet frozen). This will help it slice more cleanly, but you can skip this and just let it cool to room temperature instead. Remove from the pan, remove the parchment, and place on a serving dish.
  10. While you wait for the brownies to cool, make the frosting: Combine the cocoa, powdered sugar, butter, cream cheese, and orange blossom water (in that order!) in the bowl of a stand mixer with the whisk attachment (or a stainless steel bowl with a hand mixer). Mix at very low speed until the cocoa and powdered sugar incorporate, and then increase the speed to medium-high and beat for about 3 minutes, until there are no more lumps and it’s a little lighter and fluffier.***
  11. Dump all of the frosting into the center of the brownies. Use an offset spatula to work the frosting almost to the edges. Then make a few swoops in it with the spatula. Decorate with the final 1 tablespoon of finely ground pistachios and slice into 16 pieces.

Notes

* Don’t beat the eggs and sugar quite as much as you would if you were making a sponge cake.

** If you’d like, you can make this without the cream cheese frosting. Simply decorate the brownies with the 2 tablespoons ground pistachios before baking, and skip the frosting.

*** You can make everything ahead up to this point, and then frost it later, a little while before serving (see notes on storage below)

Storage: These brownies hold pretty well in the refrigerator for a few hours, but longer than 12 and they will start to stale a bit (like many baked goods), so you should avoid refrigerating them by frosting them closer to the last minute. If you’re making them ahead for guests, you can bake the brownies ahead and keep them at room temperature for about 24 hours before losing any quality, or freeze the whole sheet of unfrosted brownies for up to 3 months (wrapped tightly) if you want to store them longer. You can also make the frosting ahead and keep it in the refrigerator for a few days. Bring the frosting to room temperature so it’s spreadable, and let the brownies thaw at room temperature (if you froze them), and then frost them at the last minute (or frost them a few hours ahead and store in the refrigerator). If you have any frosted leftovers, they freeze beautifully.

find us on instagram and let us know what you made!

Filed Under: every recipe, sweets Tagged With: bars, brownies, chocolate, cookies and bars, cream cheese, cream cheese frosting, frosting, orange blossom water, pistachio

  • « Go to Previous Page
  • Page 1
  • Interim pages omitted …
  • Page 78
  • Page 79
  • Page 80
  • Page 81
  • Page 82
  • Interim pages omitted …
  • Page 183
  • Go to Next Page »

Primary Sidebar

Kathryn Pauline smiling

Welcome! I’m Kathryn Pauline, cookbook author, recipe developer, and photographer.

Footer

read our privacy policy

© 2017 - 2026 Kathryn Pauline