• Skip to primary navigation
  • Skip to main content
  • Skip to primary sidebar
  • Skip to footer
Cardamom and Tea
  • Blog
  • Recipes
  • About
  • Cookbooks
    • Piecemeal
    • A Dish for All Seasons (my first cookbook)

Protein Baked Oatmeal (no powder required)

February 6, 2026 by Kathryn Pauline Leave a Comment

protein baked oatmeal with yogurt and berries

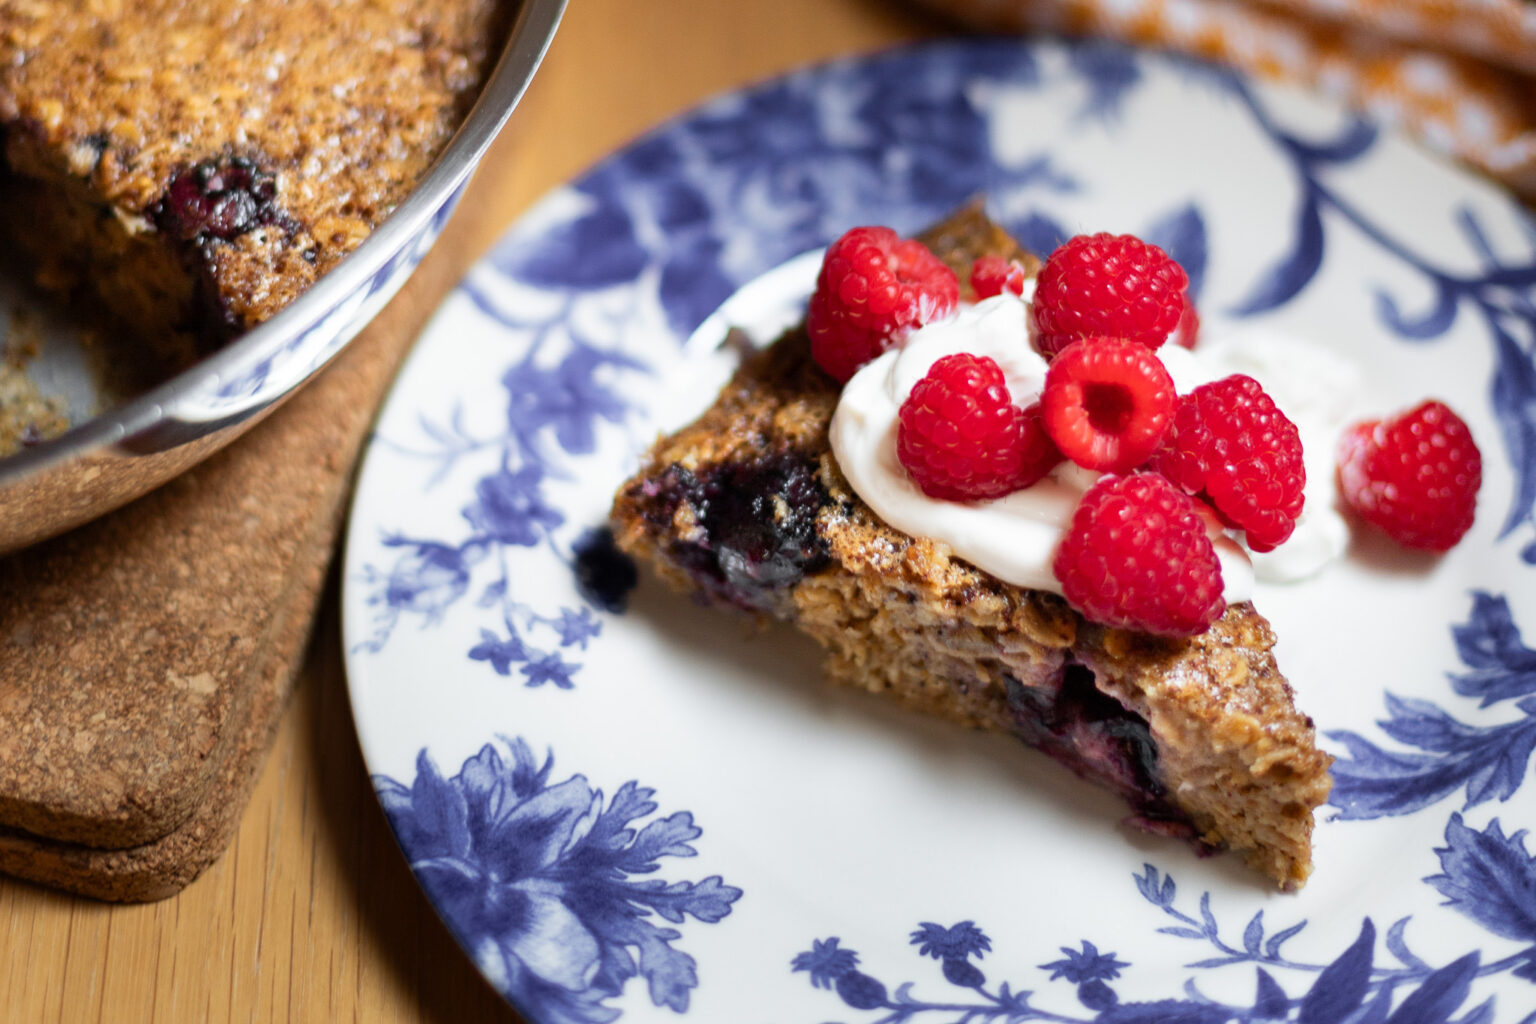
This protein baked oatmeal recipe kills two birds with one stone: By adding 6 entire eggs (💪💪!!), we add protein while also adding a rich, custardy texture. And all that comes as a great relief to me because:

1) I’ve never been a fan of baked oatmeal. It often emerges from the oven as a squelchy, sodden blob. Not this one though! Adding more eggs creates the perfect binder. If you’re a fan of egg tarts, bread pudding, or French toast, then this is the baked oatmeal for you.

2) I am always trying to find ways to add a bit more protein to my breakfasts. But I really, really dislike adding protein powder to baked things. I like protein powder in a smoothie, but it has a tendency to taste chalky when heated. Eggs are a whole other story though!

Read on for a bit more context, or jump to the recipe to hit the ground running. [April 17 edit: I have made this recipe every single week for the last ten weeks, since posting it. We are a bit obsessed!]

protein baked oatmeal

What’s to love about eggs in baked oatmeal?

1. They add a custardy flavor and texture.

If you love custardy baked goods, you’re going to love this protein baked oatmeal. It’s inspired by my protein oatmeal recipe, where a couple eggs add both protein and a custardy vibe. There, they add creaminess, but here they also add a pleasantly chewy texture.

The banana, oat starches, and sugar help prevent the eggs from breaking or curdling. This isn’t flan or some complicated custard bake—it’s hard to go wrong.

2. They’re an easy way to add protein to baked oats (and you probably already have them on hand)

I asked Caroline Weeks, PA-C, RDN, about her take on eggs as a way of adding protein to oats, and she said, “Eggs are a refrigerator staple I most recommend to my patients because not only are they generally affordable[…], but they are a nutrition powerhouse. One egg contains 6 grams of high quality protein with only 70 calories and contains all nine essential amino acids important for building and repairing muscle while also supporting bone health. I also recommend eggs because they are one of the highest food sources of choline, a nutrient important for brain health and cognitive performance which about 90% of Americans do not get enough of.”

protein baked oatmeal with yogurt and berries

Substitutions

This protein baked oatmeal recipe is very adaptable. The recipe itself has substitution details, but here are the highlights:

  • Mix-ins: Choose whatever mix-ins you’d like. In the recipe, I suggest chopped nuts, chocolate chips, or blueberries. But you could try another low-moisture fruit instead (like cherries, raspberries, etc.), which I suspect would work equally well. There is no baking powder or soda in the recipe, so you don’t have to worry about berries turning green.
  • Sugar: In case you don’t use refined sugar, I’ve included maple syrup as an option. But if you need to scale back on added sugar in general, you can get away with adding less of either maple syrup or brown sugar. The amount in this recipe is not-too-sweet, so if you have a sweet tooth, you might want to add a bit more.
  • Dairy-free: I make this all the time with soy milk instead of cow’s milk. You can use another milk substitute, but if you’re trying to increase the dish’s protein content, keep that in mind when selecting an alternative milk.

There’s just one thing you can’t really substitute here (womp womp):

  • Egg-free? (sorry—the answer is no!): This recipe is hard to veganize, since the whole point is the eggy custard texture and flavor. I’ve been meaning to try it with a vegan egg substitute (e.g., JustEggs), but have not tried that yet, so I can’t say for sure it would work (let me know if you give it a try!). But I absolutely do not recommend using something like a flax/chia egg for this. It will not have the right flavor or texture.

“Baking” it in the microwave (edit: April 23, 2026)

Kathryn from the future here! Our oven broke a few days ago, and as I mentioned in the headnote to this post, we are officially addicted to this protein baked oatmeal. We have no toaster oven, so I started to experiment with “baking” this in the microwave, which actually worked pretty well! It’s not exactly the same in texture—a bit more of a steamed pudding consistency, and any berries will explode and get saucy—but it works in a pinch. I prefer the oven version, but this one is worth trying, especially if you aren’t able to use the oven. Here are the details:

Scale the recipe down into a 1- to 2-serving portion:

  • 1 Tbsp (15g) mashed ripe banana
  • 5 Tbsp (30g) rolled oats
  • 1 egg
  • 3 Tbsp (45g) milk
  • 2 tsp (8g) sugar
  • 1 tsp (5g) oil
  • (plus cinnamon, vanilla, salt, and/or mix-ins—all as needed)

Combine ingredients in a microwave-safe bowl (see recipe below for details on the order to combine). Every microwave is a bit different, but I used mine at its default intensity and microwaved it for 4 minutes in the bowl. Keep an eye on it the first time you try this. The middle will look bubbly for a while, and should eventually set. Let it cool in the bowl before serving.

Print

Protein Baked Oatmeal (no powder required)

protein baked oatmeal
Print Recipe

5 Stars 4 Stars 3 Stars 2 Stars 1 Star

No reviews

  • Author: Kathryn Pauline
  • Prep Time: 5 minutes
  • Cook Time: 40 minutes
  • Total Time: 45 minutes
  • Yield: 6 large, 12 small servings

Ingredients

  • 1/3 cup [80 g] mashed ripe banana (about 1 banana)
  • 2 cups [200 g] rolled oats
  • 6 large eggs
  • 1 1/4 cups [300 g] your milk of choice
  • 1/4 cup [80 g] maple syrup or 1/3 cup [65 g] brown sugar*
  • 3 Tbsp neutral oil
  • 2 tsp cinnamon
  • 2 tsp vanilla extract
  • 1 tsp salt
  • Optional mix-ins (see note ***)
  • Serve with optional yogurt, maple syrup, and/or fruit at the table.

Instructions

  • Preheat your oven to 350°F [180°C]. Grease a 10-inch ovenproof skillet.
  • In a medium mixing bowl, combine the banana, oats, eggs (mash the banana first if it is not already mashed). Whisk together until there are no longer streaks of yolks or whites.
  • Add the milk (or “milk”), syrup or brown sugar, oil, cinnamon, vanilla, and salt. Whisk together to combine.
  • Add the mix-ins and fold to combine.
  • Pour into the prepared skillet and place in the oven.
  • Bake for about 40 to 45 minutes,** until the center is set.
  • Let it rest for about 10 minutes before scooping or slicing. Serve with additional maple syrup, yogurt, and/or fruit at the table.

Notes

* You can use more or less sugar than this if you’d like. Preferences vary, so here is a guide to help you decide:

  • Just right: This amount of maple syrup or brown sugar in this recipe yields a batch that’s not-too-sweet (as long as you don’t accidentally add both). It is not particularly sweet, but you can always add more maple syrup at the table if it does not turn out as sweet as you’d like it to be.
  • On the sweet side: If you like a sweeter baked oatmeal, feel free to add a tad more syrup or sugar than the recipe calls for.
  • Less sugar: If you want less added sugar, you can scale it back. Most people prefer it with the amount of sugar in this recipe, so if you do scale it back, be sure to serve it with lots of fruit on top (sliced ripe bananas, berries, etc.). I’ve made it with as little as 3 Tbsp brown sugar.

** I used a 10 inch stainless steel skillet, which took 40 minutes to cook perfectly. Nonstick will behave similarly. If you’re using glass or cast iron, it should take closer to 45 minutes (possibly longer), but I have not tested it in glass. If you are not using any mix-ins, it may cook through slightly than the instructions. Adjust accordingly and keep an eye on it.

*** Choose 1/3 cup chocolate chips, 1/2 coarsely chopped nuts, and/or 3/4 cup blueberries (fresh or frozen, but do not thaw)

find us on instagram and let us know what you made!

Filed Under: breakfast, dairy free, every recipe, gluten free, sweets, vegetarian, weeknight Tagged With: banana, berries, chocolate, cinnamon, eggs, nuts, oats, vanilla, yogurt

Spaghetti alle Vongole

January 28, 2026 by Kathryn Pauline Leave a Comment

spaghetti alle vongole

For the last 7 years, this spaghetti alle vongole recipe has existed as a 14-line recipe in my phone’s notes app. Any version of pasta with clams is a desert-island-dish for me, and this is the most delicious, easiest way to make it. Truth be told, I’ve always been a bit disappointed by the results of other vongole recipes I’ve tried, so I decided to officially write up, test, and share my tried-and-true one.

What’s my beef with most spaghetti alle vongole recipes? Not to be a negative Nancy, but:

  • Nearly all clam recipes make you throw away a whole bunch of perfectly good, 100% alive clams because of a common misconception about how to cook them. This recipe does not do that. More on that soon.
  • Most recipes for spaghetti with clams do not have you do a proper white wine reduction, which is the only way to get the right flavor.
  • A few vongole recipes over-complicate things and make you use a million different pots and pans. This recipe just uses 2 pots (one for the pasta, one for everything else) and does everything it can to streamline the process.
  • Most recipes do not account for the existence of super-salty clams, which can absolutely ruin a dish. But whether your clams have a normal amount of sodium or a bonkers amount, this recipe has you covered.

Jump to the recipe to start cooking, or read on to learn more about what makes this recipe easy (and also special).

clams
spaghetti alle vongole

What makes this recipe super flavorful:

The biggest risk with spaghetti alle vongole is blandness. I mean, it’s basically just clams and pasta, which is not the most thrilling starting point. But when it comes to flavor, this recipe has you covered:

1. Garlic, garlic, garlic! (and toasted breadcrumbs)

Garlic is the primary seasoning. Here it shows up in both the breadcrumbs and the white wine sauce via 9 whole cloves.

The toasted breadcrumbs also add a crisp and roasted flavor that would otherwise be missing from a whole lot of (let’s face it!) mushy ingredients. Furthermore, those breadcrumbs help the white wine sauce cling to the pasta. That means that every bite is packed with flavor.

2. White wine reduction

Most recipes do not call for enough wine to achieve a true reduction. To get the right flavor and texture, it needs to reduce down quite a lot. That means you need to start with a larger amount of wine to end up with the right amount in the end.

My recipe calls for about half a bottle, which reduces down into a super flavorful sauce (once before the clams go in, and again after they cook and release their “clam liquor”). The reduction process goes much more quickly than you’d think, especially if your pot is not super narrow.

I’ve seen some recipes that do not have you reduce the cooking liquid after cooking the clams. In my experience, that leads to a soupy mess. Clam liquor itself is not a sufficient pasta sauce. And I’ve also seen recipes that have you reduce the liquid with the clams still in the pot, which almost certainly results in overcooked clams.

The key to a good spaghetti alle vongole: reduce, reduce, reduce! (Just get those clams out of there first!)

spaghetti alle vongole

What makes this recipe efficient and fool-proof:

Spaghetti alle vongole is easy to over-complicate. It’s also easy to get wrong in a few key ways. This recipe keeps things streamlined, and it also gives you the tools you’ll need to handle a few potential pitfalls.

1. You have full control over the saltiness.

All clams give off a different amount of saltiness. I live right by a fish market where you can buy clams that were happily burrowed in the sand just a few hours ago. I’ve also used clams from the supermarket (you know, the ones that come in those vacuum-sealed bags). My fish market clams give off an absurd amount of salt, even after purging. The clams from my supermarket don’t give off nearly as much.

This means you have to taste the sauce and adjust. Normally, reducing the amount of salt in a dish is impossible after the fact, but this recipe includes tricks for both over-salted and under-salted clams:

If your clams don’t give off much salt, you can add a bit of your own (duh). And if they give off too much salt, you just scoop out a bit of the clam liquor, discard it, add some more wine to compensate, and reduce down from there.

2. Just two pots.

It’s hard to get spaghetti alle vongole down to just 1 pot, since it’s most efficient to cook the pasta at the same time as the sauce. But this recipe does get it down to just 2 pots. You toast the breadcrumbs, and then reuse the same pot for the clams without washing it. Many other recipes have you jumping back and forth from one pot to another, using a separate one for the clams, the sauce, the pasta, etc. I’ve tried to streamline that as much as possible because I hate doing dishes as much as the next home cook.

3. No wasting perfectly good clams.

Most recipes don’t quite get the process of cooking live clams, which leads to wasting perfectly good shellfish.

The most essential step is to throw away any cracked, chipped, or unresponsive clams before cooking. If an uncooked clam is flopped open and doesn’t close when you disturb it, it is dead. If any clams are cracked or chipped, you should assume they are dead. A tightly closed, completely intact clam is most likely a live clam.

Once you cook them, most of the clams will open after about 5 minutes, but a few might stay closed. This is where most recipes would tell you to throw them away. But you can actually test to see whether they are indeed dead. Remove the open ones, and give the closed ones a couple more minutes to cook. If they open after a couple more minutes, then they simply needed a little more time. If they stay closed, then you should discard them. Those clams were (spoiler alert!) dead all along!

spaghetti alle vongole
Print

Spaghetti alle Vongole (the easiest spaghetti with clams)

spaghetti alle vongole
Print Recipe

5 Stars 4 Stars 3 Stars 2 Stars 1 Star

No reviews

Ingredients

For the topping:

  • 1 Tbsp extra virgin olive oil
  • 2 medium cloves of garlic, crushed through a press
  • 2/3 cup [50 g] panko breadcrumbs
  • 1/2 cup [20 g] chopped parsley

For the clams:

  • 7 cloves of garlic, sliced thinly
  • 1 1/2 cups [350 g] dry white wine (about half a bottle*)
  • 2 lb [905 g] fresh, live clams, purged**
  • 1/4 cup [60 g] extra virgin olive oil

For the pasta:

  • Boiling water
  • 10 oz [285 g] spaghetti (or another long pasta)

Instructions

  1. Place the olive oil and crushed garlic in a medium stockpot or dutch oven and set over medium heat. Once the garlic starts quietly sizzling, add the breadcrumbs and stir everything together. Stir constantly until the breadcrumbs turn golden brown (about 5 minutes).
  2. Once the bread crumbs have toasted, remove to a bowl. Place the parsley in another bowl. Do not wash the pot.
  3. Set the pot back over high heat. Add the sliced garlic and white wine. Bring to a boil and let it boil for about 10 minutes, until it’s reduced to just about 1/2 cup and thickens slightly.
  4. In the meantime, bring a large pot of water to a boil. Don’t salt it.
  5. Add the clams to the wine reduction. Cook for 5 minutes over medium-high heat, just until most of the clams open. Remove opened ones with a slotted spoon to a large bowl, leaving behind any closed ones. Cook the closed ones*** for another 2 minutes. Throw out any ones that never open and keep the newly opened ones.
  6. Raise the wine/clam liquor to high heat. Taste and see note if it is extremely salty.**** Let it reduce down for about 5 minutes. It should once again thicken and reduce down to about 3/4 cup.
  7. While you’re waiting for the sauce to reduce, place your pasta in the boiling water and cook to al dente according to the package instructions. Once done, drain and do not rinse (toss in a little olive oil if the sauce is not done).
  8. Taste the sauce again and adjust seasoning. It should taste salty but not too salty. Once you’re happy with the sauce, add the olive oil, clams, and pasta and remove from heat.
  9. Add half the breadcrumbs and half the parsley to the pot with the clams and pasta. Toss together. Move to a serving bowl, top with more breadcrumbs and parsley, and enjoy.

Notes

* This is not time to break out a pricey bottle. Use whatever inexpensive wine tastes pretty good to you. You shouldn’t wince when you take a sip, but you don’t need to want to take another.

** Purging means letting your clams sit in salty water for an hour or so and then lifting them out. You should also sort through your clams and discard any dead ones (those are flopped open and/or broken). Here’s a great guide to purging.

*** It’s a common misconception that closed clams are necessarily dead. Once cooked, clams release and flop open. Closed clams usually just need another couple minutes of steaming with the lid on. However, if they don’t open even after a few more minutes of cooking, throw those away. Never eat a clam that does not open after steaming.

**** If it is too salty, don’t despair. Remove some of the liquid (remove a lot if it’s extremely salty). Add some white wine to replace the amount lost, and reduce from there. Clams range a lot in their saltiness. I’ve needed this trick a few times, but I’ve also had times where I did not need to use it. It really depends!

Video note: If you don’t see the video for this post after scrolling up, please disable ad block and try reloading the page.

find us on instagram and let us know what you made!

Filed Under: dinner, every recipe, lunch, main courses Tagged With: garlic, olive oil, parsley, pasta

  • « Go to Previous Page
  • Page 1
  • Interim pages omitted …
  • Page 13
  • Page 14
  • Page 15
  • Page 16
  • Page 17
  • Interim pages omitted …
  • Page 183
  • Go to Next Page »

Primary Sidebar

Kathryn Pauline smiling

Welcome! I’m Kathryn Pauline, cookbook author, recipe developer, and photographer.

Footer

read our privacy policy

© 2017 - 2026 Kathryn Pauline