• Skip to primary navigation
  • Skip to main content
  • Skip to primary sidebar
  • Skip to footer
Cardamom and Tea
  • Blog
  • Recipes
  • About
  • Cookbooks
    • Piecemeal
    • A Dish for All Seasons (my first cookbook)

creamy rice pudding

August 29, 2021 by Kathryn Pauline 1 Comment

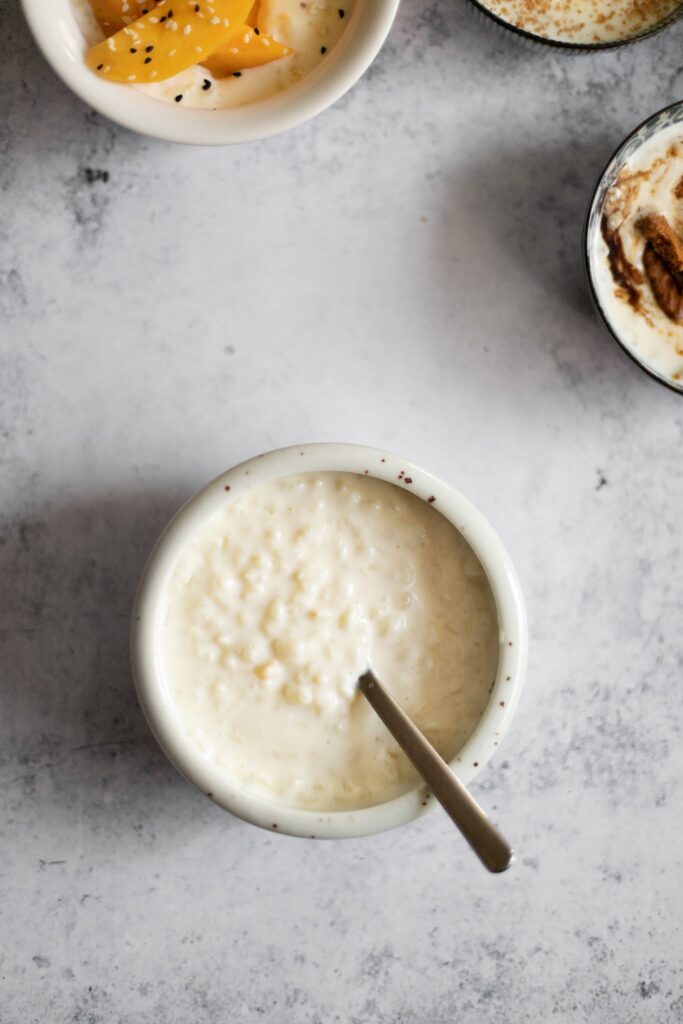
Rice pudding is too often a stodgy blob. Typically, it bubbles away until it’s the consistency of peanut butter, then you plonk it into a bowl, and it immediately sets up like concrete. But lucky for us, it’s super easy to make perfectly silky, creamy rice pudding instead.

This particular recipe has the consistency of a lovely custard or pastry cream. Pour it into cute little bowls, top it with all your favorites, and enjoy hot or chilled.

There are two secrets to this recipe’s deliciousness:

1) make it creamy by using enough liquid, and

2) make it al dente by adding the rice in two stages.

how to make your rice pudding creamy

The secret to perfectly creamy rice pudding? Use enough liquid!

My recipe uses almost twice as much liquid as your average rice pudding recipe. It might seem like way too much when you first throw it together. But after a long simmer, the rice absorbs a ton of liquid, and also gives off a ton of starch. That starch thickens the liquid it’s cooking in, and it all ends up being the perfect amount.

how to make it al dente

Creaminess is all well and good, but to keep it from turning out mushy (or worse, totally runny!), I add the rice in two stages.

Here’s why that works:

The first addition of rice cooks for-absolute-ever, until it starts to break down and thicken the liquid. You’ll notice slightly bigger bubbles in the milk, and the whole thing will take on an almost creme-anglaise-like consistency. *

You add the second addition of rice once the first addition has done its job. The first batch thickened the liquid, but the second batch only needs to cook until it’s al dente. That way you’ll have some chewier grains in the mix. As these rice grains cook, they give off even more starch, and the liquid thickens further.

And voilà! You’re left with a perfect pot of pudding!

* Note: You could actually stop adding rice after the first addition, let it simmer for a while longer, and serve it as a more Middle Eastern style rice pudding (extremely silky smooth, and not super set).

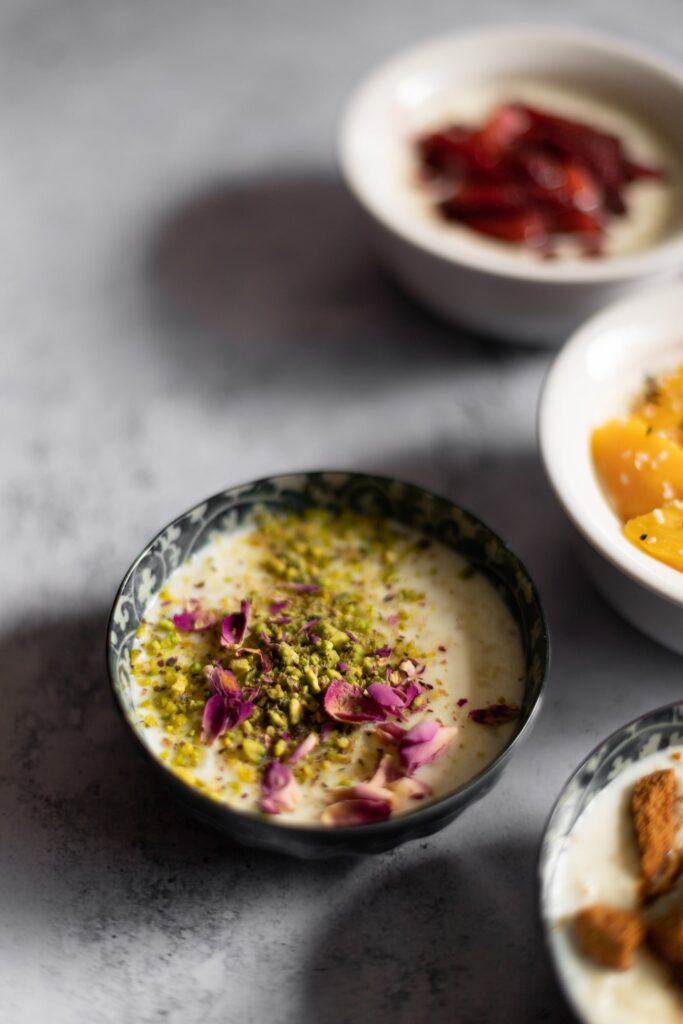
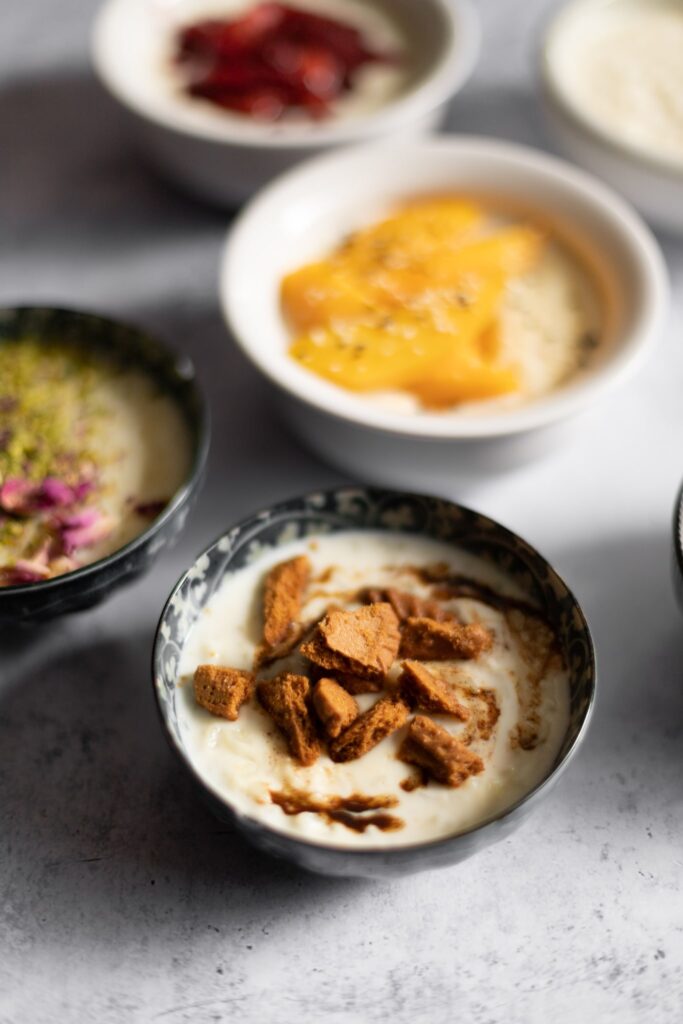
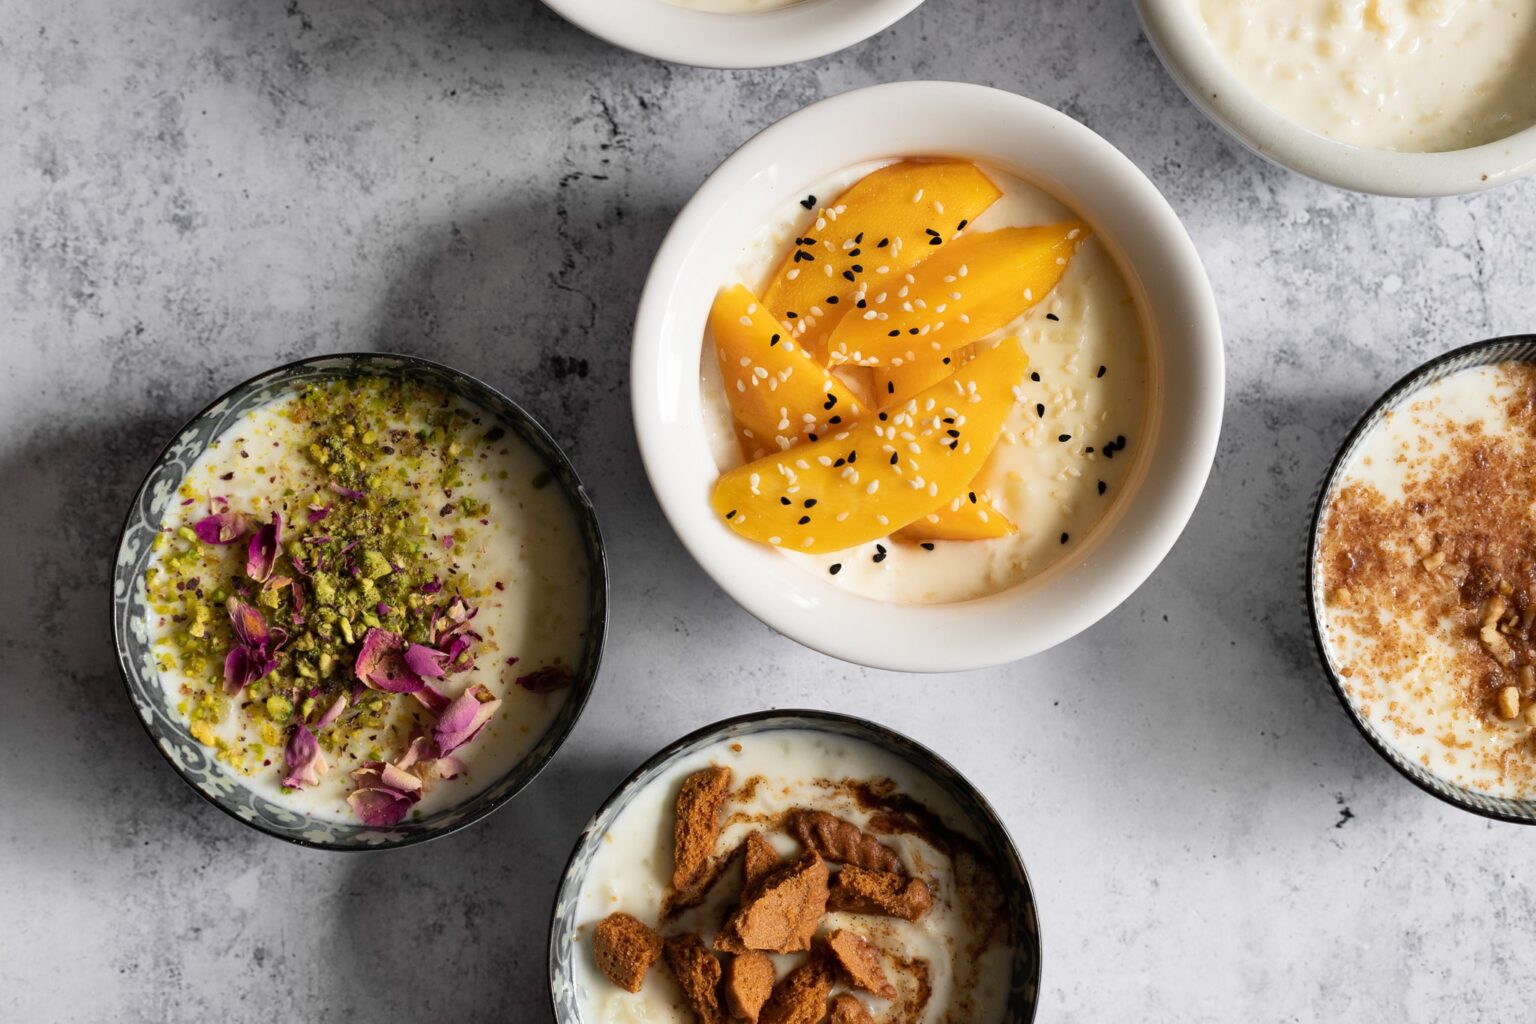
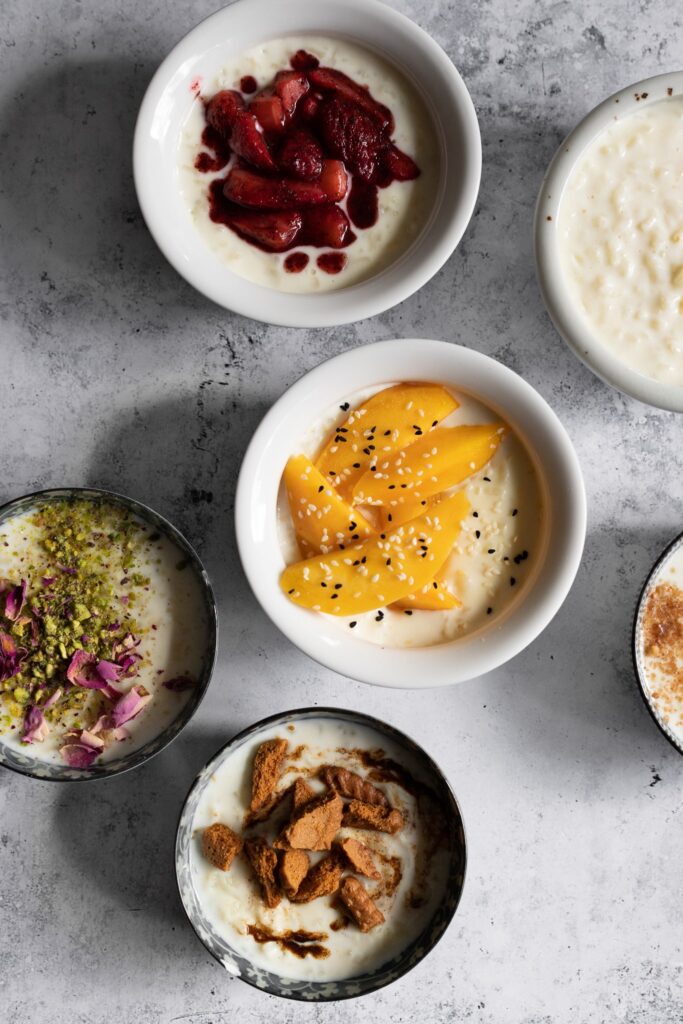
rice pudding toppings

The recipe below includes 5 ideas of toppings for your rice pudding. But feel free to get creative, or even enjoy it plain on its own. You can’t really go wrong!

The 5 described at the end of the recipe below are:

  • Rose pistachio
  • Cinnamon walnut
  • Strawberry sumac
  • Thai mango sticky rice
  • Vanilla biscoff

Enjoy the recipe, and don’t miss my post on creamy oatmeal. Because apparently it’s my mission in life to get people to add more liquid to their puddings and porridges.

Print

creamy rice pudding

Print Recipe

5 Stars 4 Stars 3 Stars 2 Stars 1 Star

5 from 1 review

  • Author: Kathryn Pauline
  • Prep Time: 5 minutes
  • Cook Time: 50 minutes
  • Total Time: 55 minutes
  • Yield: 8 servings

Ingredients

  • 1 cup [200 g] medium grain rice, split into ¾ cup [150g] and ¼ cup [50g]
  • 6 cups* [1440 g] milk of choice
  • 2 cups [470 g] water
  • ⅓ cup [65 g] sugar**
  • 1 pinch salt
  • Flavorings and/or toppings (see note)

Instructions

  1. Combine ¾ cup rice, milk, water, sugar, and salt in a large dutch oven or small stock pot.*** Bring to a low boil over medium-high heat, stirring occasionally. Once boiling, lower the heat and let it simmer uncovered for about 30 minutes, until the rice is starting to fall apart. Stir occasionally as it simmers.
  2. Add the remaining ¼ cup of rice, and simmer for another 20 minutes, unti that rice is cooked through but still holding its shape, and the liquid has thickened significantly. Stir a little more frequently for these last 20 minutes, scraping the bottom often. If/when it develops a skin, feel free to lift it away with a fork, or just stir it back in.
  3. It should be a pourable consistency, but not runny. It will set a little more once you pour it into bowls. Stir in any flavorings (if using) off the heat, pour into individual servings, and sprinkle on toppings (if using).

Notes

* May 7, 2026 update: I used to make this recipe with 8 cups of milk, but now make it with 6 cups of milk and 2 cups of water. This prevents scorching better than the full amount of milk and results in a creamy, rich flavor despite the reduced amount of dairy. If you’ve been making this recipe for years and you’ve been happy with it, feel free to make it with 8 cups of milk instead of the milk and water.

* I don’t like my rice pudding to be super sweet, so I only add 1/3 cup of sugar. But if you prefer a sweeter pudding (especially if you won’t be topping it with something sweet), feel free to increase this amount, to taste.

** If you use a very wide pot, you may need to top it off with a little more water as the second rice addition cooks (because more water will evaporate). On the other hand if it is too thin (perhaps because your pot is very narrow), feel free to cook it a bit longer to reduce down further.

Toppings and flavorings:

  • Cinnamon walnut: Sprinkle bowls with a mixture of chopped walnuts, brown sugar, and cinnamon
  • Thai mango sticky rice: Optionally make your rice pudding with a carton of coconut milk (not the kind of coconut milk from a can, but the kind from a carton that you might pour on cereal), top bowls with sliced mango and sesame seeds.
  • Vanilla biscuit: Stir in a teaspoon or two of vanilla extract or vanilla bean paste, top bowls with cookie crumbles.

find us on instagram and let us know what you made!

Filed Under: breakfast, dairy free, every recipe, sweets, vegan, vegetarian, weeknight Tagged With: middle eastern, rice

tomato basil soup with butter corn

August 15, 2021 by Kathryn Pauline 2 Comments

My favorite ramen is hands-down butter corn miso ramen. I love it so much that even when I order something else, I’ll often order extra butter corn as an add-on. We lived across the street from an Ippudo when we lived in Hong Kong, and I think I’ve tried (some might say ruined) everything on their menu by tacking on butter corn from their menu’s extras. And I don’t stop at ramen—I now add butter corn to pretty much any soup I make at home. It’s got a sweet crunch and silky beads of butter, and it’s just the best topping ever. And in late summer, butter corn is very at home atop a bowl of tomato basil soup.

tomato basil soup ingredient substitutions

I developed this recipe using canned tomatoes, but you can absolutely make it with a similar amount of fresh, especially if you’ve got a ton growing in your garden. Use about 6 or 7 medium tomatoes [1kg]. First halve your tomatoes, coat in a thin layer of olive oil, sprinkle with a little salt, and roast your fresh tomatoes cut-side-up at 350°F [180°C] for about 45 minutes, just until they soften and caramelize very slightly. Don’t let them fully dehydrate—you just want a little flavor concentration. Roasting adds a caramelized quality that you wouldn’t get with fresh or sautéed. If your fresh tomatoes are a little on the sad side, you can add 2 to 3 tablespoons [30 to 45g] tomato paste to liven them up.

You can also get away with using dried basil, though the flavor will be different. Substitute 1 tablespoon [3g] dried basil in place of fresh, and add it along with the stock so it hydrates and melds with the other flavors.

Also feel free to use frozen corn instead of fresh. It’ll just take an extra minute or two to sauté if you go straight from frozen. But whether frozen or fresh, tomato corn soup is better than just tomato soup.

Also feel free to cut back on the cream if you’d like, but keep in mind that a little cream goes a very long way in making tomato basil soup delicious. It comes out to slightly more than 1 tablespoon per serving, and makes all the difference. So feel cut back if you must. But don’t forget to live a little! It’s August—time to enjoy that glorious combination of butter fat and late summer veggies.

Print

tomato basil soup with butter corn

Print Recipe

5 Stars 4 Stars 3 Stars 2 Stars 1 Star

5 from 1 review

Ingredients

For the tomato basil soup:

  • 2 Tbsp extra virgin olive oil
  • 1 medium onion [180g], sliced
  • Salt
  • 28 oz [800g] can whole tomatoes with their juices (see note above recipe to use fresh)
  • 1 quart [940g] vegetable stock
  • 3 medium garlic cloves, crushed through a press [10 g]
  • ½ tsp [1.5g] freshly ground black pepper
  • ½ cup [120g] heavy cream
  • Leaves from 1 medium bunch basil [40g leaves] (see note above recipe to use dried)

For the butter corn topping:

  • 4 Tbsp [55g] butter
  • 1 cup [50 g] thinly sliced green onion
  • 1½ cup [210g] corn kernels
  • Salt
  • More basil, for topping (optional)

Instructions

  1. Place a stock pot or dutch oven over medium heat and let it heat for a few minutes. Once hot, add the olive oil, onion, and a pinch of salt. Cook stirring occasionally until the onions soften a little (about 5 minutes).
  2. Add the tomatoes, vegetable stock, garlic, and pepper, and bring to a simmer over medium-high heat. Reduce the heat to medium or medium-low to maintain a simmer. Simmer uncovered for about 5 minutes, just until the flavors meld a bit.
  3. Add the cream and basil, then blend with a high-power or immersion blender until completely smooth. If you use a blender, learn to do it properly so the top doesn’t pop off. 
  4. Make the butter corn topping: place the butter in a skillet over medium heat. Add the green onion and cook for about 1 minute, just until they soften a little. Once the butter melts, add the corn and a pinch of salt and continue cooking until everything is warmed through and slightly more golden, about 2 more minutes.
  5. Serve each bowl with a little spoonful of butter corn and a few basil leaves (if using).

find us on instagram and let us know what you made!

Filed Under: dinner, every recipe, gluten free, lunch, soups and stews, vegetarian, weeknight Tagged With: basil, corn, herbs, summer, tomato

  • « Go to Previous Page
  • Page 1
  • Interim pages omitted …
  • Page 55
  • Page 56
  • Page 57
  • Page 58
  • Page 59
  • Interim pages omitted …
  • Page 183
  • Go to Next Page »

Primary Sidebar

Kathryn Pauline smiling

Welcome! I’m Kathryn Pauline, cookbook author, recipe developer, and photographer.

Footer

read our privacy policy

© 2017 - 2026 Kathryn Pauline