People ask me about the significance of my blog name all the time. Cardamom is my favorite spice, and tea is my favorite drink, and the two are a perfect match, so that would be the easy answer, but that’s not exactly what inspired the name. There’s a very particular reason these are my two favorite things. Right before I started my blog, my sister and I were talking, and she reminded me that when we were growing up, our grandparents’ house always smelled like cardamom and tea.
One of my grandmother’s first jobs after immigrating was at the Swedish Bakery in Andersonville, Chicago. She had been living in the US for a few years, but she didn’t speak English yet, and the bakery owner, Mr. Bijour decided to place her at the cash register, which was incredibly stressful at first. But Marlies, the manager, who would later become the owner, gave her a study guide with all of the English phrases she would need for the job (this did the trick, and my grandmother started speaking English fluently in no time).


Even after she left her job to start working as a tailor, our family kept in touch with Marlies, and every year around Christmas time (right up until they closed up shop last year) she would sell my grandmother at least one pound of cardamom at cost, and this cardamom would end up dusted between thousands of layers of filo in dozens of trays of baklawa all year long.
Over the years, the whole house absorbed the scent of these bags of cardamom, tucked away in the pantry, as well as the heavenly aroma of cardamom baklawa, which was often baking away in the oven. The smell of cardamom had become a permanent fixture, whether or not there was any cardamom or baklawa actually present. And alongside the cardamom, there was the ever-present scent of black tea, or chai, as so much of the world calls it. We would drink chai and eat baklawa every weekend for dessert.


Ghraybeh (also spelled ghoraibi) isn’t a cookie I grew up eating, and I learned how to make it from Maureen Abood’s very helpful explanation and recipe. But while this recipe itself isn’t from my childhood, I’ve infused it with cardamom and tea, the namesake of my blog and my two most nostalgic sense memories. As you might expect, it’s perfect served with a cup of chai (which simply means “tea,” with or without spices—but either is lovely).
As anyone who’s tried it will tell you, the special thing about ghraybeh is its meltiness. This comes from the use of clarified butter instead of sweet cream butter. Clarified butter is entirely made up of butter fat, without any dairy solids or water, which are naturally present in unprocessed butter. Because clarified butter doesn’t have water, as long as you don’t add moisture to the dough, the clarified butter keeps the cookies from developing gluten, which makes the cookies even more crumbly and melty than shortbread made from sweet cream butter. To way oversimplify a complicated scientific thing (sorry scientists!), flour forms gluten when its proteins (gliadins and glutenins) combine with water. That doesn’t mean that avoiding water makes flour gluten free—wheat in all its forms is never suitable for a gluten-free diet. It just means that clarified butter lets you see flour from another delicious perspective.
cardamom and tea ghraybeh


loosely adapted from Maureen Abood’s ghraybeh
- Prep Time: 45 minutes
- Total Time: 4 hours 30 minutes
- Yield: about 2 dozen cookies
Ingredients
To clarify the butter:
- 227 grams (8 ounces / 2 sticks) unsalted butter*
To bake the cookies:
- 180 grams clarified butter, at room temperature**
- The contents of 2 bags of black tea (2 teaspoons of black tea)
- 1/4 teaspoon cardamom
- 125 grams powdered sugar (about 3/4 cup)
- 1/2 teaspoon salt
- 1/2 teaspoon orange blossom water
- 305 grams sifted all purpose flour (about 2 1/2 to 3 sifted cups) ***
- Optional: 25 to 30 blanched almonds or pine nuts
Instructions
- Clarify the butter: Melt the butter in a small saucepan over medium heat. Once the butter has completely melted, reduce the heat to medium-low and continue to simmer. Keep an eye on the temperature and adjust it as necessary, so that the butter solids don’t brown, and so that it doesn’t boil out of control. Within the first couple minutes, the white solids will separate from the yellow liquid (they will float to the top, and then some of them will sink to the bottom).
- Remove from heat as soon as the simmering has quieted down a bit, but before it goes silent—this should take about 7 minutes. Use a spoon to carefully skim off any curdled solids from the surface, and then slowly pour the liquid into a measuring cup, leaving behind any of the solids left at the bottom of the pot.
- Leave the butter at cool room temperature until it solidifies a bit (although it may still be runny), or refrigerate and then leave at room temperature to soften. You can also give it a head start by placing it in the refrigerator for about 30-45 minutes, and then at room temperature.
- To bake the cookies: In the bowl of a stand mixer (or with a hand mixer), beat the butter, tea, and cardamom with the paddle attachment for about 1 minute, until the butter becomes a little fluffier. Add the powdered sugar, salt, and orange blossom water and continue to beat for about 3 minutes, until it’s light and fluffy.
- Add the flour and mix together. Stop mixing once you can form it into a ball of dough.****
- Move the dough to a long sheet of wax paper, shape it roughly into a log, fold the wax paper over, and use an offset spatula or cutting board to apply pressure over the part where the two sheets of wax meet. Use this pressure to shape it into a round or rectangular log and place it in the refrigerator to solidify for about 45 minutes to 1 hour.
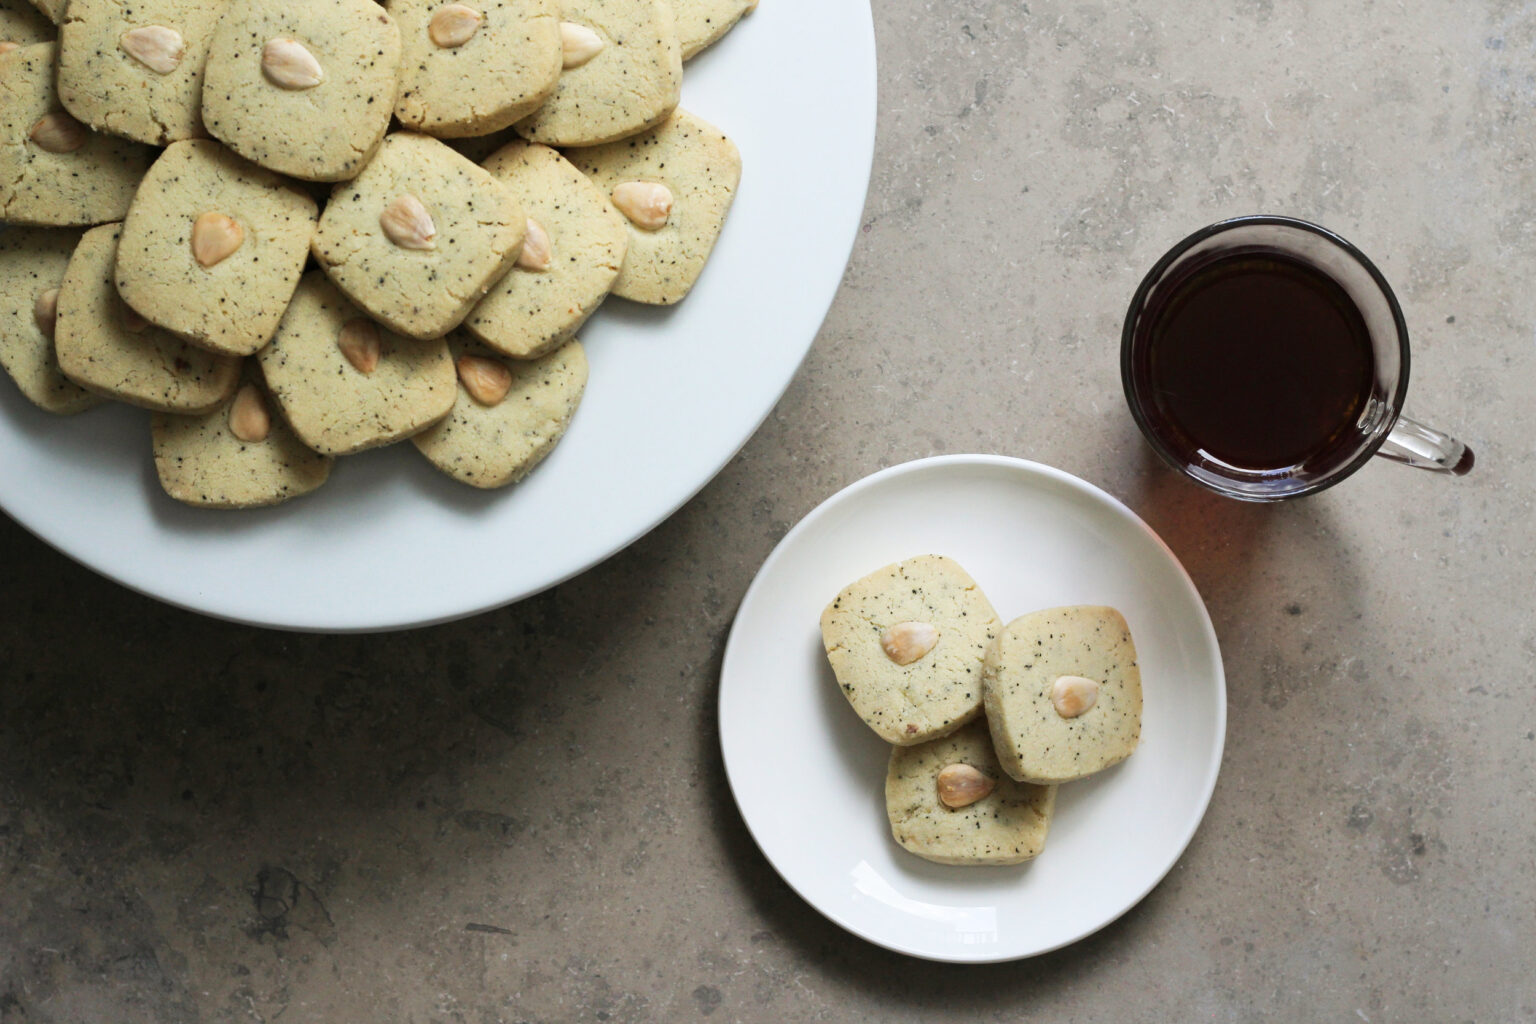
- Once the log is solid enough to hold its shape, slice off pieces that are between 1/4 and 1/2 inch thick, and place on parchment-lined baking sheets with some space between them (see above photo). (Optional): gently press one almond or pine nut onto the center of each cookie.
- Preheat the oven to 325° F, and let the sliced cookies come to room temperature while you wait on the oven to preheat (this prevents cracks).
- Bake for about 25 to 30 minutes, until the almonds are a little golden-brown (the cookies themselves shouldn’t change much in color).
- Cool on the parchment, and then serve with tea.
Notes
* I use European butter (because it’s most easily available where I live), which has less water. If you’re using American-style butter, use an additional 2 tablespoons, because yours might end up reducing more in volume.
** The melted clarified butter is 3/4 cup + 2 tablespoons volumetrically, in case you don’t have a scale.
*** If you weigh all your ingredients, you shouldn’t have any issues, but measuring with cups is less exact, so you need to be a bit more cautious if you don’t have a scale. Be sure to sift the flour before measuring 2 1/2 cups (I sift directly into the measuring cup with a flexible cutting board underneath to catch the spillover), and be sure to measure level cups by sweeping the tops with a straight edge (not packing it in). Too much flour will make the dough unable to stick together.
**** A perfect ghraybeh dough will seem crumbly when you mix it together, but it will stick together into a ball when compressed in your hand. If you measure everything by weight, you won’t have an issue, but if you do have an issue, don’t sweat it: if the dough won’t stick together, simply add an additional tablespoon of softened butter and work everything together, adding another one if it really needs it.