• Skip to primary navigation
  • Skip to main content
  • Skip to primary sidebar
  • Skip to footer
Cardamom and Tea
  • Blog
  • Recipes
  • About
  • Cookbooks
    • Piecemeal
    • A Dish for All Seasons (my first cookbook)

sfiha | meat pies

February 16, 2020 by Kathryn Pauline 12 Comments

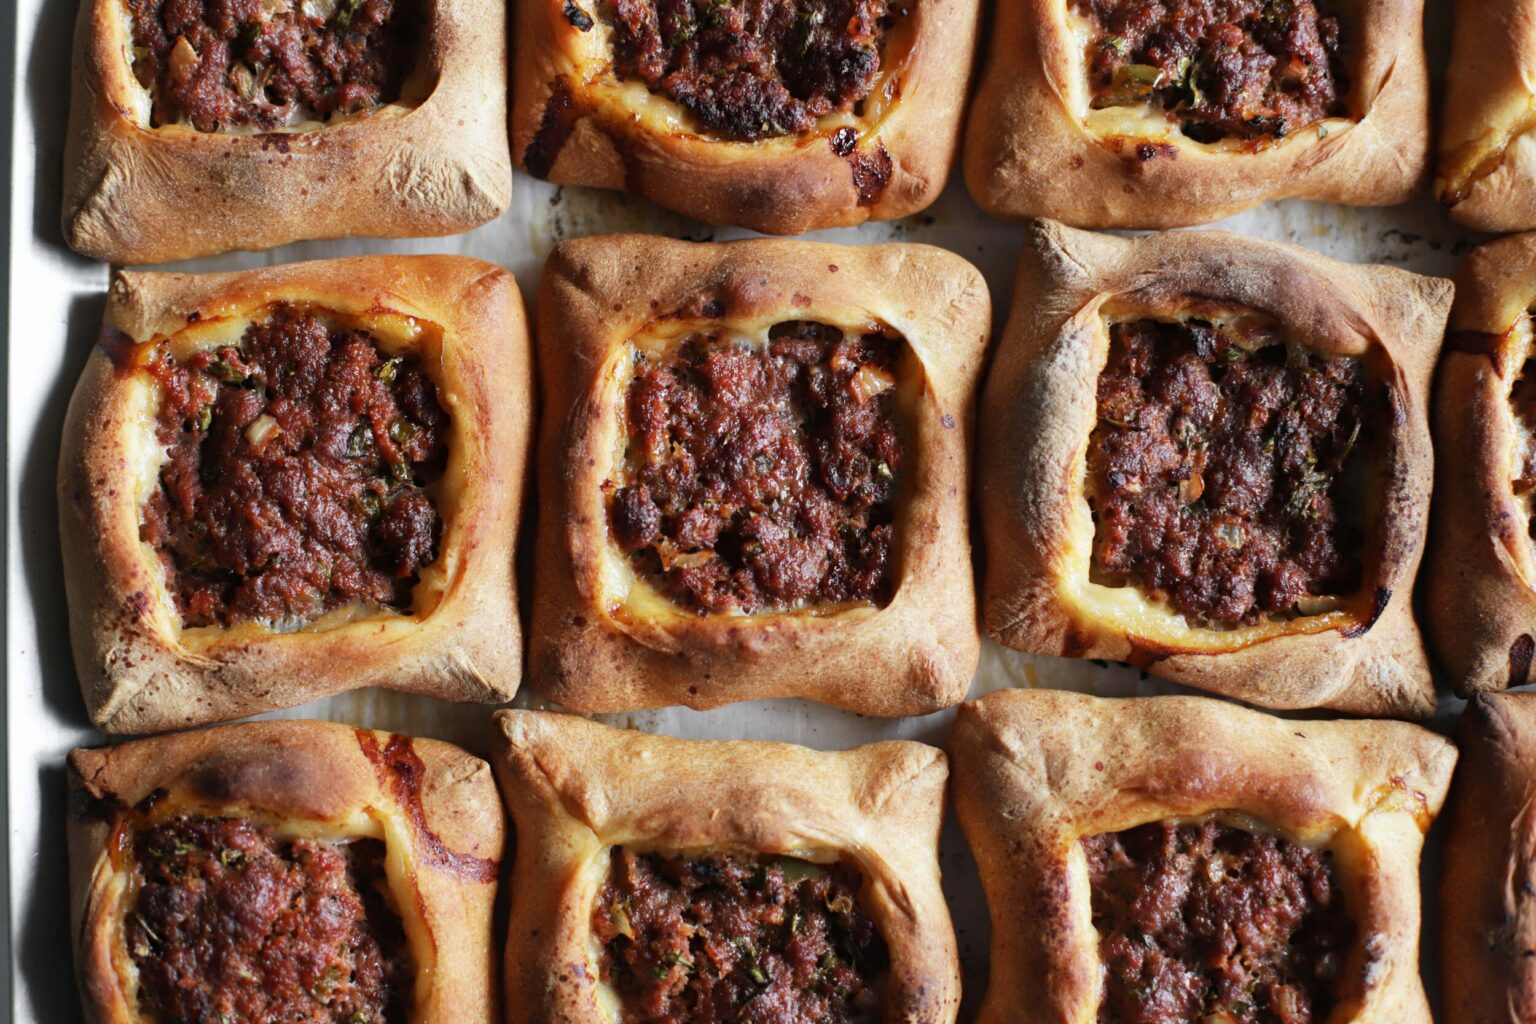
I’ve been tinkering a bit with my lahm bi ajeen/sfiha recipe from the last year or two. And I’ve finally decided that I prefer making them with the corners pinched, a style I picked up from some of my Lebanese friends. My cousin Kris originally taught me to make them the flat way, which works wonderfully if you have a pizza stone and an extremely hot oven—indeed, making them that way results in a chewy-crisp crust similar to the best pizza Napoletana.

But after two international moves in three years, it’s been a while since I’ve owned a pizza stone. Luckily, baking them with pinched corners at a lower temperature works great when you don’t have a pizza stone. Otherwise, without a stone, a thin, flat crust has a tendency to turn out either too crackery or too soft.

When it comes to the filling, I do one thing differently than most other lahm bi ajeen/sfiha recipes. The secret to a fail-proof recipe for sfiha? I add a tiny bit of bread crumb to the meat.

You don’t have to add breadcrumbs, and it’s not exactly traditional, but yields super consistent results. Before I started adding breadcrumbs, I occasionally struggled with the meat shrinking up into a little hockey puck in the center of the pie, and also had a couple batches turn out soggy from the excess liquid trapped by the pie’s sides. Breadcrumbs give excess moisture somewhere to go, and help prevent the meat from seizing up as the pies bake.

The following recipe only calls for two tablespoons of breadcrumbs. That’s just enough to help out with the moisture problem, without “watering down” the flavors and meat, so to speak.

Print

sfiha | meat pies

Print Recipe

5 Stars 4 Stars 3 Stars 2 Stars 1 Star

5 from 3 reviews

  • Prep Time: 30 minutes
  • Total Time: 1 hour 15 minutes
  • Yield: 16 small pies (each about the size of a slice of pizza)

Ingredients

  • 1 pound lean, ground beef (450g)
  • 2 tablespoons pomegranate molasses (35g)
  • 2 tablespoons tomato paste (30g)
  • 2 teaspoons olive oil (10g)
  • 1 jalapeño, seeded and minced (15g minced)
  • 1/4 cup chopped parsley (10g)
  • 1/2 small onion, minced (40g)
  • 1 tablespoon Greek yogurt or labneh (15g)
  • 2 tablespoons breadcrumbs (15g)
  • 3/4 teaspoon salt (4g, or more to taste)
  • 1/2 teaspoon ground black pepper (1g)
  • 2 lb pizza dough (905g)*

Instructions

  1. Combine the ground beef, pomegranate molasses, tomato paste, olive oil, jalapeño, parsley, onion, Greek yogurt, breadcrumbs, salt, and pepper.
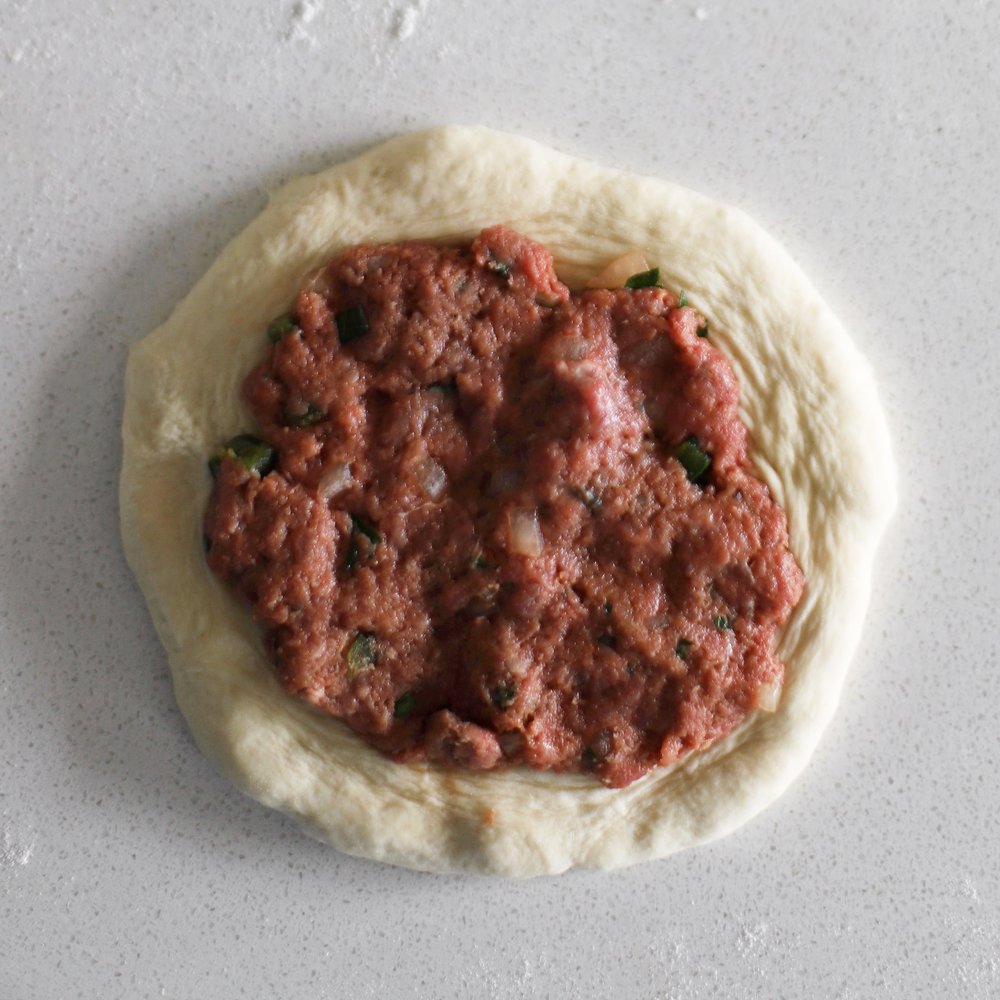
  2. Divide the pizza dough into 16 equal pieces (about 57g each). On a lightly floured surface, roll each piece into a ball, and roll each ball out into a circle, about 1/8-inch thick (start with the first ball you formed into a circle, which will give it a second to relax, and then move down the line). Move the circles to 2 parchment-lined baking sheets.
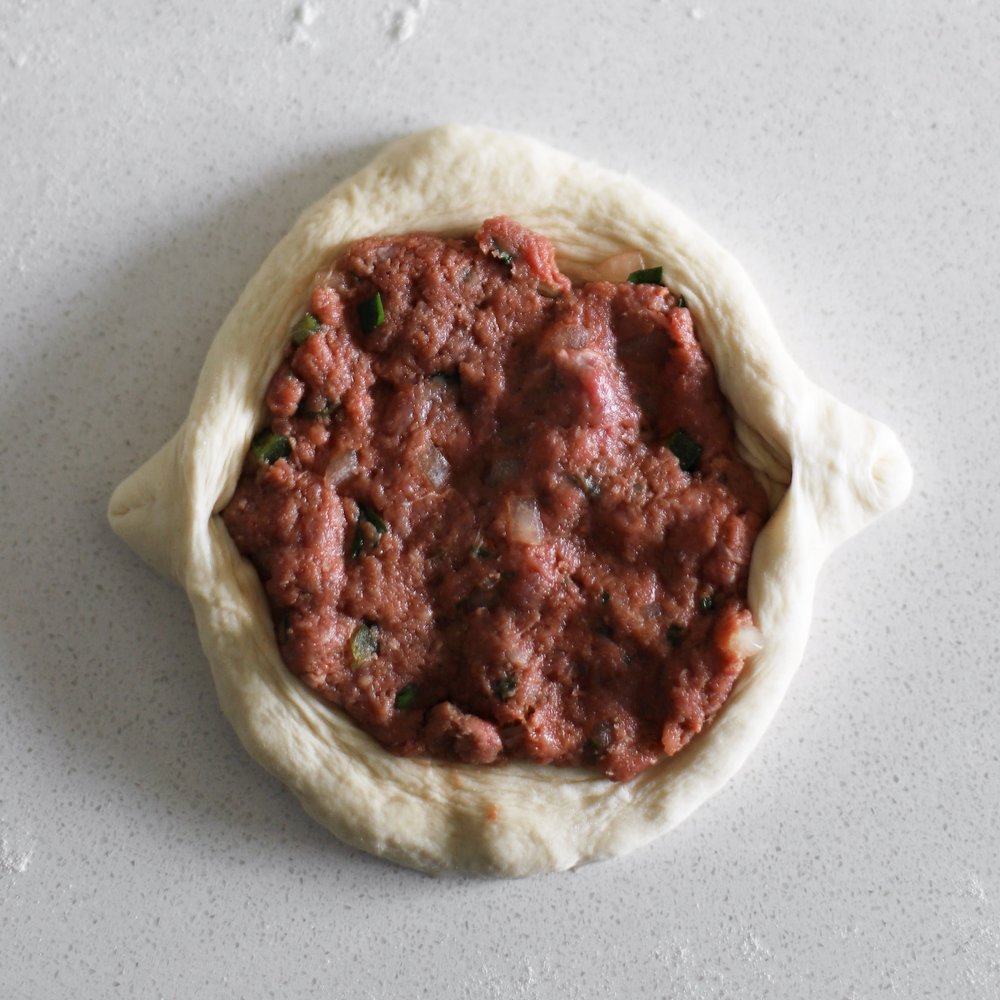
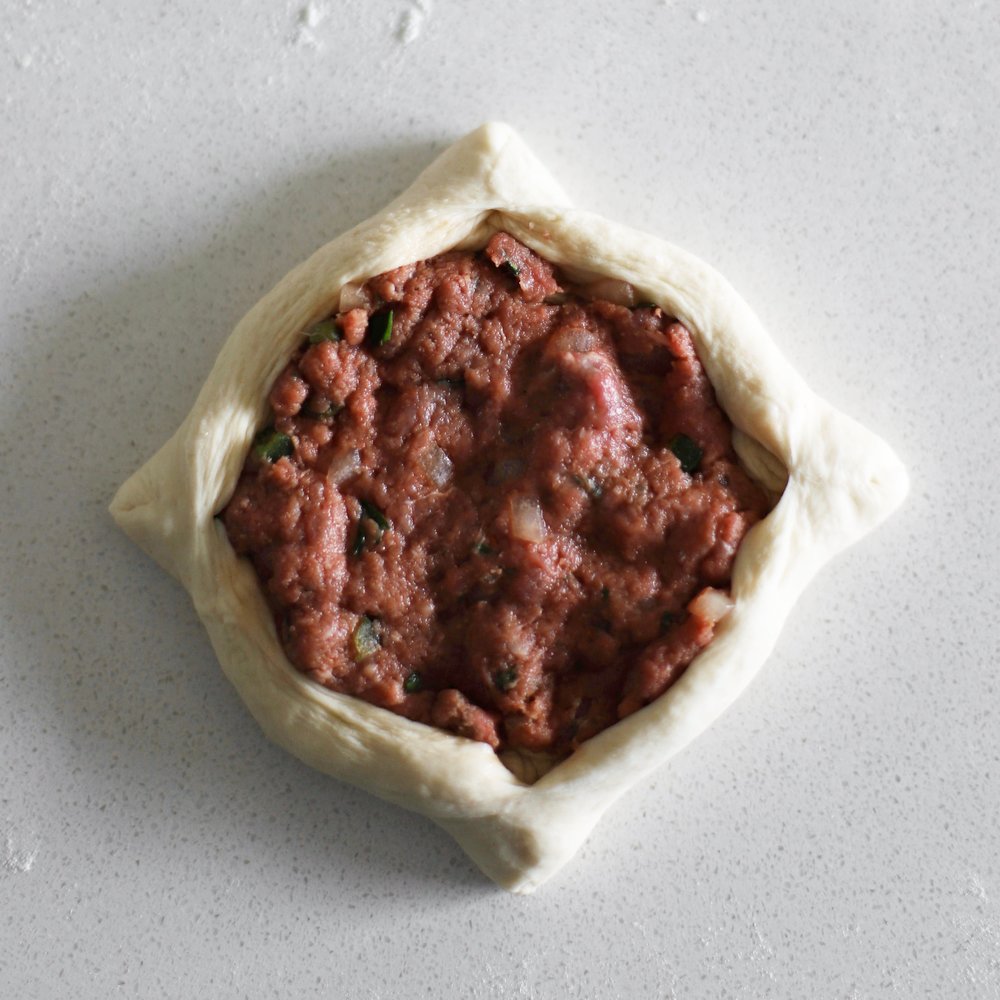
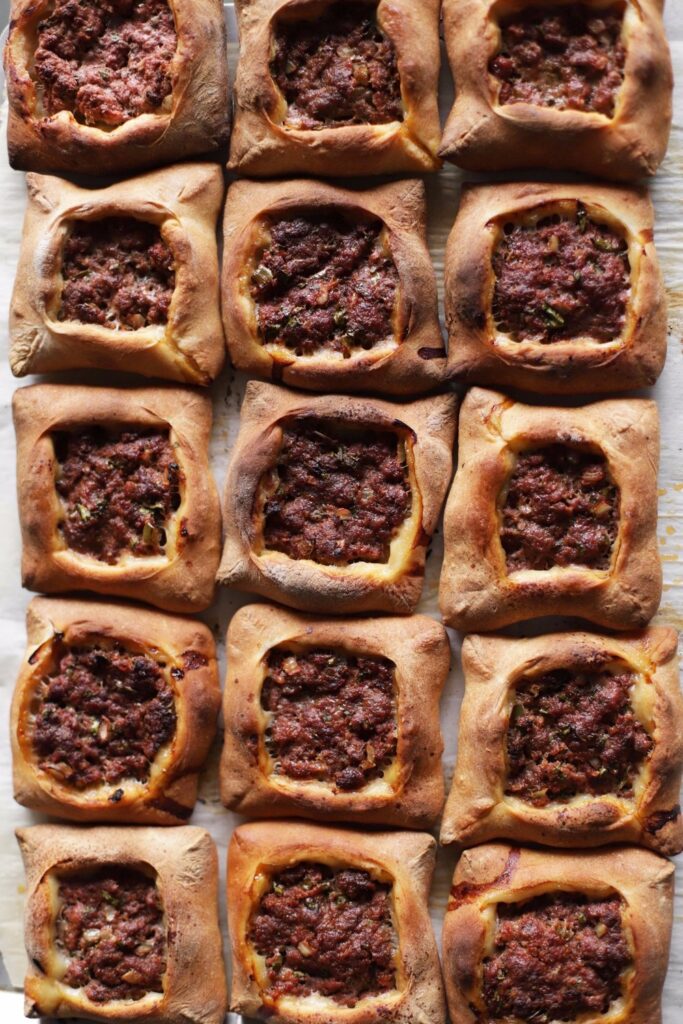
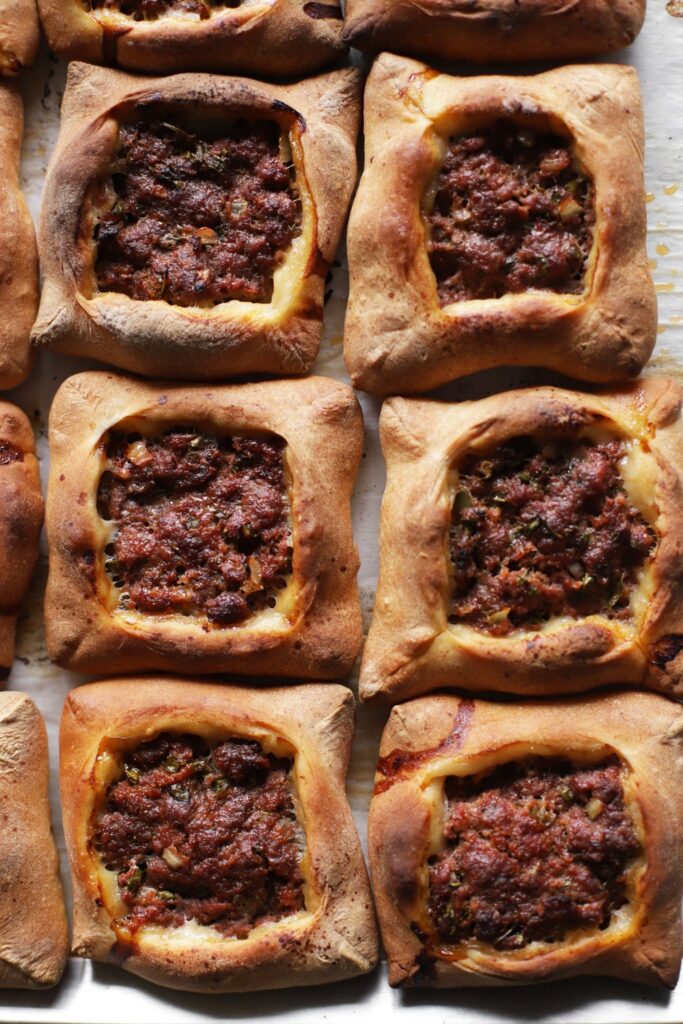
  3. Divide the meat into 16 equal pieces (about 38g each), and then place each piece in the center of each dough circle. Pat the meat down and spread it out, leaving a border between 1/4 to 1/2 inch. Pinch 2 opposite sides closed (see photos), and then pinch the other 2 sides closed. If the dough is too dry and floury, and you can’t get it to stick, brush lightly with water before pinching.
  4. Preheat the oven to 475°F (245°C) while the pies rise for about 15 minutes.
  5. Bake for about 25 minutes, until golden brown and cooked through. They will take less time to bake on a lower rack, and may take as little as 10.

Notes

* Store-bought dough works wonderfully, or feel free to make a double batch of the dough recipe from this post.

Making ahead and storing: These keep wonderfully in the freezer, but they (like any bread) will stale much faster in the refrigerator. I like to reheat them by microwaving them for just a few seconds to get them started thawing, then throw them in the toaster oven for just a couple minutes to thaw all the way through and crisp up a little (keep an eye on them to make sure they don’t burn).

find us on instagram and let us know what you made!

Filed Under: bread, dinner, every recipe, main courses, side dishes, weeknight Tagged With: beef, herbs, middle eastern, parsley, pizza dough, pomegranate molasses

biscoff cheesecake with sumac strawberries

February 6, 2020 by Kathryn Pauline 8 Comments

Cooking at home on Valentine’s Day is a lovely opportunity to skip the crowds, the restaurant floors with identical two-seaters as far as the eye can see, and the half-hearted and overpriced prix fixe Valentine’s Day menus. Stay in, cook together, and watch an old movie with a silly amount of transatlantic accents. And definitely enjoy this biscoff cheesecake with sumac strawberries. It’s sweet, tangy, and creamy, and leftovers keep wonderfully for days.

When I think of Valentine’s Day dessert, I always think strawberries, even though they’re woefully out of season in the US. So I usually end up finding a way to incorporate them while doing something extra to emphasize their flavor. The sumac in this recipe gives the strawberries a bit of extra berry flavor and tartness. So even if you’re working with sad February berries, you’ll be bringing out the best in them. Think strawberry rhubarb flavor in the middle of winter. Feel free to skip the sumac if you don’t have it around (or if your berries are perfect as is).

You can also totally use frozen berries for the puréed glaze, which will add some peak-strawberry flavor to the whole cake. Frozen berries’ texture isn’t ideal for enjoying whole, but they are much more flavorful than fresh ones out of season. Plus, they work great in any puréed applications. You can use leftover frozen berries + chocolate milk to make smoothies next Saturday morning. Maybe even blend in a piece of leftover biscoff cheesecake if you’re feeling it.

Print

biscoff cheesecake with sumac strawberries

Print Recipe

5 Stars 4 Stars 3 Stars 2 Stars 1 Star

5 from 1 review

loosely adapted from this King Arthur Flour Recipe

  • Prep Time: 30 minutes
  • Total Time: 4 hours
  • Yield: 8 standard or 12 small pieces

Ingredients

for the cheesecake:

  • 24 Biscoff Lotus cookies (185g)*
  • 4 tablespoons butter, melted (55g), plus more for coating the pan
  • 1 tablespoons sugar (15g)
  • 1/4 teaspoon salt (1g)
  • 2 8-oz packages cream cheese, softened to room temperature
  • 2 large eggs (110g)
  • 2/3 cup granulated sugar (135g)
  • 1/4 teaspoon salt (1.5g)
  • 16 oz small strawberries (455g)**

for the glaze:

  • 8oz medium strawberries (227g)
  • 1 tablespoon cornstarch (10g)
  • 1/2 cup sugar (100g)
  • 2 tablespoons sumac (10g)

Instructions

  1. For the cheesecake: Preheat the oven to 350° F convection (177° C).
  2. Finely grind the cookies in a food processor.
  3. Add the melted butter, sugar, and salt, and process until everything is well-blended.
  4. Lightly coat the sides of an 8 or 9-inch cheesecake round with oil or butter. Place the crumbly crust in the cheesecake round, and press it down into 1 even layer. Use a glass, measuring cup, or something else that has a flat bottom to press it compactly.
  5. Place the cheesecake round on a rimmed baking sheet and bake for 10 minutes. Let it cool a little while you work on the filling, and leave the oven on.
  6. Whisk the cream cheese, eggs, sugar, and salt together until completely smooth (whisk slowly so you don’t incorporate too much air).
  7. Pour the filling into the crust.
  8. Bake for about 30 minutes, until it’s just a little jiggly in the very center. Remove from the oven and let it cool to room temperature, then let it chill for at least 3 hours until it’s completely cold.
  9. Once it’s chilled, remove from the pan and place on a serving tray.
  10. Cut the tops off the strawberries, and then place them cut-side-down on the cheesecake.
  11. For the glaze: Hull the 8 oz of strawberries and place them with the cornstarch, sugar, and sumac in a small saucepan, and use an immersion blender to process until smooth (or use a food processor).
  12. Bring the puree to a simmer over medium-high heat. Simmer for about 1-2 minutes until the cornstarch activates and it thickens. Remove from heat and strain through a fine mesh sieve. Once you’re ready to use it, add a few drops of water and rewarm in the microwave until it’s a brushable consistency.
  13. Brush the strawberries generously with the glaze.

Notes

* Feel free to instead use graham crackers. Just use 1 tablespoon more butter with them.

** If you don’t have small strawberries, no worries—hull and slice them, and fan them out in a pretty design on the surface instead.

To store and make ahead: This keeps super well in the fridge. If you’re making it for guests, you can make it about 12-24 hours ahead of time and chill it (you might want to brush it with the glaze at the last moment, so it doesn’t get messed up from cling wrap). After a day or so, the strawberries will start weeping a little, but the leftovers are still amazing. If you want to store it longer, it freezes beautifully. I like to individually wrap them in plastic wrap, and then freeze. Thaw in the refrigerator overnight.

find us on instagram and let us know what you made!

Filed Under: every recipe, sweets Tagged With: berries, cakes, cheesecake, cream cheese, strawberry, sumac, summer

  • « Go to Previous Page
  • Page 1
  • Interim pages omitted …
  • Page 71
  • Page 72
  • Page 73
  • Page 74
  • Page 75
  • Interim pages omitted …
  • Page 183
  • Go to Next Page »

Primary Sidebar

Kathryn Pauline smiling

Welcome! I’m Kathryn Pauline, cookbook author, recipe developer, and photographer.

Footer

read our privacy policy

© 2017 - 2026 Kathryn Pauline