These cardamom buns taste a bit like Swedish kardemummabullar, but the inspiration actually comes from my grandmother’s baklawa, which is flavored with cardamom and sprinkled with pistachios; besides, they’re shaped more like the kind of cinnamon rolls I grew up with—you know, the kind that you pop out of a can when you wake up and realize there’s an unexpected snow day. These, on the other hand, take a little bit of extra planning, but they’re absolutely worth it and perfect for a lazy weekend morning. And if you roll out your dough as thinly as I suggest, you’ll get a trillion layers, which will delight the kind of person who likes to pick their food apart as if it were an artichoke… but it’ll also work for the kind of person who would rather eat their dessert in a few big bites (the dental records of the last photo in this post will clue you into how I like to eat these).


My recipe for cardamom buns does frosting a little differently than most cinnamon roll recipes. But let me just start by saying that I absolutely adore cream cheese frosting (it’s hands down my favorite). I just don’t always love the way it looks on swirl buns. First of all, I have yet to master the art of casually swooping and swooshing frosting with an offset spatula, so my cream cheese frosted cinnamon rolls always just end up looking really messy (and not in a good way). But also, I kind of hate buying ingredients only to use a couple tablespoons, and an open block of cream cheese is one of those things that ends up sitting at the back of my fridge collecting dust and eventually tiny pink mold spores. Ew.
For a more polished look, you can always use royal icing (which is just water or egg white and powdered sugar), but royal icing is kind of (hah, kind of…) lame compared to cream cheese frosting. In fact, I don’t really like royal icing unless it’s flavored with something tangy, so I usually make mine with a bit of lemon juice (e.g., my gingersnaps). But in this case, that’s not going to cut it. Lemony royal icing is no substitute for cream cheese frosting when it comes to swirl buns.
That’s where buttermilk royal icing comes in. It’s like if you could make cream cheese frosting drizzleable, instead of spreadable. It’s got the same tangy flavor, although it’s a little on the sweeter side (which is why I don’t overload the buns themselves with sugar). Plus—bonus!—you’re already buying buttermilk for the dough, so you won’t have to pick up another ingredient. And if you’re looking for a way to use up the rest of that buttermilk without cooking something, might I suggest strawberry milk?


cardamom buns

- Prep Time: 30 minutes
- Total Time: 3 hours 30 minutes
- Yield: 8 buns
Ingredients
For the dough:
- 3/4 cup buttermilk, at room temperature
- 1 large egg, at room temperature
- 1 yolk from 1 large egg, at room temperature
- 1/4 cup sugar
- 2 teaspoons yeast
- 1/2 teaspoon salt
- 450 grams all purpose flour (about 3 1/4 to 3 3/4 cups)
- 5 tablespoons butter, at room temperature
For the filling:
- proofed dough
- 2 tablespoons melted butter
- 1 vanilla bean, scraped
- 1 teaspoon ground cardamom
- 1/2 teaspoon cinnamon
- 1 pinch salt
- 1/2 cup brown sugar
For the glaze:
- 30 grams buttermilk (2 tablespoons)
- 180 grams powdered sugar (about 3/4 cup)
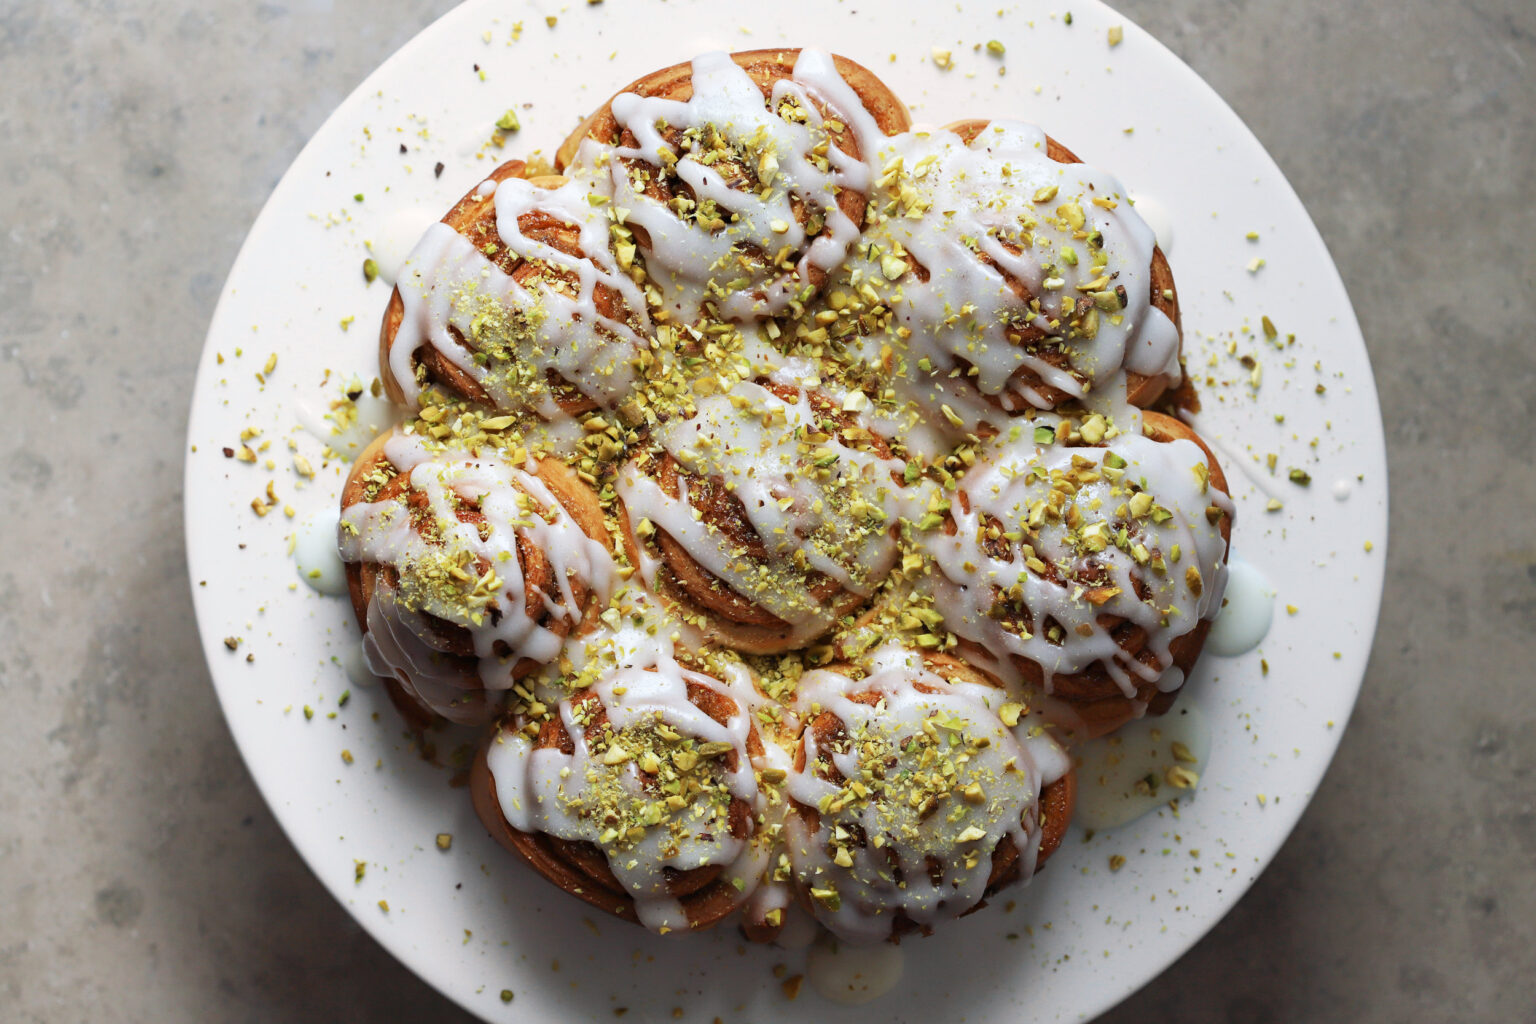
- 1 to 2 tablespoons finely chopped raw pistachios
Instructions
- Make the dough: Preheat the oven to 180° F (you will be shutting it off to proof the dough)
- Combine the buttermilk, egg, yolk, sugar, yeast, and salt in a mixing bowl (keep the yeast and salt on separate sides). Once the yeast has dissolved, Add the flour and butter and knead everything into a dough for a few minutes in the bowl. If the dough seems a little dry, add another tablespoon of buttermilk and continue kneading; if it seems a little wet, add a couple tablespoons of flour (using a scale to measure the flour takes out the guesswork). The dough will smooth out and look much less shaggy after a few minutes of kneading, although it might still look a tiny bit lumpy and not perfectly smooth (this is fine).
- Turn the oven off and open the door for about 30 seconds to let it cool off a little. Cover the bowl of dough with plastic wrap, place it in the oven (again, make sure the oven heat is off), shut the door, and let it proof for about 1 hour. The dough is done rising once it’s noticeably larger, and has approximately doubled in size.
- Roll out the dough and make the filling: Roll the risen dough out into an approximately 14 by 19-inch rectangle (do not use flour. While the dough will stick as you roll, it is buttery enough that it won’t stay stuck to a smooth surface). Start by flattening it with your rolling pin, and then gently pull 4 corners out to make it more of a square. Pat the top and sides to nudge it into a more regular-looking square, and then continue to roll out. It will want to become an oval whenever you roll it, so pull and pat it back into a rectangular shape between rollings. It will be very thin, about 1/8-inch or thinner, by the time you’re done rolling it out. Let it stay stuck to the counter to relax while you mix up the filling.
- Combine the butter, vanilla, cardamom, cinnamon, salt, and brown sugar in a small mixing bowl. Spread this out over the surface of the dough, leaving a 1/2 inch border at the two shorter ends.
- Tightly roll the dough up from one short side to the other short side (you want to end up with a 14-inch-long log).
- Use a sharp serrated knife to slice about 1/2 inch off either end of the log.* Then cut the log into 8 equal pieces (carefully saw back and forth—don’t just chop straight down or they won’t look perfectly round and spirally).
- Butter an 8-inch cake round and place a parchment round in the bottom (butter under and on top of the parchment). Place the biggest looking cardamom roll in the center of the cake round, and surround it with the 7 other rolls.
- Cover the rolls with saran wrap and let them proof in a 70° F room for about 1 hour, being careful that they don’t over-proof. They’re ready to bake once the tops start to look a bit round (see above photo of the unbaked rolls from the side).** Toward the end of their rise, preheat the oven to 350° F convection.***
- Bake for about 25 to 30 minutes, until they’re golden brown.
- Feel free to let them cool in the pan, and serve them in the pan. If you’re going to place them on a cake stand or plate, remove the whole thing from the pan after they’ve been out of the oven for about 10 minutes (treat them like a cake: loosen the sides with a knife, place a cutting board over the top, flip, remove the pan, place the plate or cake stand, and flip again).
- Make the glaze: Whisk the buttermilk and powdered sugar together until there are no lumps. The glaze should be free-flowing, but it shouldn’t be too runny or it will disappear and become kind of translucent after you pour it. If it’s too thick, add a drop or two of additional buttermilk at a time to thin it out. If it’s too thin, add a tablespoon or two of additional powdered sugar at a time to thicken it.
- Once the cardamom buns have cooled off a bit, drizzle the glaze with a spoon, and then immediately sprinkle with the pistachios. Serve immediately****
Notes
* Discard the ends, or flatten them into a pancake, cook it on the stove, and enjoy while you’re waiting on the rolls to bake
** I find it’s really hard to determine when they’ve risen, so I always take a photo of them with my phone before, and then take another one later to compare how much larger they’ve become.
*** If you’re not using a convection oven, you may need to slightly increase the temperature and/or cook them just a minute or two longer.
**** If you’re not serving them within an hour, keep the un-glazed cardamom buns covered or in a plastic bag for up to 1 day, and reheat in the microwave just to warm them a little and take off the stale (in my microwave, about 45 seconds for the whole pan works great). Then glaze them at the last minute. You can also freeze them unglazed and then glaze them after thawing—if you seal them tightly before freezing, these will be pretty enough to serve to company. If you have any leftovers after glazing, you can also freeze these, but they just won’t look as pretty after they thaw (great for midnight snacks and weekday breakfasts).