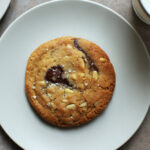
chocolate féve and pine nut cookies

- Prep Time: 30 minutes
- Total Time: at least 14 hours
- Yield: about 20 giant cookies
Ingredients
- 3 2/3 cups [480 g] all purpose flour
- 1 teaspoon baking soda
- 1 1/2 teaspoons baking powder
- 2 1/2 sticks [284 g] cool room temperature butter
- 1 1/3 cup + 2 Tbsp [284 g] brown sugar
- 1 cup + 2 Tbsp [227 g] granulated sugar
- 1 teaspoon salt
- 2 large eggs
- 2 teaspoons vanilla extract
- 10.5 oz [300 g] chocolate féves (or substitute chocolate chips)
- 1 1/2 cup [200 g] pine nuts
- flaky sea salt for sprinkling (or substitute kosher salt)
Instructions
- Sift or whisk together the flour, baking soda, and baking powder, and set aside for later.
- Set your stand mixer up with a paddle attachment (or feel free to use a hand mixer, or simply a sturdy whisk), and beat the butter, sugar, brown sugar, and salt together until they’re light and fluffy (this will take about 3 to 5 minutes).
- Add one of the eggs to the creamed butter/sugar mixture and beat together until it’s completely incorporated. Scrape up the bottom and scrape down the sides of the bowl, and add the other egg and the vanilla. Beat together until it’s completely incorporated.
- Add the flour mixture and stir together at a low speed, just until it’s almost completely combined. Stir in the chocolate féves and pine nuts by hand until they’re somewhat evenly distributed.
- Roll the dough into 90 gram balls. If there are any féves sticking out, push them back in.* Chill the dough balls in the refrigerator overnight, for at least 12 hours (up to 3 days).**
- The next day, preheat the oven to 350° F.
- Place 6 cookies on a parchment-lined sheet pan, and be sure to leave enough room between them so they can spread (and possibly shift around). Sprinkle them with flaky sea salt.***
- Bake for about 20 minutes; take them out of the oven once they’ve flattened out and turned a nice golden brown color. They should be gooey on the inside and crispy around the edges.
- Slide them, parchment and all, off the sheet pan, and let them cool this way. Bake the remaining dough balls, and freeze however many you don’t plan to bake.
Notes
* I don’t bother fiddling with them to make sure they look pretty, because I like the eclectic look when they all turn out different (and I love when they end up with hidden, gooey chocolate pockets), but if you want them to get lots of pretty, visible pools of chocolate, take Leite’s advice and make sure some of the féves are flat and facing up instead of on their sides or tucked in.
** I guess you can skip the resting step, but trust me—you will not regret waiting. You could also wait until the next day to roll the dough into balls, especially if the dough got a little too warm and difficult to work with.
*** If you want to get a slightly more even distribution of salt, feel free to sprinkle them about halfway through baking, just as they’ve started to flatten out.
Find it online: https://cardamomandtea.com/154/chocolate-feve-pine-nut-cookies/