• Skip to primary navigation
  • Skip to main content
  • Skip to primary sidebar
  • Skip to footer
Cardamom and Tea
  • Blog
  • Recipes
  • About
  • Cookbooks
    • Piecemeal
    • A Dish for All Seasons (my first cookbook)

green bean salad

August 23, 2018 by Kathryn Pauline 6 Comments

The thing that makes this green bean salad delicious is also the thing that makes it easy.

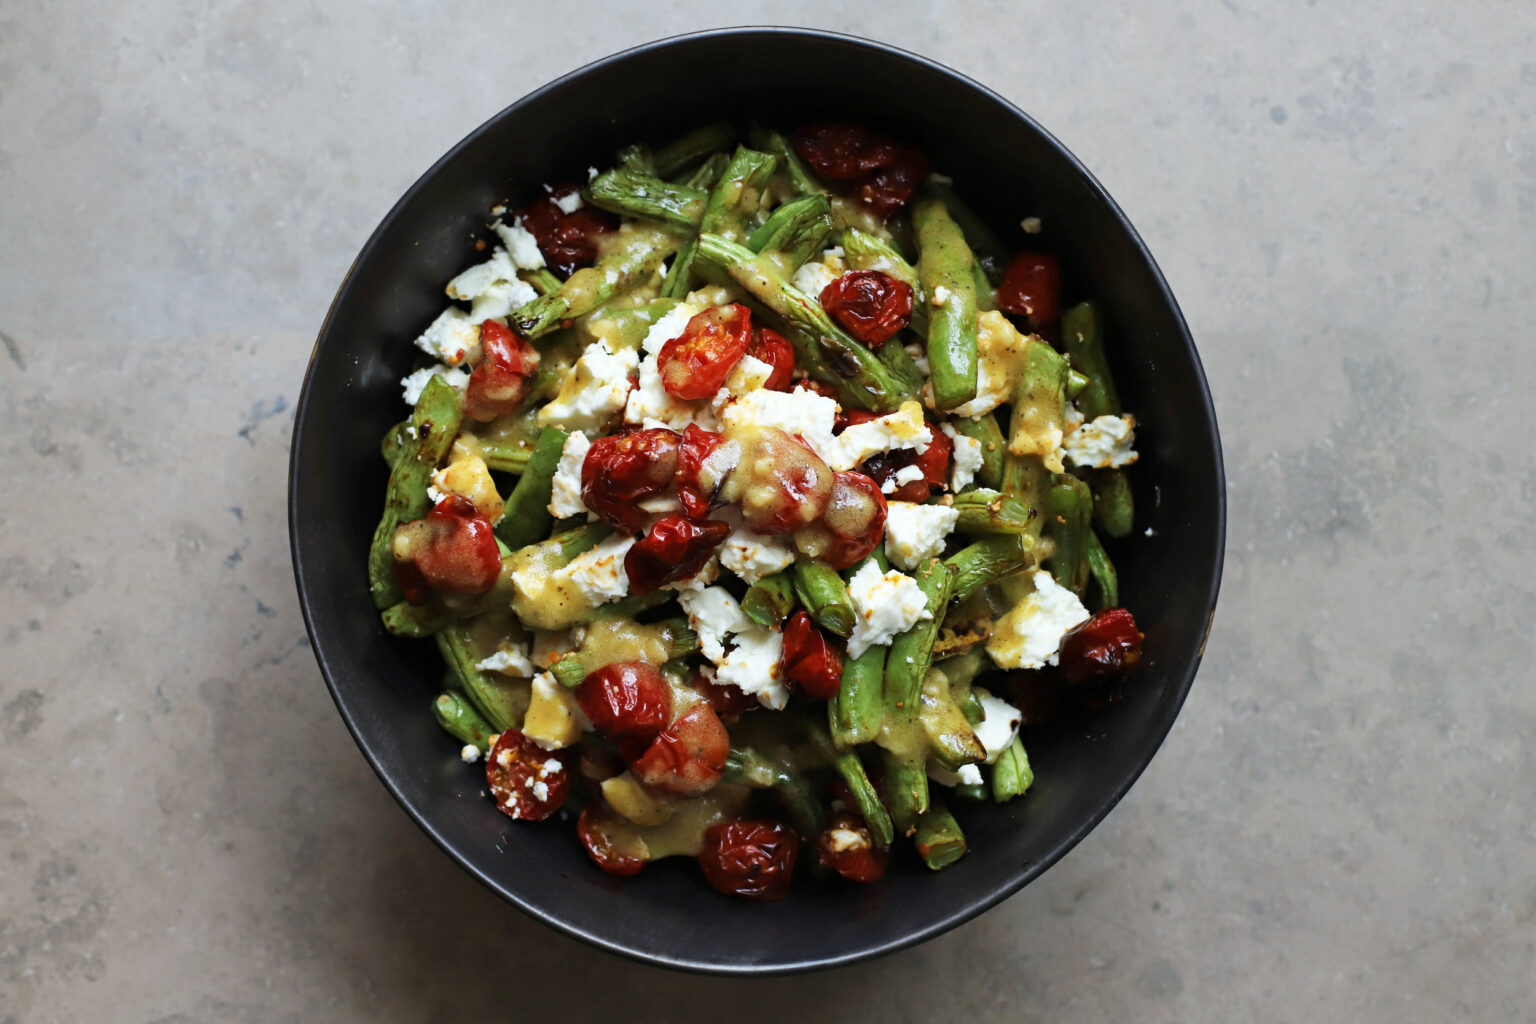
Here’s the magic: You slow roast cherry tomatoes on a sheet pan until their juices caramelize into sticky borderline-burnt bits. Then—without washing the pan—you toss the green beans right onto that pan with stuck-on bits and blast them under the broiler. They char in spots, soak up all that umami-rich tomato essence, and take on a smoky-sweet depth that makes you forget that this dish only has a handful of ingredients.

The result? A green bean salad that’s bright, bold, and deeply satisfying—perfect for a picnic or a solo lunch straight from the bowl.

green beans
slow-roasted tomatoes
roasted green beans
roasted green beans

Green bean salad make-ahead instructions

To make this recipe ahead, you can roast the tomatoes, then roast the green beans, and store them in a container in the refrigerator for up to 3 days. You can also mix the dressing and store it in a separate container along with the veg.

When is this recipe in season?

Green beans are usually in season from early summer through mid-fall, but they’re often available year-round. You might have a slightly harder time finding them fresh when they’re not in peak season. But frozen green beans are certainly available year-round, and that will work in a pinch in this recipe. Frozen green beans have a slightly different texture than fresh, and they won’t take as long to cook through.

Tomatoes are in season at the same time as green beans. And if you’re a tomato fan, you know that they’re really best enjoyed in-season. But slow-roasting really changes their texture and intensifies their flavor, so this recipe works incredibly well with out-of-season tomatoes.

So TL/DR: It’s technically in season in summer through fall, but this salad is really good year-round too.

green bean salad
Print

easiest green bean salad

green bean salad
Print Recipe

5 Stars 4 Stars 3 Stars 2 Stars 1 Star

No reviews

  • Prep Time: 20 minutes
  • Total Time: 60 minutes
  • Yield: 4 servings

Ingredients

for the tomatoes:

  • 1 pint cherry tomatoes, cut in half
  • Olive oil and salt

for the dressing:

  • 2 tablespoons extra virgin olive oil
  • 1 teaspoon mustard
  • 1 tablespoon red wine vinegar
  • 1/4 teaspoon salt
  • 1/4 teaspoon black pepper
  • 1 small clove garlic, crushed through a press or finely minced

for the green beans and salad:

  • 16 to 18 ounces green beans, washed, dried, stemmed, and broken into pieces
  • Olive oil and salt
  • 3 to 6 ounces feta cheese

Instructions

  1. Roast the tomatoes: Preheat the oven to 350°F (180°C) convection.*
  2. Coat the tomatoes in olive oil and sprinkle evenly with salt.
  3. Spread the tomatoes out on a sheet pan,** and make sure they’re all facing cut-side up.
  4. Roast the tomatoes for 35 to 45 minutes, until the puddles of juice concentrate and become syrupy. Carefully lift them up with a spatula, and remove them to a salad bowl (but do not wash the pan!).
  5. Make the dressing: Whisk everything together until very well combined. Set aside.
  6. Roast the green beans and make the salad: Set the oven to broil. Coat the green beans in olive oil and sprinkle evenly with salt.
  7. Spread the green beans out on the sheet pan on top of all the caramelized tomato juices.
  8. Broil until blistered, a little charred, and somewhat softened (about 5 to 10 minutes, but it could be even less depending on your broiler).
  9. Momentarily toss the green beans in the (now slightly dissolved) tomato juices. I like to just run the spatula down the middle once or twice to coat them a little (but do not scrape up the tomato bits—they’re extremely strong, and you just want a light coating), and then empty them into the salad bowl.
  10. Crumble the feta into the salad bowl, drizzle with dressing, and gently toss everything together, just until combined (don’t over-mix or the tomatoes and feta will dissolve).

Notes

* If you don’t have a convection oven, they might take a little longer, and you might need to rotate them once halfway through.

** For the cleanest flavor, it’s best to use stainless steel instead of aluminum, but I often use aluminum and it turns out totally fine. There’s a good Cooks Illustrated Article on the subject.

Video note: If you don’t see the video for this post after scrolling up, please disable ad block and try reloading the page.

find us on instagram and let us know what you made!

Filed Under: dinner, every recipe, gluten free, lunch, salads, vegetarian, weeknight Tagged With: feta, greenbeans, summer, tomato

banana stone fruit trifle with orange blossom custard

August 16, 2018 by Kathryn Pauline 4 Comments

Last summer, my friend Mary brought a fruit trifle to my parents’ house for dinner, and I haven’t stopped thinking about it since. She was visiting her mom in Chicago at the time, and in her words she “just threw it together with whatever was around the house.” And being an amazing Assyrian baker, her mom had orange blossom water on hand, which found its way into the trifle’s whipped cream and custard. It was just so perfect, and when Mary offered to leave the leftovers, I don’t think I even did one of those “oh I couldn’t possibly!” false protests, and just said “yes please!”

So this summer, with peaches, plums, and nectarines at their peak, I made this stone fruit and banana trifle. Orange blossom water works beautifully with all stone fruits, but there’s really no better combination than orange blossom and banana—the flower water really highlights the ripe banana flavor that we’re always looking for more of when baking and cooking with them.

A quick note on Middle Eastern and North African trifles in general: I sometimes come up with recipes inspired by the flavors and techniques of classic Middle Eastern food, but this trifle isn’t done “with a Middle Eastern twist,” because it’s something that’s actually cooked in Iraqi and Egyptian kitchens. So I just wanted to take this opportunity to highlight some of the Middle Eastern and North African trifles out there, because there are some amazing ones, and it’s August, and high time to make all the trifles:

Maryam’s Culinary Wonders’ lemon trifle
Amira’s Pantry’s tropical fruit trifle
Nadia Barrow’s Iraqi trifle

notes on adapting this fruit trifle to be more and less set

I love this trifle the way it is and hope you will too, but you might prefer a more set dessert, so I’ve put together some advice on adapting it to suit your preference. First, a quick description, so you can determine whether this version is for you:

This trifle has a texture similar to classic banana pudding, which means that it scoops more like pudding and less like a custardy cake. I personally don’t prefer trifles where you can see the distinct spoon imprint after scooping out a serving (e.g., trifles with a texture more like panna cotta)—but on the flip side, you don’t want your trifle to rush in to fill the gap when you scoop some out (that would be way too watery for anyone). This trifle is somewhere in between—definitely not watery or soupy, but also not super firm.

Here are some things you can do if you’d like a more cakey, set trifle:

  • Substitute poundcake or angel food cake in place of all or some of the cookies.
  • Trifles with a lot of fruit tend to be on the puddingy side, so to prevent this one from getting watery, I ask you to macerate the fruit and then strain it. No one should skip this step, because there’s a fine line between puddingy trifle and trifle soup, and stone fruit contains a lot of liquid. But if you want it to be a bit more set, let the fruit macerate even longer, and strain it extremely well for several minutes. You could also use more bananas in place of some of the stone fruit, which don’t give off juices to the same degree (but I really like it with the full amount of stone fruit, especially this time of year). Even if you’re going for a puddingy texture, make sure you don’t use over-ripe stone fruits (as I mention in the recipe).
  • Whip the cream to stiff peaks, and then pipe it onto the top. Stiff peaks are much firmer, but they don’t dollop well at all, so you’ll need to pipe it with a star tip or something pretty that’ll give it the right kind of texture (otherwise it’ll look grainy and awkward). I like the more casual look of dolloping soft peaks.
Print

stone fruit banana trifle with orange blossom custard

Print Recipe

5 Stars 4 Stars 3 Stars 2 Stars 1 Star

No reviews

  • Prep Time: 45 minutes
  • Total Time: 2 hours 15 minutes
  • Yield: 16 servings (i.e., makes a gallon, so feel free to halve the recipe)

Ingredients

For the orange blossom custard:
2 1/2 cups cold whole milk (567 g)
1/3 cup sugar (72 g)
1/4 teaspoon salt (1.5 g)
1/4 cup + 2 tablespoon cornstarch (59 g)
3 eggs (150 g) + 2 yolks (30 g)
an instant-read thermometer
1 1/2 teaspoons orange blossom water (8 g), or to taste
2 tablespoons butter (28 grams)

For the macerated stone fruit:
8 cups ripe stone fruit cut into bite-sized pieces (nectarines, peaches, cherries, apricots, plums, etc.)*
3 tablespoons sugar
1 pinch salt

For the whipped cream:
1 pint cold heavy whipping cream
2 tablespoons sugar
1 teaspoon orange blossom water
1 pinch salt

To assemble the trifle:
1 big glass bowl or trifle dish (4-quart container)
macerated stone fruit, strained and liquid discarded (above)
4 bananas, sliced (they should be yellow with a few small brown flecks)
orange blossom custard (above)
orange blossom whipped cream (above)
7 to 10 ounces amaretti cookies (or Nilla Wafers or lady fingers—any dry cookies)
2 stone fruits sliced into pieces for the top

Instructions

  1. Make the pudding: Whisk together the milk, sugar, salt, and cornstarch (no eggs yet!) in a medium saucepan off the heat. Turn the heat to medium or medium-high, and stir constantly as you bring it to a simmer. As soon as it comes to a simmer, it will thicken noticeably. Simmer and stir for another 30 seconds to 1 minute to fully thicken, then remove from heat.
  2. Immediately temper the eggs: Beat the eggs and yolks together in a medium mixing bowl over a wet paper towel (to keep it from skidding). Take a whisk-full (or about a couple tablespoons) of the hot thickened milk and quickly beat it into the eggs until the mixture is relatively smooth with some tiny lumps. Keep whisking in small amounts of the milk into the egg mixture, and continue until the eggs smooth out completely. Now you can start adding big spoon-fulls of the milk, until you’ve added about half of it to the eggs.
  3. Once you’ve whisked in about 1/2, slowly pour the egg mixture back into the milk mixture while whisking. Set this over medium-low heat, and cook, whisking constantly, until it’s 165-170° F.
  4. Once it’s done, immediately stir in the orange blossom water and butter, and whisk together until the butter melts and completely incorporates. Chill in the refrigerator for about 1 1/2 to 2 hours, until it’s cool, but not too cold. Work on the fruit while you wait.
  5. Macerate the stone fruit: Combine the cut up stone-fruit with the sugar and salt, and let it sit in the refrigerator for at least 45 minutes while you prep the rest of the ingredients. Once it’s given off a decent amount of juice, strain it very well.
  6. Whip the cream: Move the bowl of your stand mixer to the freezer or refrigerator, and chill until you’re ready.
  7. A few minutes before assembling the trifle, combine the cream, sugar, orange blossom water, and salt in the chilled bowl. Whisk at medium speed until soft peaks form.
  8. To assemble: Slice the bananas and combine them with the strained fruit.
  9. Whisk the custard very well until it’s smooth and spreadable.
  10. Layer the ingredients in whatever order you want, ending with a layer of whipped cream.** Top with the additional sliced stone fruit.
  11. Let it chill for about 15 minutes, and then dig in.

Notes

See the notes above the recipe if you’d like this trifle to be less puddingy and more set.

* Measure the fruit by filling a 2-cup liquid measuring cup up to the 2-cup line 4 times. Or if you want to go by weight to be more exact, this is 1230 grams, or 2 pounds 11 ounces. Use stone fruit that’s ripe, but not extremely ripe. E.g., you don’t want the kinds of plums that feel like water balloons.

** Styling suggestions: Place the fruit around the perimeter before filling in the center, and let it kind of fall down the sides of the container, instead of trying to push it out to the sides (this will give you cleaner lines, instead of accidentally smushing all the custard to the edges). After you do the second fruit layer, wipe out the top portion of the sides of the trifle dish to wipe away the fruit juices (this will look much neater than trying to wipe down the sides after you’ve already topped it with whipped cream). Spoon whipped cream and custard around the edges and then in the center, without letting it fall down the sides. When you do the final whipped cream layer, don’t try to make it even and smooth—just dollop it in the center and give it a few swoops, and it’ll look much better.

find us on instagram and let us know what you made!

Filed Under: every recipe, sweets Tagged With: apricot, middle eastern, orange blossom water, summer, trifle, whipped cream

  • « Go to Previous Page
  • Page 1
  • Interim pages omitted …
  • Page 112
  • Page 113
  • Page 114
  • Page 115
  • Page 116
  • Interim pages omitted …
  • Page 183
  • Go to Next Page »

Primary Sidebar

Kathryn Pauline smiling

Welcome! I’m Kathryn Pauline, cookbook author, recipe developer, and photographer.

Footer

read our privacy policy

© 2017 - 2026 Kathryn Pauline