• Skip to primary navigation
  • Skip to main content
  • Skip to primary sidebar
  • Skip to footer
Cardamom and Tea
  • Blog
  • Recipes
  • About
  • Cookbooks
    • Piecemeal
    • A Dish for All Seasons (my first cookbook)

milk tea baklawa (baklava)

December 6, 2018 by Kathryn Pauline 13 Comments

My grandmother lived in Beirut for several years as a kid, but she spent the later part of her childhood on her family’s farm in rural Syria. When she married my grandfather, she moved to Baghdad to be with him and his family, and found herself acclimating to city life again. She remembers immediately noticing some of the differences in the way people ate and lived. In their new life together, they dined with their friends at the masgouf restaurants along the Tigris river, they used refrigerators instead of preserving cheese in clay pots or grapes in crates of sawdust, and they often used sweetened condensed milk in their chai instead of farm fresh milk.

The concept of sweetened condensed milk tea will probably sound familiar to you, even if you’re not familiar with this as a mid-century Baghdad thing. Most well-known in the west is Thai iced tea, but this combination can be found the world over. For instance, here in Hong Kong, if you order a “milk tea” in any restaurant, you’ll get a cup of strong black tea mixed with sweetened condensed milk or evaporated milk.

These experiences and memories, as well as Adrianna Adarme’s milk and honey baklava and Chetna Makan’s masala chai baklava, inspired me to try incorporating both tea and sweetened condensed milk into my baklawa recipe—and I’m so glad, because milk tea baklawa is my new favorite.

While this recipe is super easy to bake (and a total delight), coming up with it was a little on the tricky side—the sweetened condensed milk made recipe developing a fun challenge. First, I had to find the best way to infuse condensed milk with tea. Just heating it up and dropping a tea bag in won’t work (there’s not enough water to allow the tea to fully steep), but you also don’t want to introduce too much liquid, otherwise your baklawa might end up soggy.

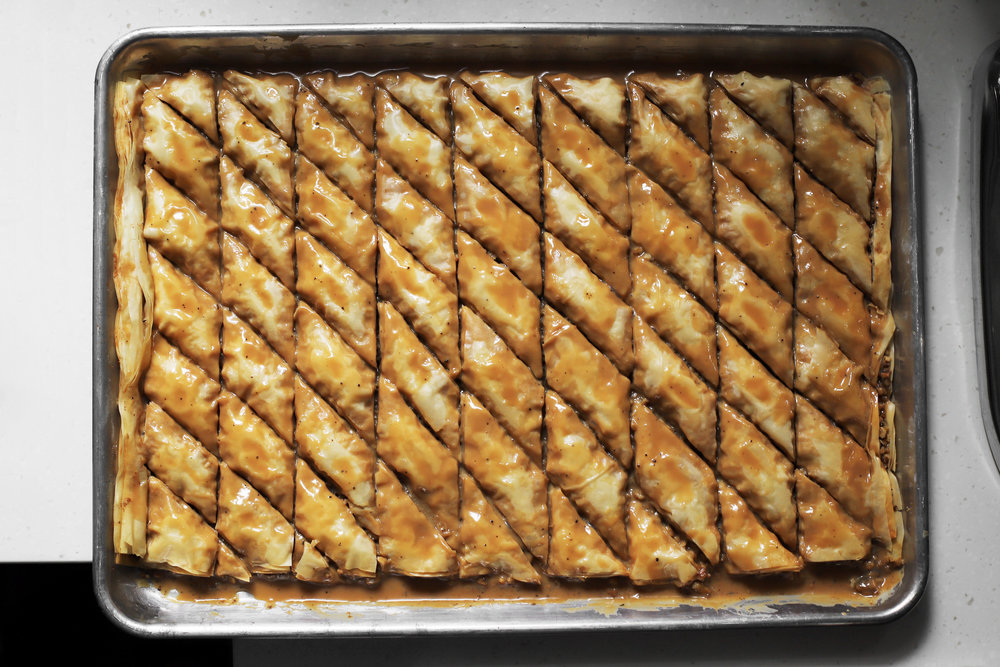
I found that first steeping the bags in a half cup of boiling water was just enough to give them a head start, before introducing the sweetened condensed milk and allowing everything to simmer for a few minutes. As you can see, the tea turns everything a beautiful caramel color, and (as you can imagine) it lends such a lovely flavor.

Plus, the half cup of water dilutes the syrup to just the right consistency (any thicker, and it would have trouble finding its way into the center of each piece; any thinner, and the baklawa would end up swimming in it). Since it’s such a small amount of water, it’s important not to let it boil off in the beginning. Follow the instructions in the recipe, and it’ll turn out great.

The second quirk in developing this recipe was the temperature of the syrup. Traditionally, cold syrup is poured over hot baklawa. But since sweetened condensed milk is more viscous than a simple syrup, it’s important that you pour it while both the baklawa and syrup are warm. But even though it’s counterintuitive, this is actually way easier—you don’t have to plan ahead, and you can make the syrup while the baklawa is in the oven.

Like all baklawa recipes, this one is ideal for a make-ahead dessert, but this particular recipe keeps better in the refrigerator/freezer than it does at room temperature. It has enough sugar that you can probably leave it out at room temperature for a while, but it should be stored in the refrigerator if you’re storing it longer than a couple hours. (Think of it like a cake with cream cheese frosting—some people are comfortable leaving it out overnight, while some people insist on refrigeration. Just remember that this contains a lot of dairy). It keeps for about 6 days in the refrigerator, or much longer in the freezer.

Print

milk tea baklawa (baklava)

Print Recipe

5 Stars 4 Stars 3 Stars 2 Stars 1 Star

5 from 1 review

  • Prep Time: 20 minutes
  • Total Time: 2 1/2 hours
  • Yield: about 50 pieces

Ingredients

for the baklawa:

  • Butter for greasing the pan
  • 16 ounces chopped walnuts, about 4 cups (454 grams)
  • 1 tablespoon cinnamon (7 grams)
  • 1 teaspoon cardamom (2 grams)
  • 1/4 teaspoon salt
  • 16 ounces filo dough sheets (454 grams)
  • 6.25 ounces hot melted clarified butter (177 grams, or 3/4 cup + 2 tablespoons by volume)*

for the milk tea syrup:

  • 1/2 cup water
  • 5 tea bags of black tea
  • Two 14-ounce cans sweetened condensed milk (2 397-gram cans)

Instructions

  1. Bake the baklawa: Preheat the oven to 350°F/180°C convection**, and grease a rimmed sheet pan.
  2. Combine the walnuts, cinnamon, cardamom, and salt.
  3. Make sure you have all your ingredients (including the clarified butter) ready before you open the filo dough. Place half of the filo dough on the sheet pan, spread the walnut mixture evenly over the filo dough, and place the rest of the filo dough on top of the walnut mixture.
  4. Cut the baklawa into diamonds by slicing straight across in the short direction, then diagonally (see photos in my original baklawa post). It’s best to work with a very sharp knife so that you don’t tear, stretch, or dishevel the filo. It’s alright if a few of the pieces go a little awry, but you want everything to stay pretty lined up.
  5. Slowly and evenly drizzle the hot clarified butter over the sliced baklawa.
  6. Bake for about 25 minutes, until it has lightly browned.
  7. Make the syrup while you wait (make sure the syrup is hot right before the baklawa comes out of the oven, and rewarm it if necessary***): Bring the water to a simmer in a small saucepan over high heat. As soon as it starts to simmer, immediately add the tea bags, remove from heat, and let them steep for 2 minutes.
  8. Once steeped, add the sweetened condensed milk, stir everything together, and bring up to a boil over medium-high heat, stirring constantly. As soon as it starts to boil, reduce heat to medium-low, and simmer for 3 or 4 minutes, stirring occasionally to make sure it doesn’t scorch. Remove from heat, let the bags continue to steep, and discard them when you’re ready to use the syrup. It’s ok if one or two of them leaks a little, but be gentle so they don’t burst open.
  9. As soon as the baklawa comes out of the oven, slowly pour the hot syrup over the surface. It’s ok if a little bit runs off to the side. It will pool a little at first, but as long as the syrup and baklawa are hot, it will sink in after a couple minutes.
  10. Let it sit until it comes to room temperature, at least 2 hours, cut through the lines you made before baking, and then serve. Store in the refrigerator for up to 1 week or the freezer for up to 3 months. It’s even better the next day.

Notes

* Clarified butter is really easy to make, and I’ve got a recipe and video here. This amount of clarified butter comes from about 8 ounces / 227 grams sweet cream butter (which is conveniently the amount in my clarified butter recipe).
** If you don’t have convection, no worries—you might need to slightly increase the temperature and/or bake it for slightly longer. If your convection fan is particularly strong, you might want to bake without convection, otherwise the pieces of filo might go flying. I’ve only had this problem baking in commercial kitchens, and most home ovens won’t actually blow things around.
*** The syrup will be much more pourable when warm, and it will more easily soak through the layers of filo. Usually, chilled or room temperature syrup is poured over baklawa, but this milk tea syrup works better when warm. Feel free to look at the above photos to get a sense of the consistency the syrup should be as it pours.

Note: If you have any leftover baklawa, you can freeze it and turn it into baklawa frozen yogurt.

find us on instagram and let us know what you made!

Filed Under: every recipe, sweets Tagged With: baklawa, cardamom, clarified butter, middle eastern, nuts, tea, walnut

cardamom gingerbread rose cake

November 29, 2018 by Kathryn Pauline 32 Comments

As promised, today I’m sharing a low-key version of that wedding cake I recently posted. So here it is, just in time for gingerbread season—my cardamom gingerbread rose cake, with rose cream cheese glaze! It has an incredibly tender crumb, a robust spiced ginger and rose flavor, and a delightful cream cheese glaze that smooths out all that fragrance.

You might notice that this rose cake’s flavors and design are pretty much identical to my cardamom rose gingersnaps. Those cookies are perfect for sharing with friends, family, and coworkers. But this cake is a lovely way to end a big holiday dinner. And best of all, it’s actually pretty simple to make. You don’t even need a stand mixer or any special baking or decorating experience to pull it off. And I’ve included some instructions for making it ahead, so it’s ideal for entertaining.

making this rose cake ahead

  • You can bake the cakes a few weeks ahead of serving. But even if you just make them a day or two ahead of time, you should store them in the freezer rather than the refrigerator. The fridge tends to dry baked goods out, while the freezer preserves them without drying them out.
  • To freeze the cake layers: Let them cool completely, wrap in plastic wrap, seal in a bag, and try to squeeze out as much air as possible before freezing. But careful not to crush the cakes—they’re fragile! Alternatively, feel free to bake the cakes the day before serving, and keep them at room temperature.
  • You can make the frosting a few days ahead of time, and keep it in the refrigerator. Make sure it’s tightly sealed so it doesn’t take on any weird fridge smells. This glaze actually freezes a bit better than most cream cheese frostings. But I wouldn’t necessarily recommend freezing it because it sometimes gets grainy and doesn’t look quite as good. But luckily it’s super easy to throw together.
  • You can crumple the rose petals weeks ahead of time.
  • Up to a couple hours before serving, you can assemble the cake, ice it, and decorate with rose petals. The decorating only takes a couple minutes, and is really easy to do at the last minute while entertaining. You won’t need to bring out a rotating turntable or any cake decorating gear.

some tips on decorating

Most of these tips are in the recipe below, but I thought I’d add a little more detail, in case you want to know more about how to get the look in these photos:

  • Make sure the glaze is the right consistency. It needs to be pourable, but thick. If you thin it out too much, it won’t cling correctly, and it will just run off the sides. It’s totally fine to make more of a thick cream cheese frosting instead. But in that case, you’ll make swooshes on the surface (rather than pouring it), like the cake in this post. The consistency will depend on how strong your rosewater is. If it’s weak, you might need to add the full amount called for in the recipe, which means you shouldn’t have to thin the glaze out any more. If it’s strong, you might only add a teaspoon, which means you can thin the glaze out further with some leftover buttermilk, or leave it as is and swoosh it.
  • When encouraging the glaze down the sides of the cake, remember that less is more. It will always drip down further and wider than you want it to, and more of the glaze should end up on the cake than on the pedestal.
  • Carefully separate the rose petals, making sure you use just the pink ones (save brown bits for tea). The best way to do this is to squeeze the stem part of the bud to crush it slightly. The outer petals will then easily fall away. Once you’ve harvested all the pink petals, further crush the bud between your fingers to release the seeds and pollen from the inside of the bud. These little black dots add a lot of nice contrast and give the cake a less froufrou look (although there’s nothing wrong with going full froufrou!).
  • Sprinkle the petals over the cake, rather than carefully placing them. Sprinkle from about 10 inches above the cake, and keep your hand moving as you go.
  • Careful not to add too much food coloring to the cream cheese glaze. Since dried rose petals are usually a deeper shade of pink, using a more pastel shade for the glaze gives the cake more contrast.
Print

cardamom gingerbread rose cake

Print Recipe

5 Stars 4 Stars 3 Stars 2 Stars 1 Star

No reviews

loosely adapted from a Cook’s Illustrated recipe

  • Prep Time: 30 minutes
  • Total Time: 90 minutes
  • Yield: 10 servings

Ingredients

for the cardamom rose gingerbread cake:

  • butter for greasing the pans
  • 250g (1 3/4 cup) all purpose flour
  • 21g (1/4 cup) cocoa powder
  • 14g (2 tablespoons) ground ginger
  • 6.5g (1 1/2 teaspoons) baking powder
  • 3g (1/2 teaspoon) baking soda
  • 2.5g (1 teaspoon) ground cinnamon
  • 3g (1 1/4 teaspoons) cardamom
  • 5.5g (3/4 teaspoon) salt
  • 240g (1 cup) buttermilk
  • 170g (1/2 cup) molasses
  • 300g (1 1/2 cups) sugar
  • 150g (3/4 cup) vegetable oil
  • 3 large eggs (140g)
  • 30g (2 tablespoons) fresh grated or puréed ginger
  • up to 45g (3 tablespoons) rosewater (add 1 tablespoon at a time)

for the rosewater cream cheese glaze and decoration:

  • 227g (8 oz) package cream cheese, softened at room temperature
  • 57g (4 tablespoons) butter, softened at room temperature
  • 210g (1 1/2 cups) powdered sugar
  • up to 22g (1 1/2 tablespoons) rosewater (add 1 or 2 teaspoons at a time)
  • a few drops pink food coloring (optional)
  • additional buttermilk (as needed)
  • edible crumbled dried rose buds* (optional)

Instructions

  1. Bake the cake layers: Preheat the oven to 350° F/180° C convection.** Butter 2 8-inch cake rounds, line them with parchment rounds and then butter the parchment.
  2. Sift together the flour, cocoa, ground ginger, baking powder, baking soda, cinnamon, cardamom, and salt.
  3. In a stand mixer, fitted with the paddle attachment (or in a mixing bowl with a whisk), combine the buttermilk, molasses, and sugar. Then add the vegetable oil, eggs, fresh ginger, and 1 tablespoon of rosewater at a time. Mix and taste between rosewater spoonfuls, and add more as necessary (different brands vary significantly in strength. Too much will taste soapy).***
  4. Add the dry ingredients to the wet ingredients, and mix at low speed just until it comes together (do not over-mix). Fold 3 or 4 times with a rubber spatula, scraping the bottom of the bowl to make sure it’s fully incorporated. Pour into the parchment-lined rounds, and bake for about 22 minutes. They’re done once they’re no longer wobbly in the center, and a toothpick inserted in the middle comes out clean with just a few crumbs.
  5. Let them cool in the pans for 10 minutes. Run a knife around the pans’ edges to loosen the cakes. Be very careful when you invert the cake—it has a very delicate crumb. Place a plate over one pan, flip the whole thing in 1 swift motion, and carefully remove the pan. Place a cooling rack over the inverted cake on the plate, and carefully flip it again so it’s right-side-up on the rack. Repeat with the other one, and let them cool completely.
  6. Make the glaze: Beat the cream cheese and butter together until they lighten a little, about 3 to 5 minutes. Add the powdered sugar and a little rosewater, and beat together. Taste, and continue adding rosewater until you’re happy with the flavor (careful not to overdo it).
  7. Once you’re happy with the flavor, take a look at the consistency. It should be very thick, but pourable, like perfectly tempered chocolate. If you need to thin it out slightly (probably because you went with a smaller amount of rosewater), add a teaspoon of buttermilk (or milk) at a time, until you reach the right consistency, but careful not to let it become thin or runny. Or, if you like it on the spreadable side, simply swoosh it on top instead of glazing the cake.
  8. Once you’re happy with the consistency, add a couple drops of pink food coloring, and keep mixing in more drops until it’s a pale pink color (careful not to make it too bright—I used 6 drops of pink to get this color. Use much less if you’re using red).
  9. Once the cakes are cool, carefully shave off the slight hump of 1 cake with a serrated knife. Place that layer cut-side-up on a plate or cake pedestal. Top with about 1/3 of the glaze, and spread into a thin layer. Place the second layer bump-side-up. Top with the remaining glaze, encouraging it to drip down the sides a little. Sprinkle with rose petals and seeds, and serve.

Notes

* When I crumble the rosebuds, I like to also use the little black seeds that fall out. They add some nice contrast to the pale icing and colorful rose petals. Some rose buds will have yellowish-brown petals on the inside—I just use the outer pink ones for decorating (sometimes with a little yellowish-brown), and save the scraps to make tea.

** If you don’t have convection, you may need to bake them slightly longer. Keep an eye on them, and take out of the oven once they’re no longer wobbly in the center.

*** If you don’t want to eat raw egg, wait to add the eggs until after you’ve tasted it, but keep in mind it should taste a little rosier without them. The cake has rosewater in both the frosting and the cake, so it’s better to under- than over-do it, and you can always sprinkle the finished cakes with a few drops if you didn’t add enough.

find us on instagram and let us know what you made!

Filed Under: every recipe, sweets Tagged With: buttermilk, cakes, cinnamon, cream cheese, cream cheese frosting, frosting, ginger, gingerbread, rosewater, winter

  • « Go to Previous Page
  • Page 1
  • Interim pages omitted …
  • Page 104
  • Page 105
  • Page 106
  • Page 107
  • Page 108
  • Interim pages omitted …
  • Page 183
  • Go to Next Page »

Primary Sidebar

Kathryn Pauline smiling

Welcome! I’m Kathryn Pauline, cookbook author, recipe developer, and photographer.

Footer

read our privacy policy

© 2017 - 2026 Kathryn Pauline