• Skip to primary navigation
  • Skip to main content
  • Skip to primary sidebar
  • Skip to footer
Cardamom and Tea
  • Blog
  • Recipes
  • About
  • Cookbooks
    • Piecemeal
    • A Dish for All Seasons (my first cookbook)

rainbow lamassu cake

June 26, 2019 by Kathryn Pauline 2 Comments

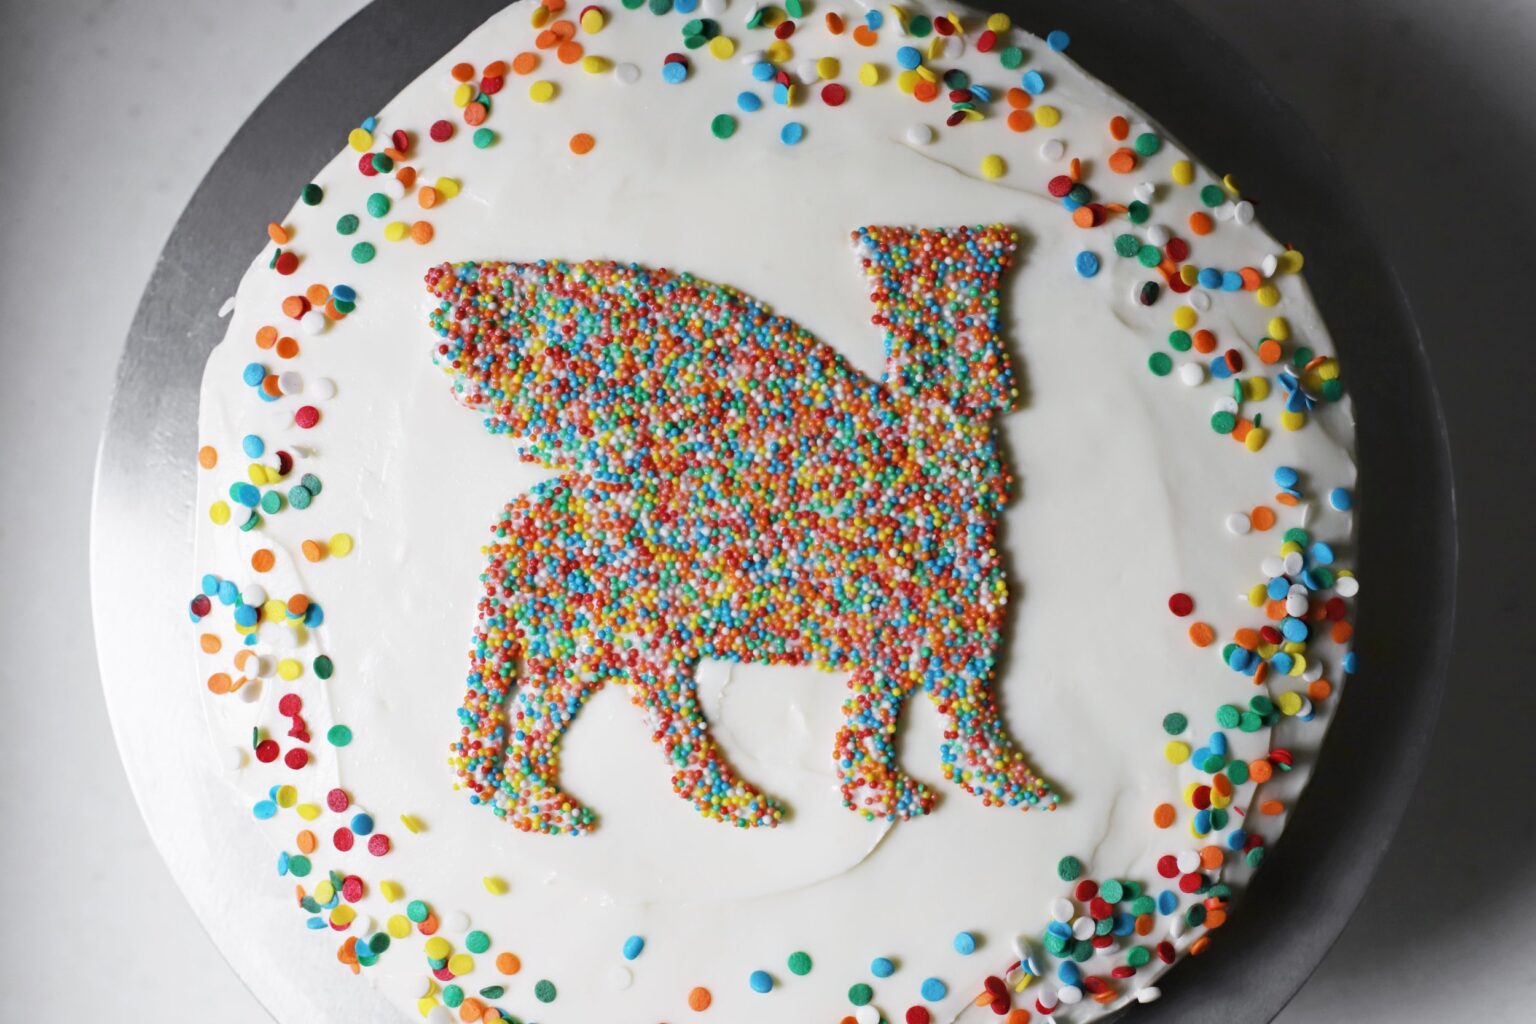
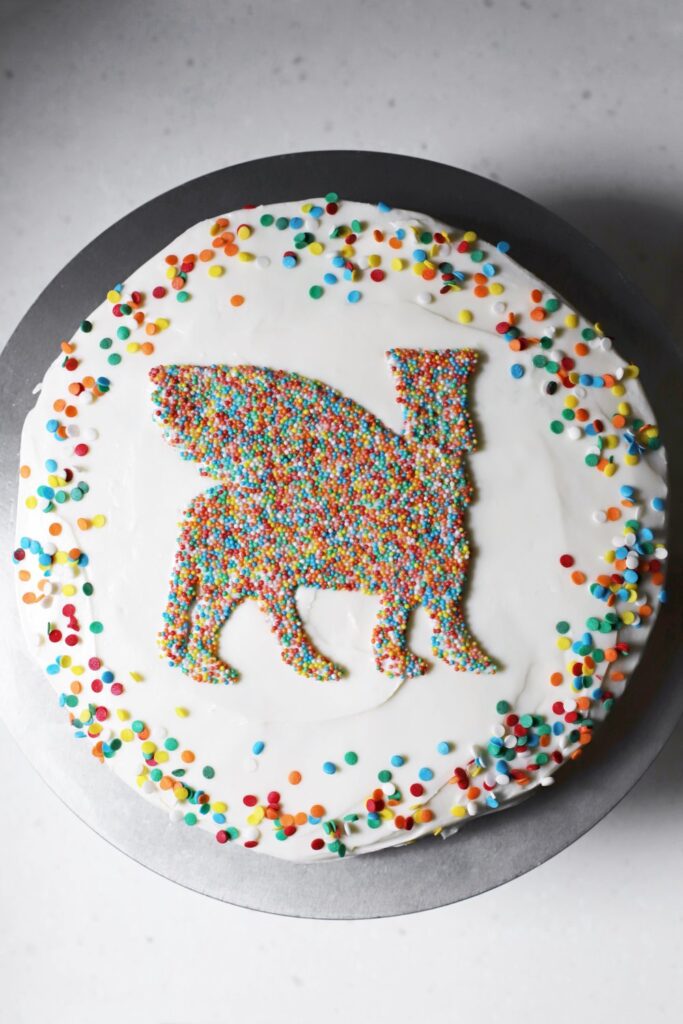
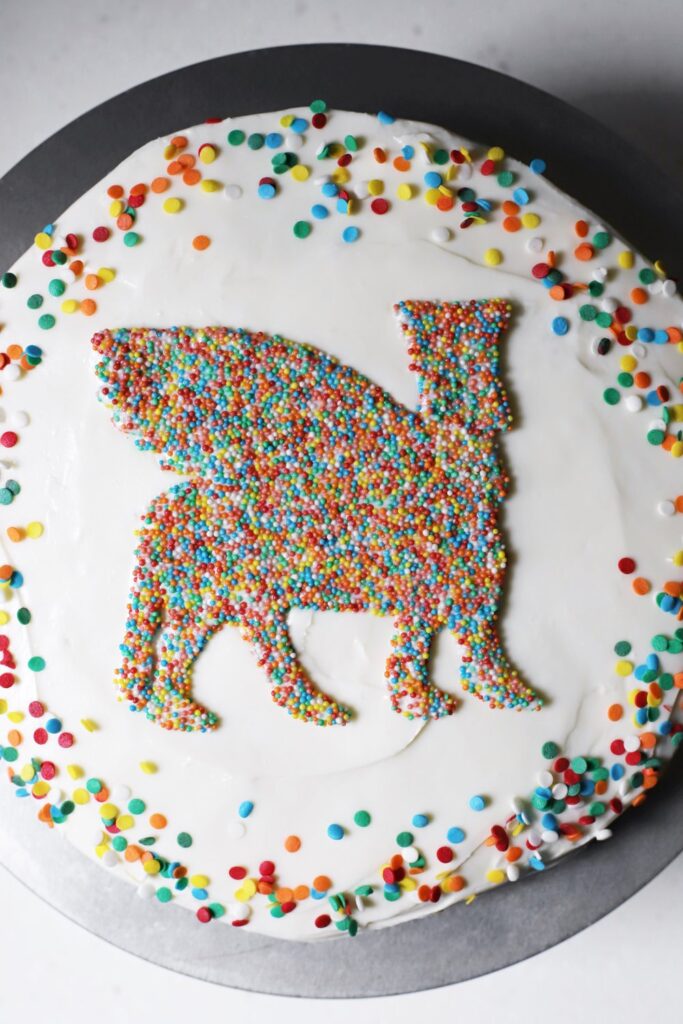
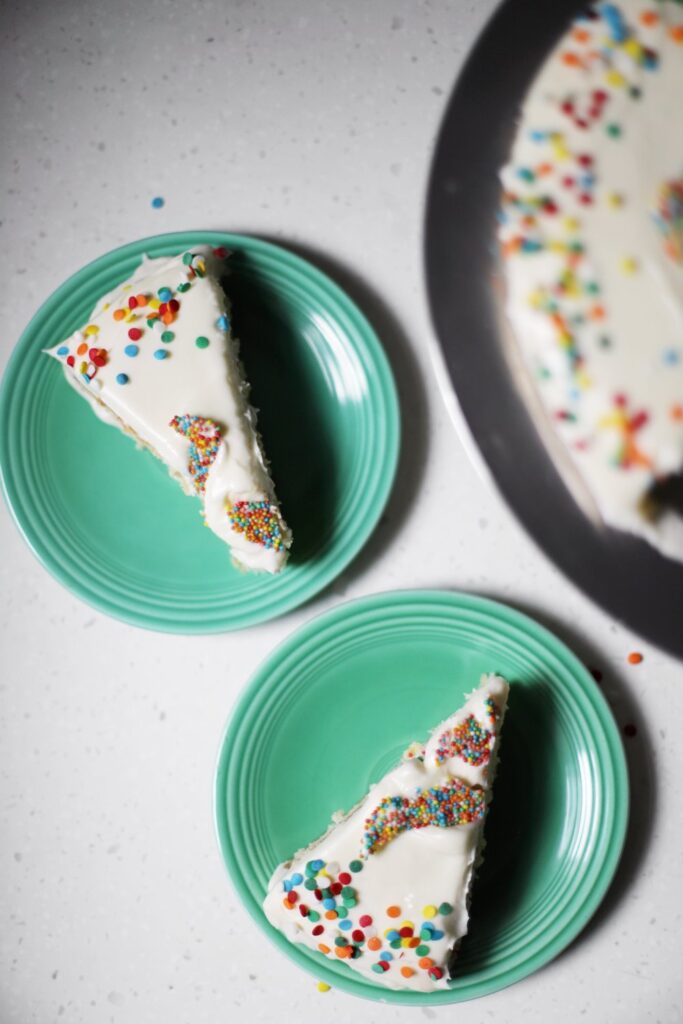
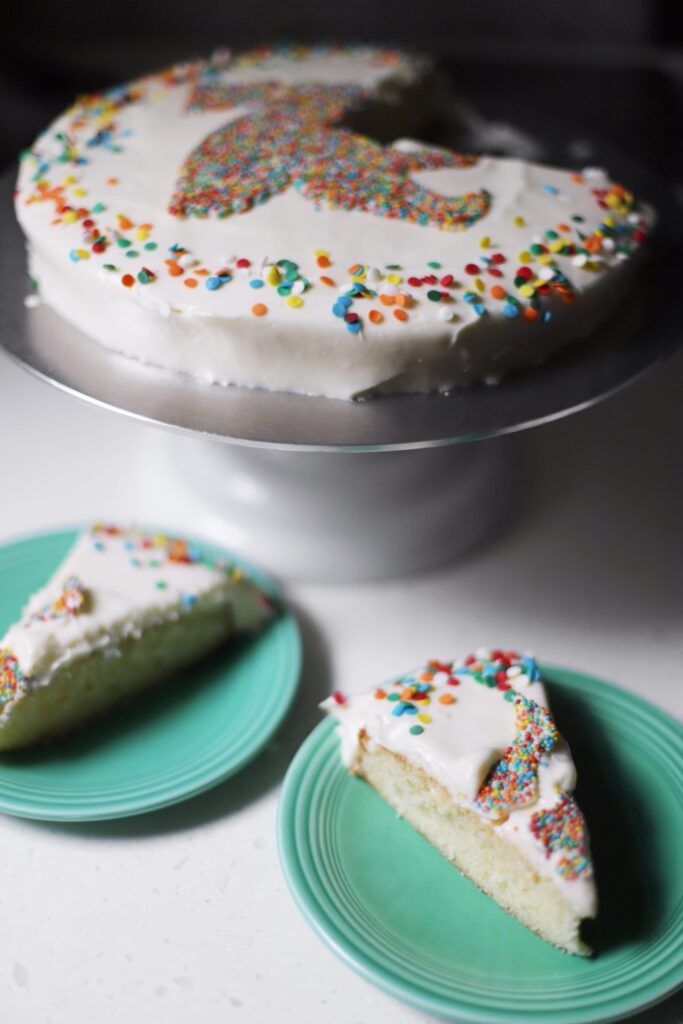
Happy Pride Month! To celebrate, I baked this rainbow lamassu orange blossom cake for my LGBTQ+ Assyrian family, friends, and readers. May you be loved, accepted, and respected wherever you go, and may you always be free to be your beautiful self ❤️🧡💛💚💙💜

This recipe is adapted from Quin’s vanilla almond rainbow petal cake—I cut the recipe in half to make it one single layer, subbed orange blossom water in place of the vanilla and almond extracts, and made my favorite cream cheese frosting instead of buttercream. Quin’s recipe is wonderful, and you should check it out and give it a try (especially her beautiful rainbow petal design).

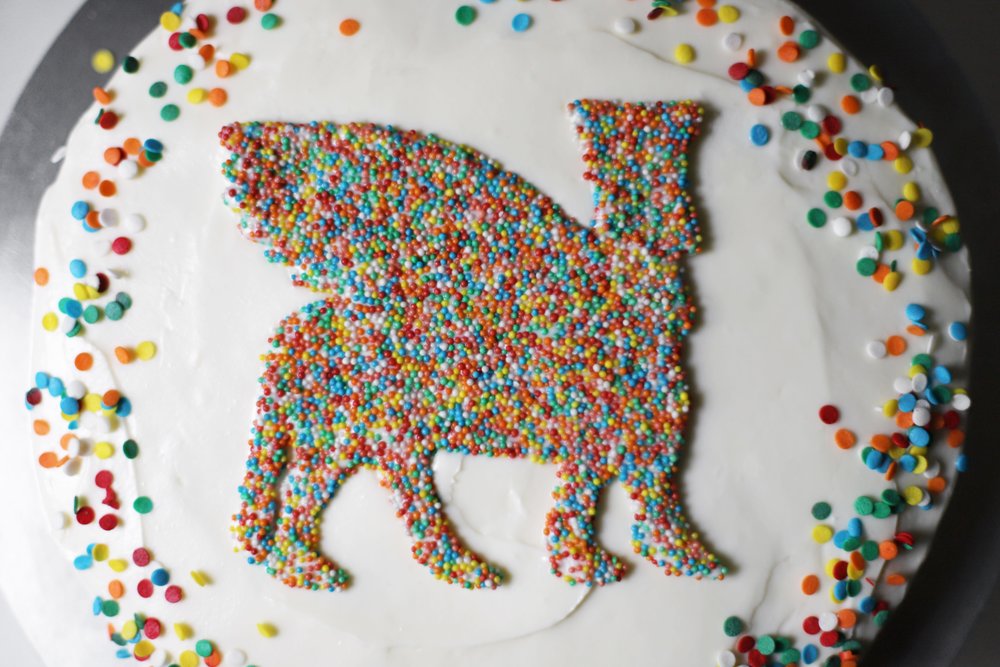
For anyone who’s interested in replicating this rainbow sprinkle covered white chocolate lamassu, I’ve included instructions and a video in the recipe below. But a small word of warning—this rainbow lamassu takes a lot of patience and care. If you’re the kind of person who likes building ships inside bottles and knitting intricate hats, this is totally up your alley. But if you’re the kind of person who absolutely dreads fiddly tasks, like installing a tiny SIM card, or if you always manage to get the entire bottle of superglue on your fingers instead of on your favorite broken coffee mug, then this project isn’t going to spark joy for you. But covering a cake in rainbow sprinkles is always a hit, so don’t sweat it if you don’t feel like fussing with all that tempering and piping.

Print

rainbow lamassu cake

Print Recipe

5 Stars 4 Stars 3 Stars 2 Stars 1 Star

No reviews

adapted from Butter Be Ready’s vanilla almond petal cake

  • Prep Time: 30 minutes
  • Total Time: 90 minutes
  • Yield: 8 servings

Ingredients

for the cake:

  • 200g all purpose flour (1 1/2 cups)
  • 7g baking powder (1 1/2 teaspoons)
  • 3g salt (1/2 teaspoon)
  • 55g unsalted butter, softened to room temperature (4 tablespoons)
  • 55g neutral-flavored oil (1/4 cup)
  • 150g granulated sugar (3/4 cup)
  • 2 large eggs, room temperature (110g)
  • 160g buttermilk, room temperature (2/3 cup)
  • 15g orange blossom water (1 tablespoon)

for the cream cheese frosting:

  • 225g (8 oz) package cream cheese, softened to room temperature
  • 115g butter, softened to room temperature (8 tablespoons)
  • 250g powdered sugar (2 cups)
  • 7g orange blossom water (1 1/2 teaspoons)
  • 1 pinch salt

to assemble and decorate:

  • Cooled cake
  • Cream cheese frosting
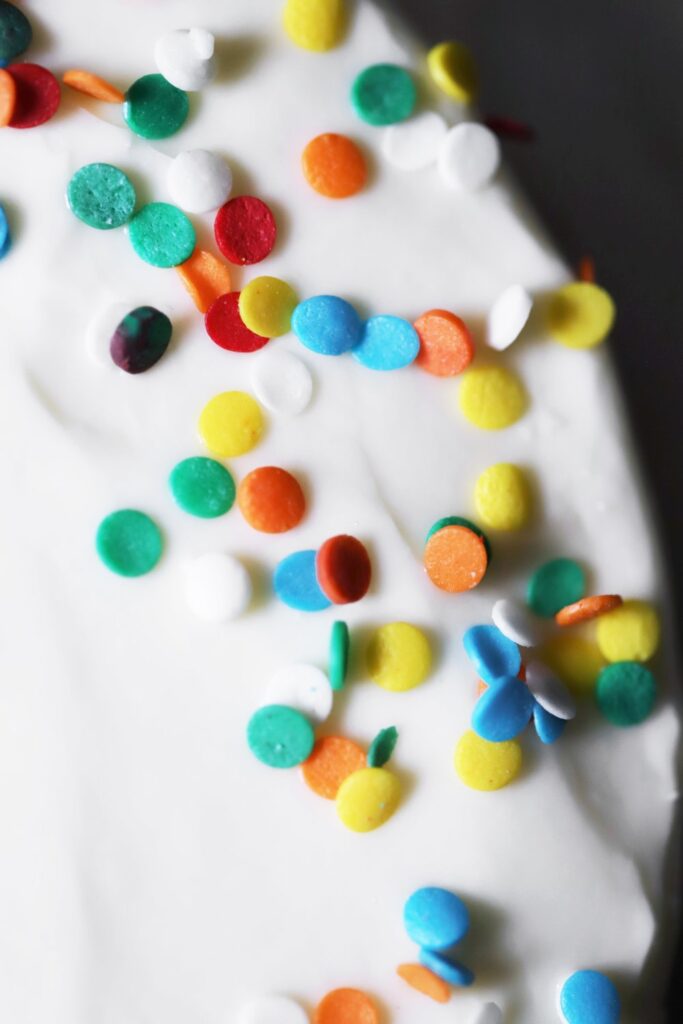
  • Rainbow sprinkles

Instructions

  1. For the cake: Preheat the oven to 350°F (180°C) convection (without convection, it might just take a couple more minutes to bake). Butter an 8-inch cake pan, line it with a parchment round, and then butter the parchment.
  2. Use a mesh sieve to sift together the flour, baking powder, and salt, and set it aside.
  3. Place the butter, oil, and sugar in the bowl of a stand mixer. Beat at medium-high speed with the paddle attachment until it comes together, then beat for another 3 minutes until it lightens a bit.
  4. Add the eggs, one at a time, allowing each to incorporate completely before adding the next. Then add the buttermilk and orange blossom water, and beat until combined.
  5. Add the dry ingredients to the wet ingredients, and mix just until it comes together into a smooth batter (don’t overmix it—it’s ok if there are a couple little lumps).
  6. Pour the batter into the cake round. Bake for about 35 minutes, or until a toothpick inserted into the center comes out clean.
  7. Trace around the edge of the cake with a thin knife, and then invert onto a cooling rack (flip it one more time, so it’s cooling flat-side-down). Let it cool completely before leveling or frosting.
  8. For the cream cheese frosting: Combine the cream cheese, butter, and powdered sugar in the bowl of a stand mixer. Beat with the paddle attachment until light and fluffy, about 3 minutes.
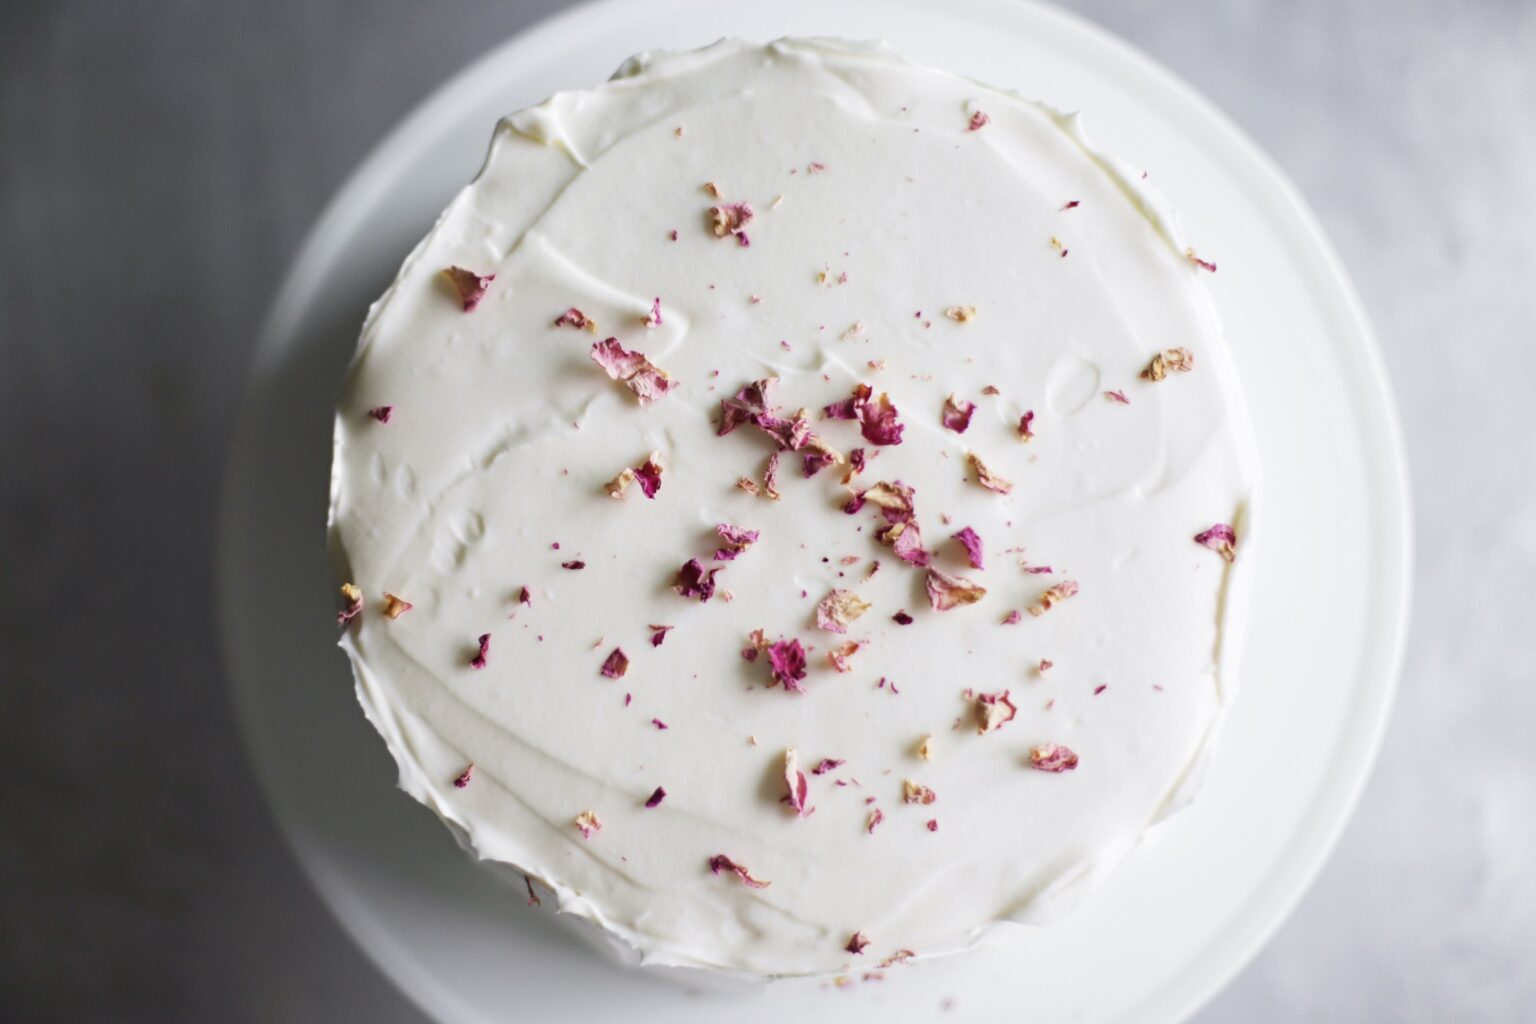
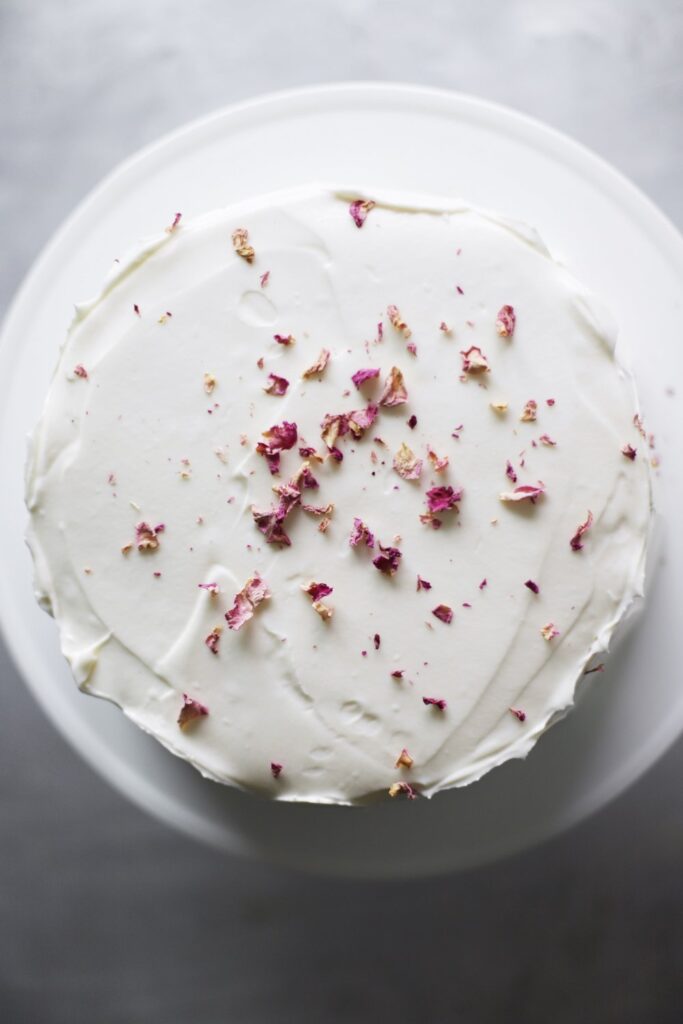
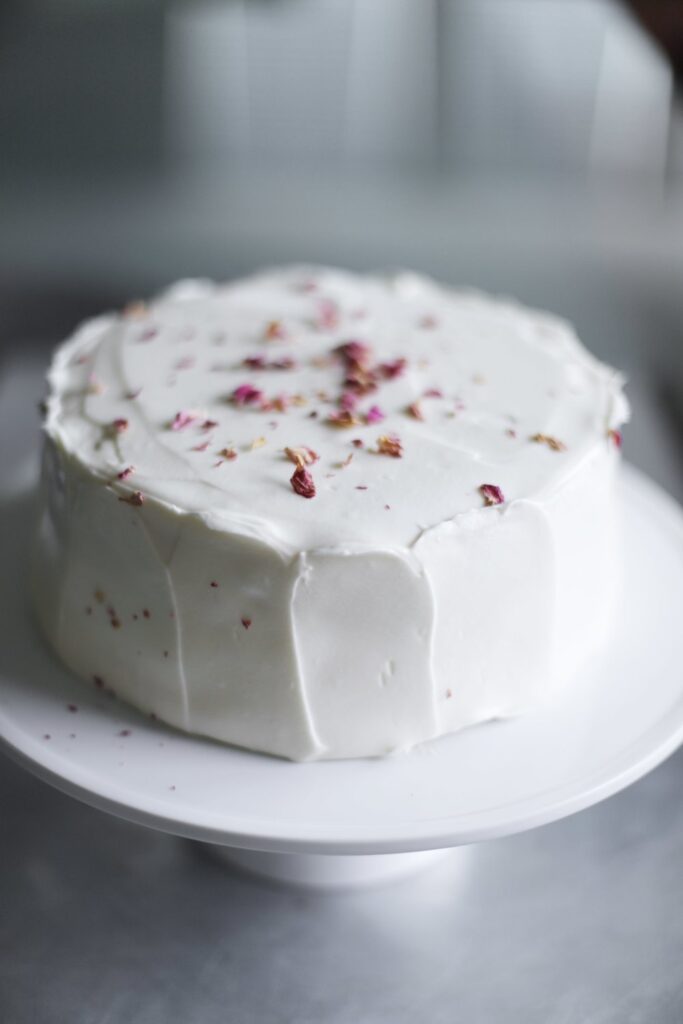
  9. To decorate: Once the cake cools, carefully shave a little off the top if it has a hump.
  10. Evenly frost the cake with the frosting (use a rotating cake tray and offset spatula if you have them).
  11. Decorate with rainbow sprinkles, or try your hand at a rainbow lamassu (follow instructions below—it’ll take an additional 30 minutes or so).

Notes

To make this cake ahead:

The cake itself can be baked 16 hours ahead and left at room temperature. If you want to bake it a day ahead of time (or longer), wrap it tightly and freeze it as soon as it cools, or it will get stale (it will stale even faster in the refrigerator than at room temperature). Let the cake thaw for a couple hours at room temperature before you’re ready to frost it.

Frosting can be made a couple days ahead of time and stored in the refrigerator, but must be brought to room temperature so that it’s spreadable before you frost the cake.

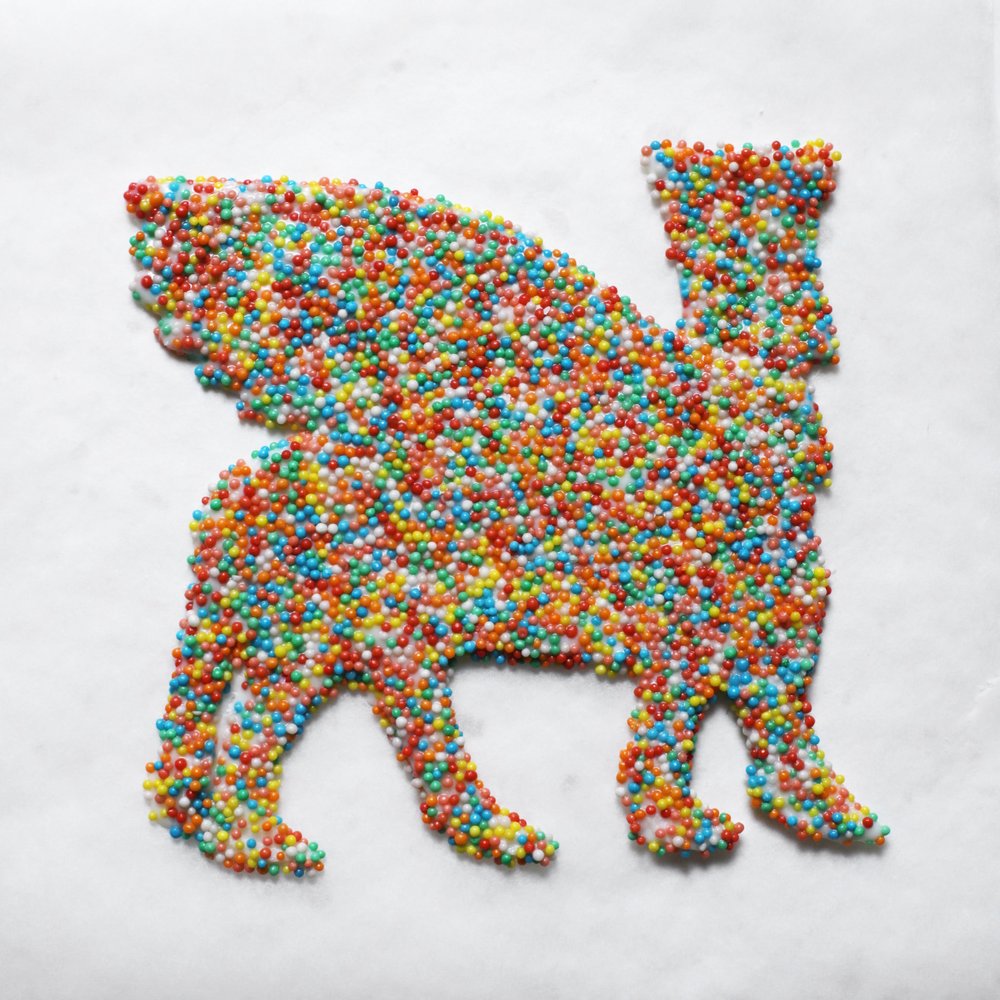
The white chocolate lamassu can be made a couple days ahead of time and stored in the refrigerator. Leave it on the cutting board, and wrap the board with plastic wrap once the chocolate has hardened.

Cakes are best assembled and decorated as close to the last minute as possible, because they tend to stale a little in the refrigerator (especially as the butter hardens), but it can be kept in the refrigerator for about 8 hours without much negative effect. Try to let it come to room temperature for about an hour before you serve it.

find us on instagram and let us know what you made!

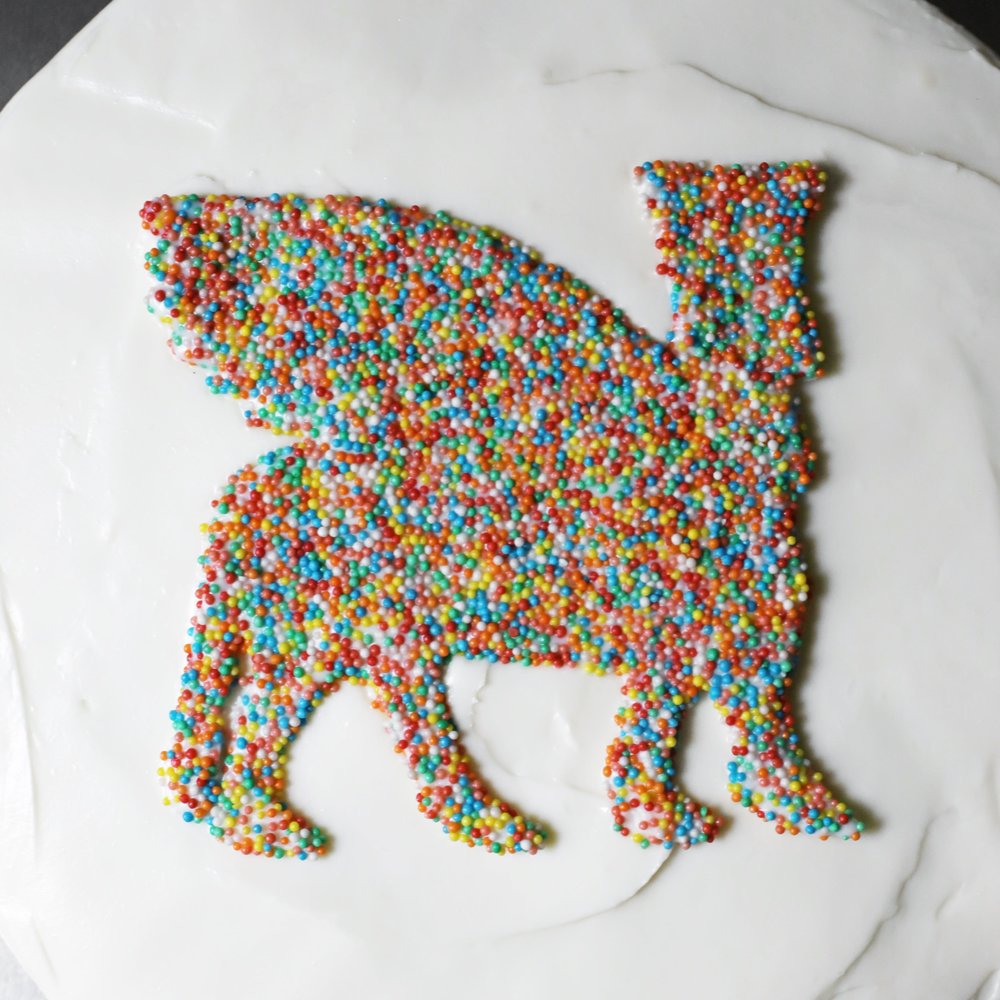
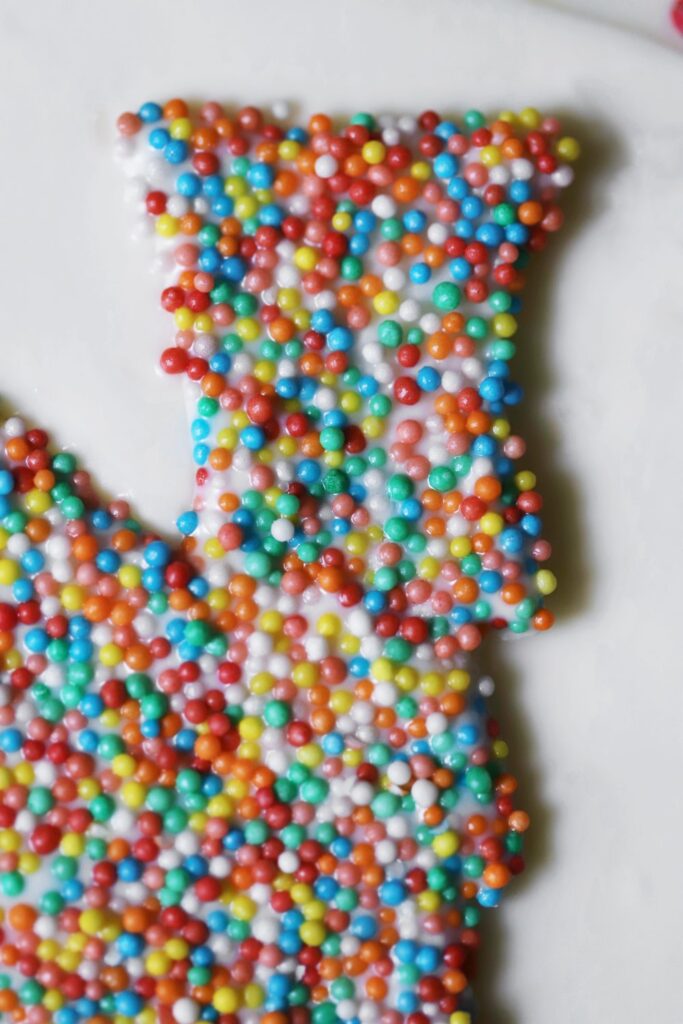
rainbow lamassu decoration

download a printable PDF with rainbow lamassu instructions
  • White chocolate
  • Tiny round rainbow sprinkles
  • Large circle rainbow sprinkles (optional)
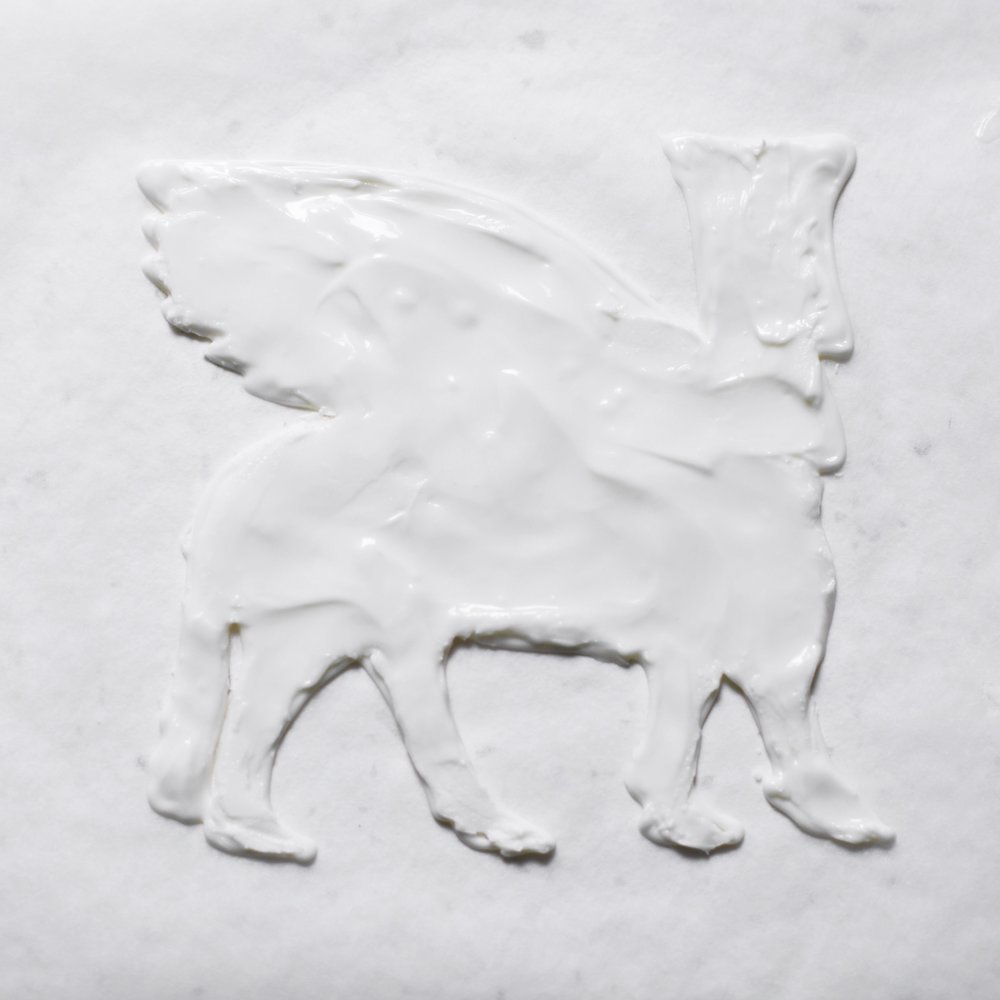
  1. Draw the outline of a lamassu on a piece of paper (look at some photos online, and feel free to just print one if that’s easier). Place the drawing on a small microwave-proof cutting board and masking tape it down so it doesn’t move around. Place a piece of parchment paper on top of the drawing, and use about 4 small pieces of masking tape to keep it in place and hold it flat.
  2. Temper some white chocolate (zap it in the microwave 10 seconds at a time, mixing between zaps, until it melts completely). Transfer the white chocolate to a pastry bag (or ziplock bag), and cut a small hole in the tip. Carefully pipe the outline of the lamassu in white chocolate (pipe at a 45 degree angle, rather than pointed directly down, and let the chocolate fall in a line).
  3. Once you’re completely done outlining, cut a larger tip in the bag, and go back and flood the rest of it. It will probably look a little rough and will probably harden a bit as you work—your priority is to stay in the lines and flood it with a somewhat thin layer (about 1/8-inch). Use a small offset spatula to help it spread out if you’re having trouble piping thinly enough.
  4. Once you’re done, place the lamassu back in the microwave just for a few seconds to slightly warm it if it has hardened at all (it takes about 15 seconds in my microwave, so keep a very close eye on it). It should be melted, but still holding its shape. Use a small offset spatula to very carefully smooth out any lumps on the surface, without letting it spill over the sides (make sure it stays in the lines).
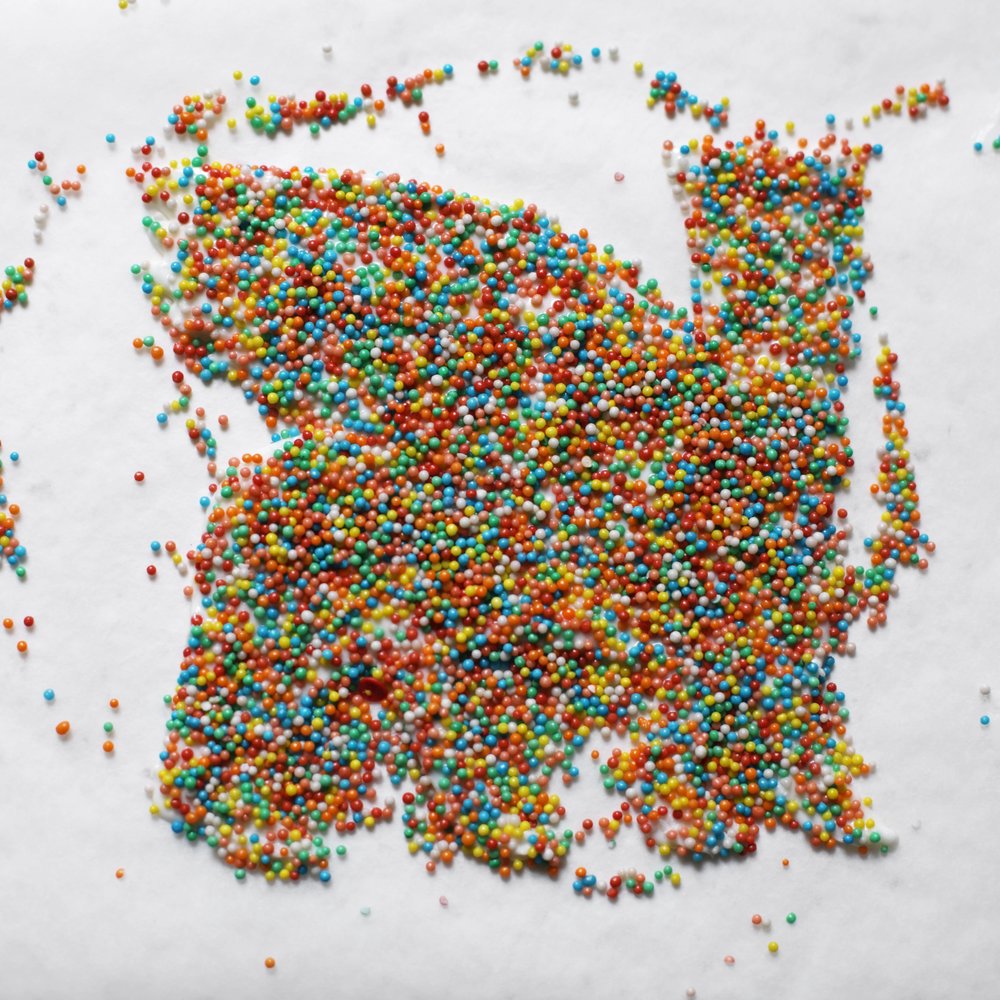
  5. Once it’s nicely smoothed out and pretty much level (it doesn’t have to be perfect), top it generously with rainbow sprinkles. Carefully shake the excess sprinkles off the cutting board—tilt the board slightly in different directions to get them to fall off (being careful not to disturb the white chocolate too much—you don’t want it to run).
  6. Use your offset spatula to gently nudge the outline back into shape (some sprinkles will stick to the side of the outline, and you’ll want to nudge those into the chocolate slightly, so that the outline isn’t jagged).
  7. Place in the refrigerator for at least 30 minutes, until it’s completely solid.
  8. Once your cake is frosted, carefully remove the tape from the parchment. Once the parchment is released from the cutting board, carefully lift it away and lift the lamassu away. Place the lamassu in the center of your cake, and optionally decorate the cake with a few large circle sprinkles.

Filed Under: every recipe, sweets Tagged With: buttermilk, cakes, cream cheese, cream cheese frosting, frosting, middle eastern, orange blossom water, sprinkles

easiest strawberry jello cake

June 20, 2019 by Kathryn Pauline 7 Comments

This strawberry jello cake recipe is particularly easy, with a dump-and-stir method (no poking the cake or pouring anything over it—just regular-old mixing!). And the frosting is just cream cheese, butter, and powdered sugar.

It’s so easy, it once saved me from the brink of recipe developing despair. Continue on to read more about that ordeal, or jump to the recipe to start baking!

strawberry jello cake sliced

Why from-scratch strawberry cakes are the worst

A few years ago, I set out to make a simple strawberry rose cake. Just something pink & white & pretty. How hard could it be? (*cue ominous music*)

Turns out, very.

Every time I folded fresh strawberries into the batter, the cake would emerge from the oven a shade of purple. On its best day, it would turn out a sad, pasty pink. And the flavor? If it tasted like anything, it was soggy berries.

I pivoted to powdered strawberries, which delivered on color—a neon pink so intense, it felt like a cry for help. But they offered zero flavor. So I tried a purée. Then I tried a reduced purée. Then jam. Then roasting. I tried food coloring.

I tried it all.

strawberry jello cake before the top goes on with a layer of strawberries

Why strawberry jello cake is simply the best

After two years of testing every strawberry cake recipe I could find, adapt, or Frankenstein into existence, I finally had to admit defeat. All roads lead to the same conclusion: nothing beats good old-fashioned strawberry jello cake. You know the kind—a cake that’s unapologetically made with box mix and a packet of jello.

It’s the pinkest. It’s the strawberriest. And it doesn’t pretend to be anything it’s not. And at this point, you could not pay me to make strawberry cake any other way.

strawberry jello cake frosted and decorated with rose petals
strawberry jello cake frosted and shown from the side

Optional ways to upgrade your strawberry jello cake

A little floral flair

I finally learned to appreciate the appeal of box-mix when I learned about my friend Abeer’s fabulous rose cardamom tres leches, which starts with box mix. The little bit of rosewater she adds to the milk soak turns ho-hum cake mix into something completely new.

Her recipe inspired me to try box mix with rosewater, and I’m so glad I did. It’s totally optional, but really takes strawberry jello cake to the next level.

All sorts of sprinkles

You can also sprinkle on some dried rose petals for the easiest-ever decoration. Pink sprinkles would do the trick too!

pink and white cake shown from the side

Suggested decorating instructions

Feel free to decorate the cake however you’d like (including just dumping the frosting on and swirling away!), or recreate this look, inspired by Zoë François’ pavlova. Patty Pinner’s fabulous strawberry cake in Sweets: Soul Food Desserts and Memories was a major inspiration for this recipe as well:

  1. Use a rotating turntable and offset spatula to evenly frost the cake. Smooth out the top with your offset spatula while rotating the turntable.
  2. Once the top is smoothed out, use your offset spatula to make sweeps up the side, rotating as you go and allowing the sweeps to overlap a little.
    • To make the sweeps, point the flat side of the offset spatula so it’s facing the side of the cake, and place the spatula so it’s oriented horizontally.
    • In one swift motion, sweep up while placing a small amount of pressure on the cake (don’t put too much pressure, or you will scrape off the frosting, which is not what you want to do).
    • Allow the end of the sweep to sort of fall toward the center of the cake (kind of trail off toward the center as your spatula leaves the cake, but don’t scrape the top).
Print

Easiest Strawberry Jello Cake

strawberry jello cake sliced
Print Recipe

5 Stars 4 Stars 3 Stars 2 Stars 1 Star

No reviews

  • Prep Time: 20 minutes
  • Total Time: 1 hour
  • Yield: 8 servings

Ingredients

for the cake layers:

  • One 15.25-oz box white cake mix *
  • One 3-oz package strawberry jello
  • 1/3 cup vegetable oil
  • 4 large egg whites
  • 1 cup water
  • 2–3 teaspoons rosewater (optional)**

For the cream cheese frosting & strawberry slices:

  • Two 8-ounce bricks of cream cheese, softened to room temperature
  • 4 tablespoons butter, softened to room temperature
  • 1/4 teaspoon salt
  • 1 1/2 cups powdered sugar ***
  • 1 cup 1/4-inch sliced strawberries (do not mix into the frosting)
  • Edible rose petals for decorating (optional)

Instructions

  1. For the cake: Preheat the oven to 350°F (175°C).
  2. Mix together the cake mix, strawberry jello, vegetable oil, egg whites, water, and rosewater.
  3. Line 2 8-inch cake pans with parchment rounds, and spray them with cooking spray. Pour the batter evenly into the 2 pans, and bake for about 30 minutes, until a toothpick inserted into the center comes out clean.
  4. Remove the cakes to a cooling rack, and let them cool completely before frosting (careful—they’re delicate).
  5. For the cream cheese frosting and strawberries: Mix together the cream cheese, butter, salt, and powdered sugar over low speed with a stand mixer and whisk attachment. Once the powdered sugar is all mixed in, increase speed to medium-high, and continue mixing until it lightens in color and consistency (this should take about 2 minutes). Use at room temperature.
  6. Place 1 cake layer on a cake stand (or use a rotating turntable and a cardboard cake round). Carefully level it if it has a hump (it probably won’t, because box mix is magical). Cover with a thin 1/8-inch layer of frosting. Top with strawberries. Spoon several small blobs of frosting over the strawberries, and smooth them out into another 1/8-inch layer of frosting. Place another cake layer on top. Dump all the frosting on top of the cake, and use an offset spatula to smooth the frosting down the sides. Decorate it however you’d like.

Notes

* If your box mix has a very different ingredients list than this recipe, feel free to follow those instead. Just add 1 extra egg white to compensate for the added strawberry jello packet. I used Duncan Hines white cake mix to test this recipe (not sponsored, just mentioning it for consistency).

** This is optional but really takes this cake to the next level. Less is more, and if you don’t add enough to the batter, you can always add a little to the frosting later.

*** If you like super sweet cream cheese frosting, feel free to add more powdered sugar, to taste.

Storage: This cake keeps well in the refrigerator for up to 24 hours. If you’re making it ahead for guests, you might want to make all the components and frost it at the last minute. It will stale in the refrigerator, so don’t make it too far ahead of time.

find us on instagram and let us know what you made!

Filed Under: every recipe, sweets, weeknight Tagged With: berries, cakes, cream cheese, cream cheese frosting, frosting, rosewater, strawberry, summer

  • « Go to Previous Page
  • Page 1
  • Interim pages omitted …
  • Page 89
  • Page 90
  • Page 91
  • Page 92
  • Page 93
  • Interim pages omitted …
  • Page 183
  • Go to Next Page »

Primary Sidebar

Kathryn Pauline smiling

Welcome! I’m Kathryn Pauline, cookbook author, recipe developer, and photographer.

Footer

read our privacy policy

© 2017 - 2026 Kathryn Pauline