This minimalist version of sautéed kale has a ton of flavor despite its few ingredients and simple technique. Here’s why I make it all the time:
- It takes 6 minutes from stove to table.
- It features very basic ingredients:
- olive oil
- garlic (or sub powder)
- kale
- lemon juice (or sub vinegar)
- salt and pepper
- and (100% optional!) parm or pecorino
- There are 0 extra steps (no cooking in batches, no covering with a lid or simmering in stock).
- There’s no guesswork about how hot your pan should get. You just start the garlic in a cold pan, and once it turns lightly golden, you know you’re ready to add the kale.
Jump to the recipe if you’re ready to hit the ground running, or read on for a bit more info.


What makes this sautéed kale recipe work
The cold pan technique (= no burnt garlic)
Garlic goes from raw to burnt very quickly, especially in an overheated pan. By starting the oil and garlic in a cold pan, you accomplish two things:
- Your garlic does not burn, since you start it slowly (yay!)
- You know exactly when the pan is hot enough to add your kale. Once the garlic starts to turn lightly golden brown, it is time.
Speed!
2+2+2=6 minutes
You put the garlic and oil in a cold pan over medium-high heat. You wait for it to start sizzling (2 minutes). You let it sizzle (2 minutes). You add the kale and toss it around until it wilts (2 minutes). Bam—6 minutes later, you have perfectly-sautéed kale with perfectly golden-brown garlic.
Basic ingredients + substitutions
If you don’t have fresh lemons, you can use the smaller amount of vinegar. If you don’t have fresh garlic, you can use dried. If you don’t have dinosaur kale, you can use curly. And if you’re not a fan of cheese, you do not have to add the pecorino or parmesan (it’s great without them).
This recipe works with whatever you’ve got!
No extra steps
The steps in this recipe only include what is absolutely necessary.
Could you work in batches? Sure, if you don’t mind taking the extra time. Could you fry the garlic separately? I mean… you do you! Could you blanch the greens first, and then shock them in some ice water before sautéing them? Well, I guessss so.
But with this technique you don’t have to do any of that. It turns out delicious with 0 fuss every time.


If you’re more in the mood for baking instead of sautéeing, I also really love this roasted kale recipe. It’s got a crisp-chewy texture and it might just be even easier than this one.
Anyway, I do hope you enjoy this recipe as much as I do. I reach for this one for both weeknight dinners as well as for guests. Save your prep time for the extra-special main course and keep it simple with the sides. Or pair this with boxed mac and cheese and chicken tenders. Either way, it’s a winner!

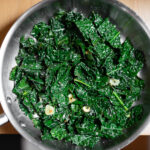
Sautéed Kale (6 minutes from stove to table)

Ingredients
- 1 Tbsp extra virgin olive oil
- 2 to 3 medium cloves garlic,* sliced thinly
- Chopped kale leaves from 1 medium-small bunch**
- 1 1/2 Tbsp lemon juice -or- 1/2 Tbsp balsamic or red wine vinegar
- Salt and pepper, as needed
- Optional: finely grated pecorino romano or parmesan
Instructions
- Place the olive oil and garlic in a large pan. Set the pan over medium-high heat.
- Once the garlic starts quietly sizzling, stir it for about 2 minutes.
- Once the garlic smells fragrant and starts to turn very lightly golden, add the kale. Stir every few seconds for about 2 minutes. Once it wilts down and turns bright green, add the lemon juice or vinegar, stir together, and remove from heat.
- Season with salt and pepper, to taste. Move to a serving bowl and top with optional pecorino romano or parmesan.
Notes
* If you don’t have fresh garlic, you can use powdered or granulated. If you have garlic salt, cut back on the additional salt. Instead of adding the garlic to a cold pan, just add the olive oil to a cold pan, heat for about 2 minutes, proceed with the kale part of the recipe, and then sprinkle on about 1/2 tsp of garlic powder before adding the lemon juice or vinegar.
** That’s 4.5 oz [125 g] of just the leaves from a 7 oz [200 g] bunch. It doesn’t actually matter what size bunch you have, but if yours is much larger, you’ll need a bigger pan and more lemon, garlic, etc. If your bunch of a lot smaller, you’ll need less of the various seasonings.
Video note: You can find the video in the introduction to this blog post. If you don’t see it after scrolling up, please disable ad block and reload the page.