
My friend’s 7-year-old daughter said that these are the best chocolate oatmeal cookies she’s ever had in her life. And given that kids are basically cookie experts, I took that as very high praise!
It’s hard to get a chocolate oatmeal cookie just right. The biggest risk is getting the ingredient ratios not-quite-right and ending up with something chalky and dry. This recipe gets the ratios just-right and has a few other tricks up its sleeve, resulting in a chewy, fudgy, and 100% chocolatey oatmeal cookie. Think of it as somewhere between a brownie, a chocolate chip cookie, and an oatmeal cookie (but with 0 raisins!!).
Jump to the recipe if you’re ready to start baking, or read on for a bit more info on why it works.


Why this recipe works
Here’s everything that this recipe for chocolate oatmeal cookies does right:
1) The right ingredient ratios
This recipe uses a ton of oats and a very healthy amount of cocoa powder. That means that we will not need as much flour as a typical chocolate chip cookie recipe. And we also need a bit more egg. The recipe has all these ratios taken care of, and they result in a wonderfully chewy-chunky texture.
2) Rest, rest, rest!
Most good cookie recipes will involve some amount of resting the dough (even just 30 minutes makes a big difference!). But this is extra-important for an oatmeal cookie recipe.
During the resting time, the oats and flour hydrate, the sugars start to dissolve a little, and everything just melds together. This is one of many reasons bakery cookies are always so good, and it’s 100% of the reason that frozen cookie dough from the supermarket is better than it has any right to be. Resting! It’s important.
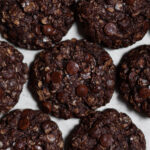
3) They’re pretty cute 🥰
Let’s just get one thing straight: an oatmeal cookie is going to be a bit lumpy. But there are degrees of lumpiness! Adding some chocolate chips and salt on top helps embraces that lumpy vibe (at the end of the day, you’ve gotta just own it). But you can also tone the lumpiness down a bit by doing this “cookie scoot” technique I first learned about from Cloudy Kitchen.
4) They’ve got enough cocoa powder
I know, I know, this is technically an ingredient ratio thing (see point 1). But it also deserves its own little paragraph because adding enough cocoa powder is essential. And in my experience, not adding enough cocoa powder is where most recipes for chocolate oatmeal cookies go wrong.
It makes sense that this would be a stumbling block—adding cocoa powder can be drying, and oatmeal cookies are already at risk of turning out dry thanks to that boatload of oats we’re also adding. But these cookies are neither dry nor bland, with plenty of chew and plenty of chocolate flavor.


Chocolate Oatmeal Cookies

- Yield: 17 pretty big cookies
Ingredients
- 1 stick (115g) unsalted butter, at room temperature
- 1/2 cup (100g) brown sugar
- 1/2 cup (100g) granulated sugar
- 1/2 tsp salt
- 1 large egg
- 1 egg yolk
- 1 tsp vanilla extract
- 2/3 cup (85g) all purpose flour
- 1/2 cup (40g) dutch process* unsweetened cocoa powder
- 1/4 tsp baking soda
- 3/4 tsp baking powder
- 1 1/2 cups (150g) rolled oats
- 1 1/2 cups (250 g) chocolate chips
- To decorate: Flaky sea salt (optional) + additional chocolate chips
Instructions
- Place the butter, brown sugar, granulated sugar, and salt in the bowl of a stand mixer fitted with the paddle attachment.** Beat together at medium-high speed until very light and fluffy, about 2 minutes.
- Add the egg to the butter/sugar mixture and beat at medium speed for about 15 seconds, just until it incorporates. Stop the mixer to add the egg yolk and vanilla, and then continue mixing for about 30 seconds, until light and fluffy. Stop to scrape down the sides and bottom and mix again for a few seconds.
- Place the flour, cocoa, baking soda, and baking powder in a fine mesh sieve or sifter. Sift directly into the stand mixer. Add the rolled oats and chocolate chips to the mixer. Mix everything together at low speed, just until it forms a uniform dough (about 15 to 30 seconds). Scrape the bottom of the bowl to make sure it is fully incorporated, but do not over-mix.
- Let the dough rest*** in the fridge for 30 minutes, up to 48 hours.
- Preheat the oven to 350°F [180°C] while your dough chills, and line a few sheet pans with parchment.
- Roll the dough into 50g balls (a scant 1/4 cup, or a size 1.75 oz/size 24 disher).
- Space the balls evenly on the prepared sheet pans. Embed a few chocolate chips across the surface and sprinkle with flaky salt (if using).
- Bake for about 14 minutes,**** working in batches. They’re done when the edges are set and the centers are still very soft but not liquid. You can do this cookie shaping trick if they’re a little wonky (but act fast, right out of the oven). Slide the parchment onto the counter to cool.
Notes
* If you are using regular (“natural unsweetened”) cocoa powder, add an extra 1/4 tsp baking soda to the dry ingredients (that’s 1/2 tsp baking soda, total).
** If you do not have a stand mixer, you can use a hand mixer with the egg beaters attached.
*** More than chilling them, the goal here is rest. Thirty minutes makes a difference, but longer is even better. During resting, the flour, oats, and sugars hydrate, which results in cookies with a bakery-quality texture. If you skip this step, your cookies will turn out fine, but they won’t quite live up to their potential.
**** Your bake time might be different, so keep an eye on the first batch and adjust accordingly. Look out for the visual cues more than the timing.
Video note: If you don’t see the video for this post after scrolling up, please disable ad block and try reloading the page.


