• Skip to primary navigation
  • Skip to main content
  • Skip to primary sidebar
  • Skip to footer
Cardamom and Tea
  • Blog
  • Recipes
  • About
  • Cookbooks
    • Piecemeal
    • A Dish for All Seasons (my first cookbook)

sticky toffee gingerbread with rose ice cream

December 20, 2019 by Kathryn Pauline Leave a Comment

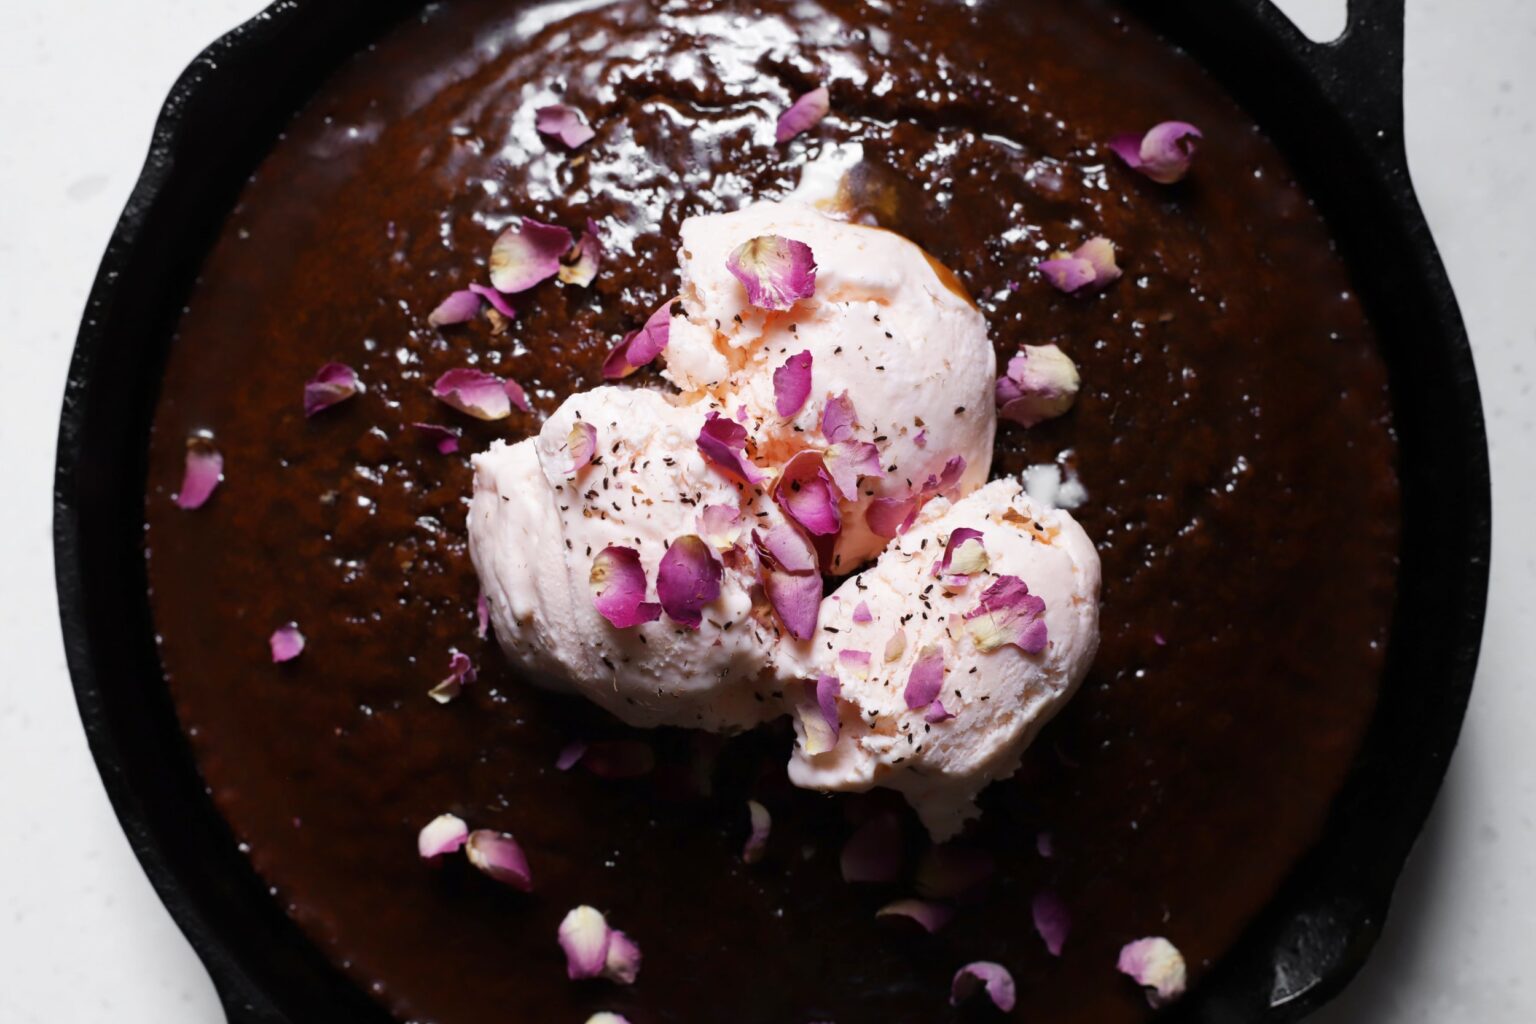
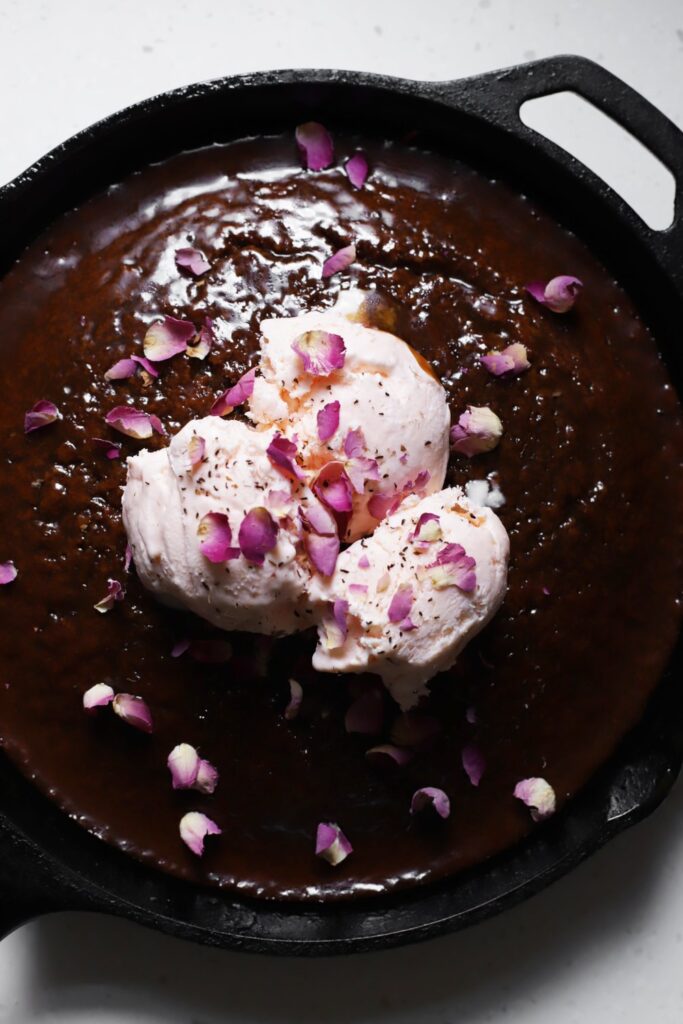
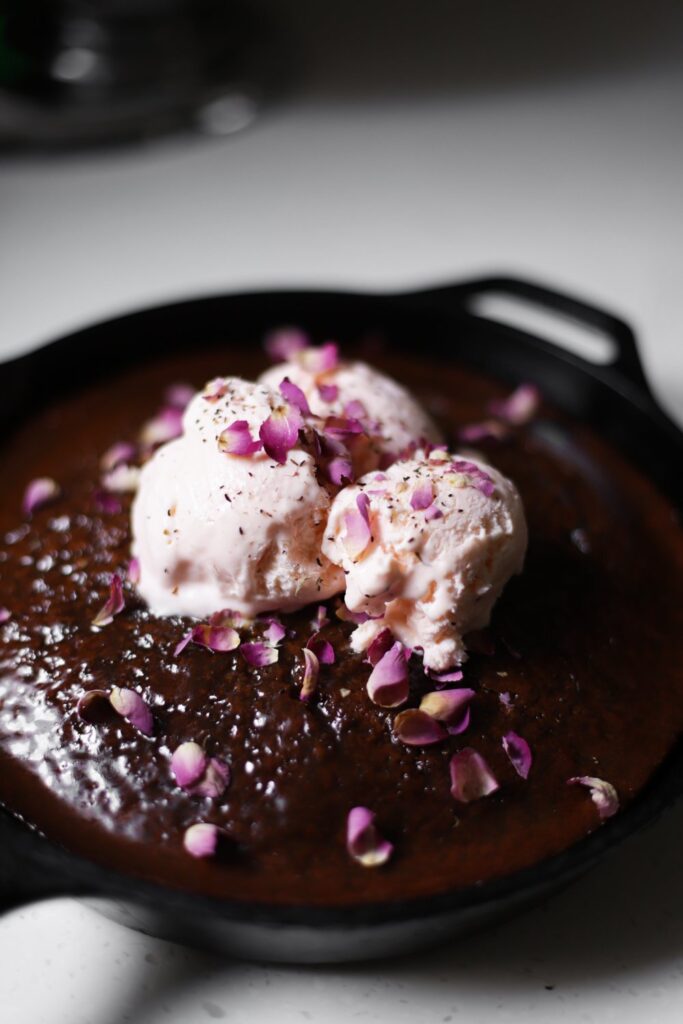
Last December, so many friends and readers made my cardamom rose gingerbread cake, so this year I wanted to share a new dessert showstopper with a similar flavor profile. So here it is—sticky toffee gingerbread with no-churn rose ice cream! It’s got everything we all love about cardamom rose gingerbread cake, but it’s got that whole cold ice cream vs. hot toffee sauce thing going for it.

It’s funny, the hot-and-cold dessert phenomenon has always kind of stressed me out, because I’m a slow eater, and it seems to turn dessert into a race to finish eating before the ice cream melts. So if you feel similarly, feel free to serve the ice cream on the side instead. Or if you’re well-adjusted, you can just go ahead an embrace the meltiness, because (apparently!) that’s part of the beauty of the experience. Either way, I think you’re gonna enjoy this one.

No churn ice cream reminds me a lot of kulfi, especially here with the rosewater. But if you want it to be smoother and more like Philadelphia-style ice cream, with absolutely no discernible ice crystals, you can add a tablespoon or two of vodka to the mix (I’ve included instructions in the notes below the recipe). I’ve tried it both ways, but I ended up developing the final version of this recipe without the vodka, because I wanted to make sure that this recipe could be enjoyed by every ice cream partaker at the table—if you’re adding the vodka for a smoother texture, of course be sure to let your guests know there’s a bit of alcohol in the ice cream. I’ve also included instructions below the recipe if you want to skip the ice cream altogether—you can always make rosewater whipped cream instead, which is just as delicious.

Before I leave you with the recipe, I just wanted to wish you all happy holidays! I’ll be celebrating Christmas with my husband Simon and my sister Meghan, who’s visiting us in Melbourne next week, and we’ll also celebrate Hanukkah by frying up some latkes with Simon’s dad’s recipe (ICYWW, I’m team sour cream and applesauce swirled together). This month I’ve scrunched all of my holiday recipes together and posted a bit more than usual, so I’m gonna be taking the next week off, and will see you soon after Christmas with a lovely little bread pudding recipe. Happy holidays, and hope you enjoy some time to recharge and enjoy the season however your heart desires.

Print

sticky toffee gingerbread with rose ice cream

Print Recipe

5 Stars 4 Stars 3 Stars 2 Stars 1 Star

No reviews

loosely adapted from Mary Berry’s recipe for sticky toffee pudding

  • Prep Time: 35 minutes
  • Total Time: 2 days
  • Yield: 8 servings

Ingredients

for the rose ice cream*

  • 460g heavy whipping cream (2 cups)
  • One 395g can sweetened condensed milk (14 oz)
  • 2–3 teaspoons rosewater **
  • A few drops pink food coloring (optional)

for the toffee sauce:

  • 115g heavy cream (1/2 cup)
  • 45g butter (3 tablespoons)
  • 65g brown sugar (1/3 cup)
  • 20g molasses (1 tablespoon)
  • 1 teaspoon rosewater (5g)
  • A pinch of salt

for the cake:

  • 100g melted butter (7 tablespoons), plus extra for greasing the pan
  • 175g brown sugar (3/4 cup + 2 tablespoons)
  • 2 large eggs (110g)
  • 55g molasses (3 tablespoons)
  • 290g whole milk (1 1/4 cup)
  • 1 tablespoon rosewater (15g)
  • 225g flour (1 3/4 cup)
  • 1 tablespoon ginger powder (7g)
  • 1 teaspoon baking powder (4g)
  • 1 teaspoon baking soda (5g)
  • 1/2 teaspoon salt (3.5g)
  • 3/4 teaspoon cardamom (2g)
  • 1/2 teaspoon cinnamon (1.5g)
  • Edible rose petals

Instructions

  1. For the rose ice cream: Whip the cream to stiff peaks.
  2. In a separate bowl, combine the sweetened condensed milk, rosewater, and food coloring.
  3. Fold 1/2 of the sweetened condensed milk mixture into the whipped cream, then carefully fold in the last 1/2.
  4. Pour the mixture in a loaf pan, cover with foil or plastic wrap, and freeze overnight.
  5. For the toffee sauce: Combine all ingredients in a small saucepan, and bring to a simmer over medium heat, stirring constantly. Once it comes to a simmer, drop the heat to medium-low and continue to simmer for 3 minutes to thicken slightly.
  6. Store in the refrigerator overnight, and slightly warm it to warm room temperature on the stove or in the microwave when you’re ready to use it (toffee sauce can be made at the last minute, but it’s easier to just make the day before).
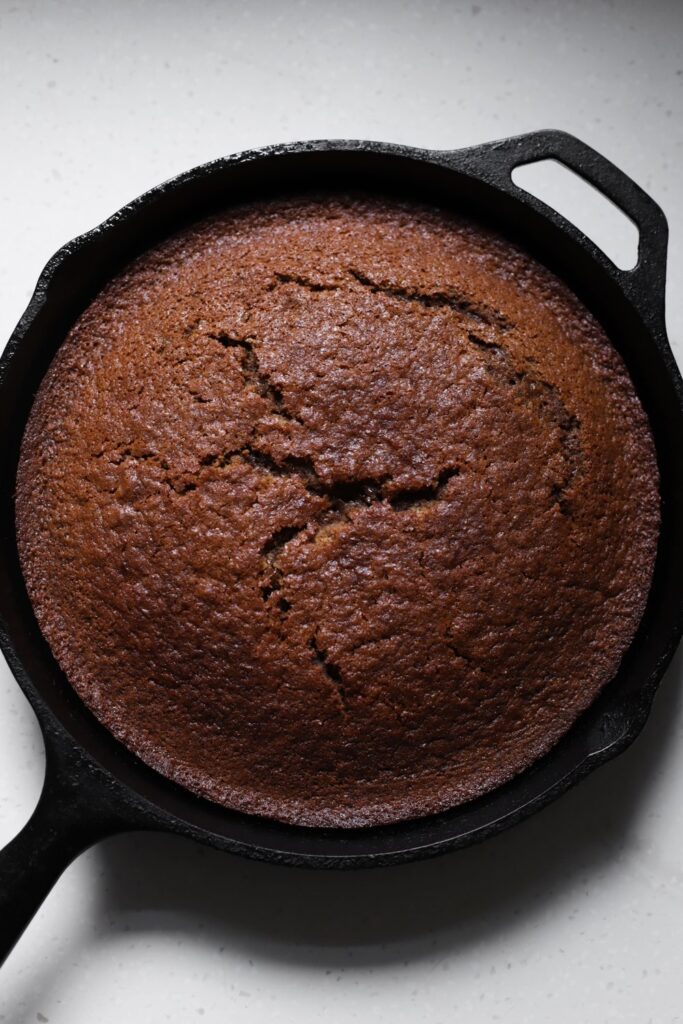
  7. For the cake: Preheat the oven to 350°F (180°C) convection (if you don’t have convection, it might just take a little longer to bake). Butter an 10-inch cast iron skillet***, line it with a parchment round, and then butter the parchment.
  8. In a large mixing bowl, combine the 7 tablespoons melted butter, brown sugar, and eggs, and whisk together for about 30 seconds. Add the molasses, whole milk, and rosewater, and whisk together until it’s completely incorporated.
  9. Place a large sieve over the mixing bowl, and sift the flour, ginger, baking powder, baking soda, salt, cardamom, and cinnamon directly onto the wet ingredients. Mix everything together until there are just a few small lumps (don’t overmix).
  10. Transfer the batter to the greased cast iron skillet and bake for about 40 minutes, until a toothpick inserted in the center comes out clean.
  11. Let it cool to warm room temperature in the pan.
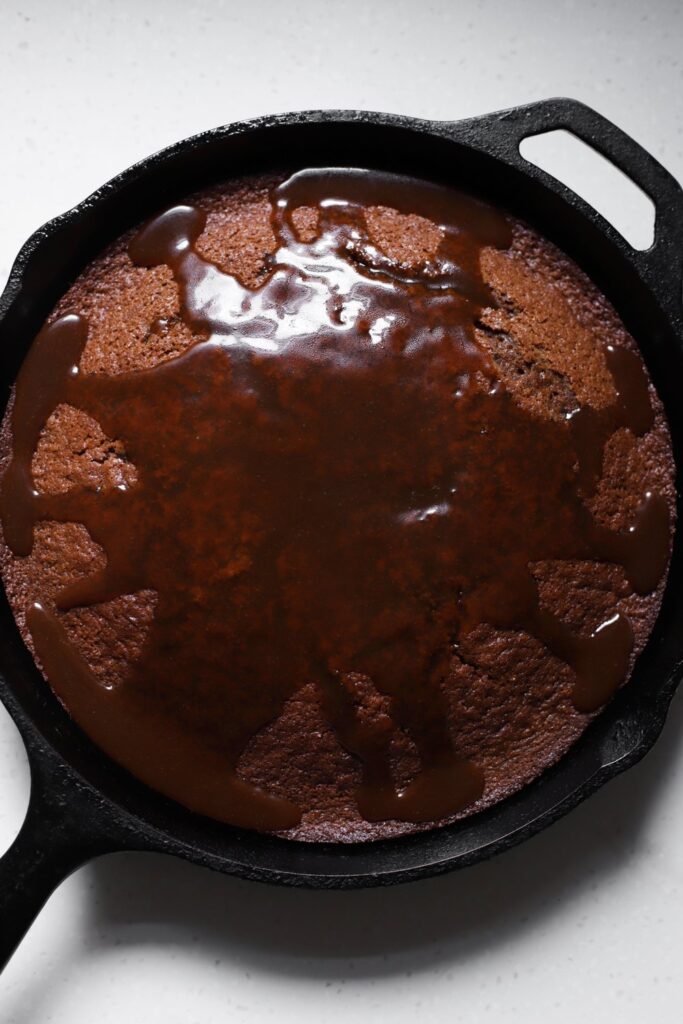
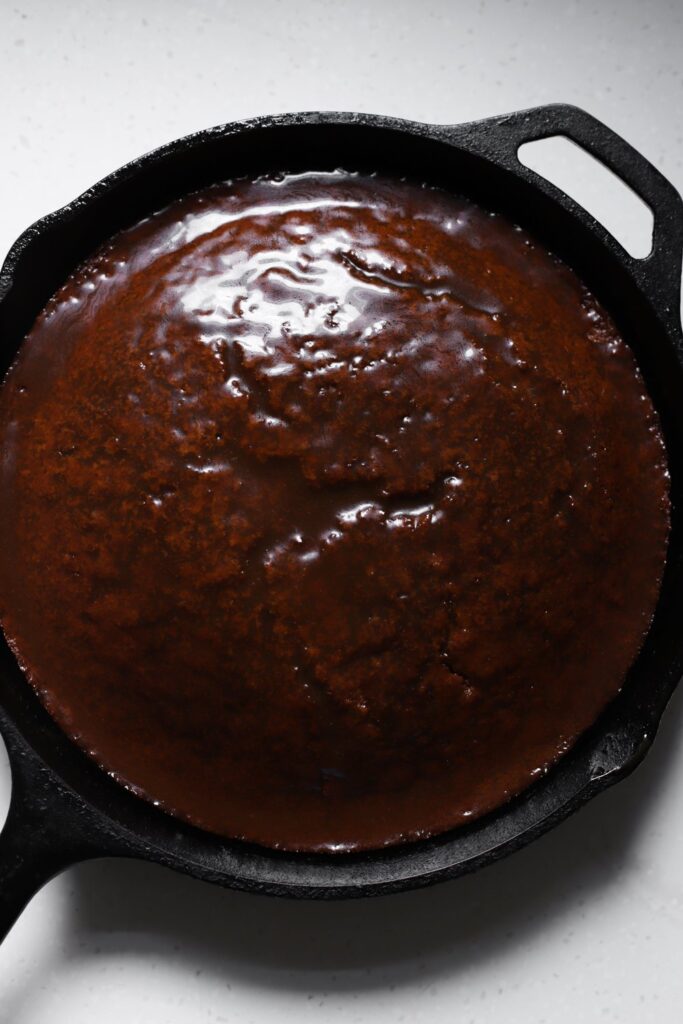
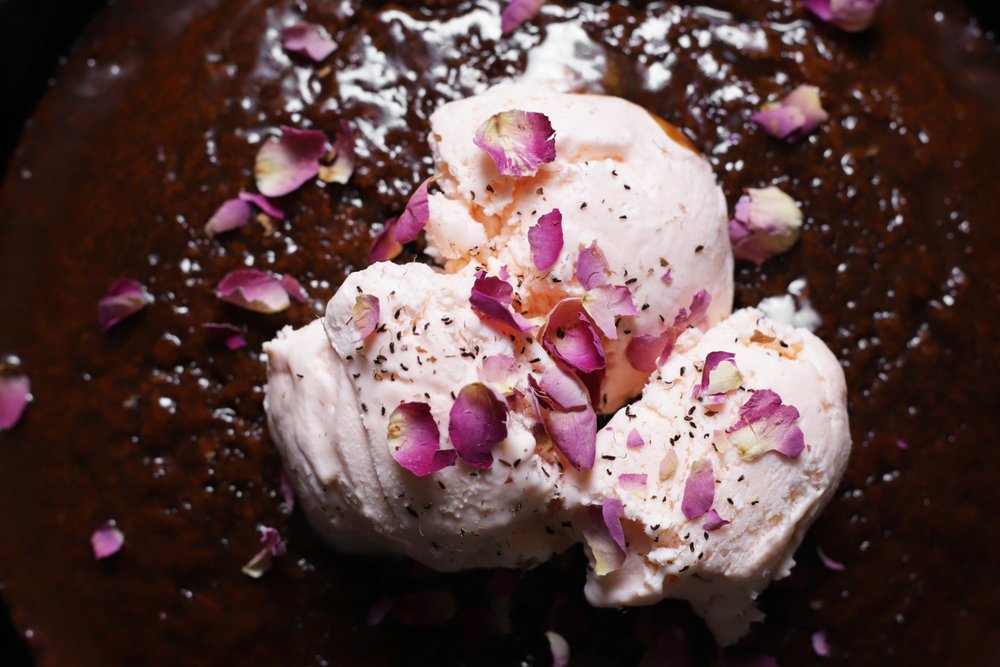
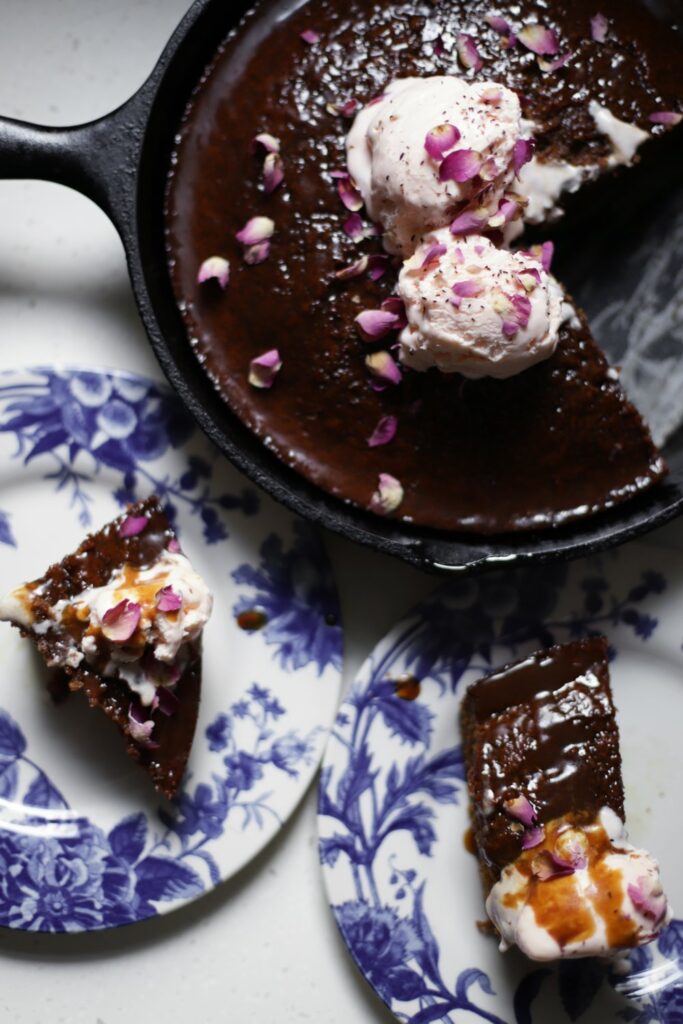
  12. Top with some of the toffee sauce, then a few scoops of the ice cream, followed by the rose petals. Serve right away with extra sauce and ice cream on the side.

Notes

* Most no-churn ice creams are a bit less fine-textured than churned ice creams (think, Indian kulfi, e.g.). No-churn ice creams that have a finer texture almost always have a few tablespoons of hard liquor, which you are totally welcome to add here, in the form of 2 tablespoons of vodka mixed with the sweetened condensed milk. Be sure to let your guests know that there’s a little bit of booze in the ice cream (and obviously don’t serve it to children). It’ll be lovely either way! If you want to avoid the question all-together, you can just whip up some heavy cream with little bit of sugar and rosewater (and pink food coloring, if you’d like), stop at soft peaks, dollop it on top, and call it a day.

** Different brands of rosewater will have different strengths, so make sure you taste and adjust as needed (if you think yours might be super strong, add it gradually in all 3 components of this cake). The ice cream should have a medium rose flavor, but not too perfumey. The cake should only have a subtle rose flavor, which highlights the cardamom and other spices. The toffee sauce should have a medium rose flavor, but again, not too perfumey. If you want to go big with the rosewater, feel free to try a little more in the ice cream only, which you can always serve sparingly if it turns out too overwhelming to eat by the spoonful.

*** You don’t absolutely need a cast iron skillet here. If you use an aluminum cake pan instead, it might just take less time to bake. I like using a cast iron skillet for this because I love things that can go from oven to table in an aesthetically pleasing way. But it’s totally not a big deal to use something else.

To make ahead and store: The cake can be made up to 3 months ahead of time and stored tightly wrapped in the freezer. If you’re making it the day before serving, you can store it for about 16 hours tightly wrapped at room temperature. Don’t store the cake in the refrigerator, as it will stale more quickly (like all cakes and floury baked goods). The ice cream can also be made way ahead of time and kept tightly covered in the freezer. The caramel sauce can be kept in the refrigerator for a few days; slightly warm it to warm room temperature on the stove when you’re ready to use it. Bring everything together when you’re rea
dy to serve. Leftovers keep really well in the freezer (microwave individual slices for a few seconds, just to warm them through… heaven!).

find us on instagram and let us know what you made!

Filed Under: every recipe, sweets Tagged With: cakes, cardamom, cinnamon, ginger, gingerbread, ice cream, rosewater

nazook (Armenian/Assyrian pastries)

December 16, 2019 by Kathryn Pauline 16 Comments

This recipe is inspired by my Auntie May’s famous nazook recipe. It’s impossible for anyone in my family to bake or eat nazook (AKA nazooki) without thinking about her. My version is deeply indebted to hers (which are truly the GOAT). Mine is also darn good because of all I learned from May’s example.

Jump to the recipe if you’re ready to bake, or read on for a few handy tips and tricks:

This post contains affiliate links (learn more).

A few tips on making the best nazook:

1. Do not bake them chilled!

This is the weirdest tip for baking nazook, but I learned the hard way. While many pie dough recipes tell you to chill it first so it holds its shape, the same is not true of this kind of dough. If you chill it before baking, they will crack and slowly explode open.

I have no idea why this happens, and would love if some friendly food scientist out there could fill me in. All I know is that it is something to worry about and avoid. Do not bake these from chilled, as you would with pie dough or shortbread.

2. You don’t need a crinkle cutter (but do buy one if you’re serious about nazook)

They will be equally tasty even if you don’t have a crinkle cutter. But they will not be as cute. I highly recommend buying a crinkle cutter for that authentic nazook look. Most crinkle cutters are around $10 and pretty easy to find online. This is the crinkle cutter I use (affiliate link).

3. Shape the log evenly.

The steps to shaping nazook are: roll out, fill, roll up, slice. But it’s not quite as simple as that.

After filling and rolling it up, the ends of the log tend to get a bit spindly while the center tends to get a bit chubby. Make sure your log is evenly shaped before slicing by slightly rolling out the center of the log as if it were a rolling pin. Also squish the sides in a bit to make sure they are not too thin. Slightly smaller nazook will turn out better than larger ones and will be less likely to misshape in the oven.

4. Store in the freezer to keep them fresh.

No one likes a stale nazook! And like all baked goods, these will stale quickly at room temperature after the first 12 hours or so. Freeze whatever you don’t plan to consume that day, and enjoy later. Freeze them once they’ve completely cooled, but while they’re still very fresh for the best results.

Print

Nazook (Armenian/Assyrian pastries)

Print Recipe

5 Stars 4 Stars 3 Stars 2 Stars 1 Star

5 from 2 reviews

  • Prep Time: 1 hour
  • Total Time: 12-36 hours
  • Yield: 3 dozen cookies

Ingredients

for the filling:

  • 100g flour (about 3/4 cup)
  • 150g sugar (about 3/4 cup)
  • 85g cold unsalted butter (6 tablespoons), cut into 1/2-tablespoons
  • 2g vanilla extract (½ teaspoon)
  • 1 pinch salt

for the dough:

  • 400g flour (about 3 cups)
  • 230g cold unsalted butter (2 sticks), cut into ½-tablespoon-sized pieces
  • 6g salt (1 teaspoon)
  • 225g full-fat sour cream (1 cup)
  • 5g instant yeast (1 1/2 teaspoons)
  • 30g sugar (2 tablespoons)
  • 2g vanilla extract (1/2 teaspoon)
  • 1 beaten room temperature egg, for the egg wash*
  • Special equipment: a crinkle cutter**

Instructions

  1. For the filling: Mix the flour, sugar, butter, vanilla, and salt with a pastry blender or food processor fitted with the blade attachment, until it’s completely combined and there are no chunks of butter. Remove the filling to a container (don’t compress it), seal it shut, and store it in the refrigerator until you’re ready to use it.
  2. Don’t bother washing the food processor, because you’ll use it in the next step.
  3. For the dough: Add the flour, butter, and salt to the food processor. Pulse several times, until there are no big pieces.
  4. In a small mixing bowl, combine the sour cream, yeast, sugar, and vanilla, and then add it to the food processor with the butter/flour mixture. Pulse several more times, until it comes together into a soft dough (don’t overmix, and stop as soon as it comes together).
  5. Shape the dough into 3 equal discs (about 300g each), and cover them with plastic wrap. Let them sit at cool room temperature for 30 minutes, and then rest them in the refrigerator overnight, up to 36 hours.
  6. Preheat the oven to 350°F/180°C when you’re ready to bake.
  7. Lightly flour the counter, and roll one of the chilled dough discs out into a 10 x 14” rectangle (⅛-inch thick). A few tips on making a rectangle: first, gently tap the sides on the counter to square them off. As you roll it out, pat the sides in every once in a while to help nudge it into a rectangle instead of a circle, and then continue rolling.
  8. Crumble and spread the filling out to the edges of the rectangle, leaving about ¼-inch border on the 2 long sides. Use the heel of your hand to gently compress the filling into an even layer.
  9. Tightly roll up from one long side to the other. Once it’s almost totally rolled up, dab a tiny bit of water along the long side to help it seal shut.
  10. Place the log so the seam is tucked under the bottom, and very slightly flatten the log with your rolling pin so that it’s about 1 1/4” tall (and 1 3/4” wide). Use a crinkle cutter to slice the log into approximately 1”-wide pieces.
  11. Repeat with the other dough balls.
  12. Place the pieces on parchment-lined sheet pans. Let them sit for 10 minutes to bring them completely to room temperature.***
  13. Brush their tops with the room temperature beaten egg. Bake for 35 minutes until deeply golden brown and cooked through.

Notes

* To quickly bring the egg to room temperature, place it in a glass, cover with hot tap water, and let it sit for a few minutes.

** No worries if you don’t have a crinkle cutter. You can totally use a knife instead—they’ll just have a different look. This crinkle cutter (affiliate link) is the one that I personally use.

*** If you bake them cold, they will burst open and crack dramatically as they bake (a few little cracks are totally fine, but cold nazook split open very dramatically). Another way to prevent cracks is to cut them a little smaller. Sometimes the middle of the log bulges a little after rolling it up, but you can gently roll it back and forth like a rolling pin to make the center a bit thinner. Squish in the sides slightly to make sure they don’t get too spindly.

To store: Nazook (like many floury, buttery baked goods) stale at room temperature after the first day or two, and stale even more quickly in the refrigerator. They will keep for up to 3 months tightly wrapped in the freezer. Do not store these in the refrigerator! If I’m not eating them 12-16 hours after baking, I like to store them in the freezer immediately after baking to make sure they stay super fresh, and let them thaw at room temperature for a couple hours before enjoying later on. You can also microwave them for just a few seconds to warm them through if they’re tasting a little on the stale side.

find us on instagram and let us know what you made!

Filed Under: every recipe, family recipes, sweets Tagged With: cookies and bars, middle eastern, vanilla

  • « Go to Previous Page
  • Page 1
  • Interim pages omitted …
  • Page 74
  • Page 75
  • Page 76
  • Page 77
  • Page 78
  • Interim pages omitted …
  • Page 183
  • Go to Next Page »

Primary Sidebar

Kathryn Pauline smiling

Welcome! I’m Kathryn Pauline, cookbook author, recipe developer, and photographer.

Footer

read our privacy policy

© 2017 - 2026 Kathryn Pauline