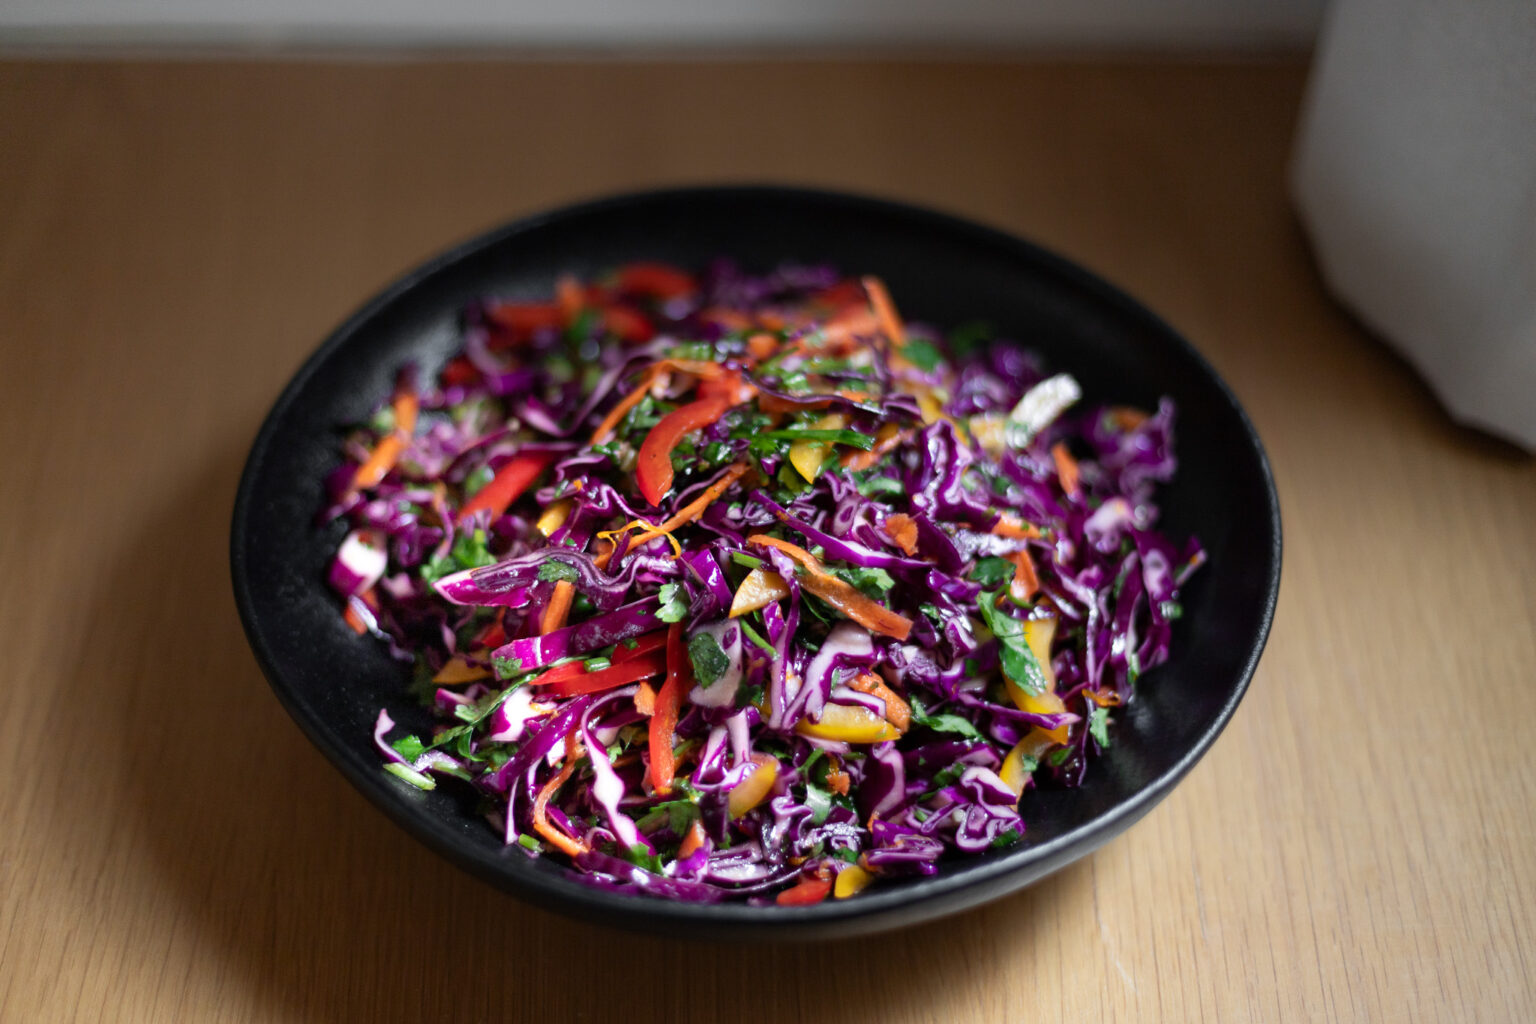
• Skip to primary navigation
  • Skip to main content
  • Skip to primary sidebar
  • Skip to footer
Cardamom and Tea
  • Blog
  • Recipes
  • About
  • Cookbooks
    • Piecemeal
    • A Dish for All Seasons (my first cookbook)

Rhubarb Galette with Pistachio Frangipane

August 2, 2025 by Kathryn Pauline Leave a Comment

rhubarb galette

If you’re looking for a rhubarb galette that actually tastes like rhubarb, this one is for you. There are no strawberries here, no syrupy glaze to water down the rhubarbiness. It’s just bright, tangy rhubarb with a few simple ingredients, nestled over a layer of pistachio frangipane, all baked into a rustic crust.

Read on to learn more about why this is my favorite rhubarb galette recipe or jump to the recipe to hit the ground running.

rhubarb
rhubarb galette

Why I love this Rhubarb Galette

1. It actually tastes like rhubarb.

I love strawberry rhubarb, but sometimes it’s nice to let rhubarb shine on its own. Its flavor is sharp and a little bit earthy. It’s like spring, distilled. With just the right amount of sugar, it turns into something bright and clean that doesn’t need any help from berries.

2. The frangipane highlights and smooths out the rhubarb.

The frangipane softens the rhubarb’s tanginess just enough and adds a little bit of creaminess, but rhubarb still takes the lead. It’s sort of like how coffee’s flavor rounds out when you add a splash of milk, or how you can taste the spices in chai more distinctly after adding milk and sugar. It helps you taste more of what’s already there.

3. It’s forgiving.

You can line up the rhubarb in perfect rows or you can toss it together in a total jumble. You can roll the dough into a perfect circle or leave the edges lopsided. I guess you could even pipe on the frangipane, but my recipe just asks you to spread it in an even layer. A galette looks (and tastes) great whether you’re a perfectionist or a well-adjusted, chill person.

rhubarb galette
rhubarb galette

Tips for dough success

My recipe for rhubarb galette will walk you through everything, but here is a bit more context about the galette dough:

  • Cream cheese crust: You can use any crust you’d like for this, but my cream cheese crust is super forgiving. It doesn’t tend to crack or develop holes, so the filling stays put as it bakes. Rolling it out is as smooth as rolling out a new can of Play-Doh. And after it bakes up, it’s flaky and delicious.
  • Disk shaping: Don’t skip the step where I have you carefully shape your dough into a disk. Making sure the disk is smooth and does not have cracks on the sides will lead to a smoother roll-out process. I have a specific method of doing this, which I describe in the recipe.
  • Chill it: Make sure you chill your pie dough before rolling it out. If you accidentally let it chill for too long, leave it at room temperature for a little while, just until it’s pliable. This also leads to a smoother roll-out.
Print

Rhubarb Galette with Pistachio Frangipane

rhubarb galette
Print Recipe

5 Stars 4 Stars 3 Stars 2 Stars 1 Star

No reviews

Ingredients

For the pie dough:

  • 1⅓ cups [175 g] all-purpose flour, plus more for dusting
  • ½ cup [115 g] cold unsalted butter, cut into chunks
  • ¼ tsp salt
  • 4 oz [115 g] cold cream cheese, cut into chunks
  • 2 Tbsp very cold water

For the pistachio frangipane:

  • ½ cup [60 g] finely ground pistachios, plus extra for sprinkling
  • 1 large egg white
  • 2 Tbsp granulated sugar
  • 1 Tbsp unsalted butter, at room temperature
  • 1 heaping Tbsp all-purpose flour, plus more for dusting

For the filling:

  • 4 cups [400 g] ½ in [13 mm] sliced rhubarb
  • ⅓ cup [65 g] granulated sugar
  • 2 Tbsp cornstarch
  • 2 Tbsp water
  • ¼ tsp salt
  • Egg wash (1 egg yolk beaten with 1 tsp water)

Instructions

For the pie dough:

  1. Place the flour, butter, and salt in a food processor fitted with the blade attachment (see Note). Pulse about ten times and stop once the butter has blended into the flour with lots of pea-size lumps left. Add the cream cheese and pulse a few more times, just until the cream cheese has blended in but the mixture is still quite lumpy. Sprinkle the water over the surface and pulse a few more times, just until the mixture can be squeezed together into a ball.
  2. Shape the dough into a ball by squeezing it together, flatten the ball into a disk, and cover tightly with plastic wrap. Gently tap and roll the sides of the disk on the counter to help them become less jagged. Once they’re smooth and no longer have big cracks, place the disk flat on the counter and gently press and pat the top to make sure it’s nice and flat. As you gently press down on the top, the plastic wrap compresses the sides and ensures that any jagged edges are smoothed out. Refrigerate for 30 minutes. If you chill it completely, let it sit at room temperature for 30 to 50 minutes, just until it’s pliable but still chilled.

For the pistachio frangipane:

  1. Combine the pistachios, egg white, sugar, and butter in a stand mixer and beat at high speed with the paddle attachment until light and fluffy, about 2 minutes. Stir in the flour once it’s fluffy. Set aside at cool room temperature.
  2. Meanwhile, preheat the oven to 400°F [205°C] and line a rimmed baking sheet with parchment paper.

For the filling:

  1. In a medium mixing bowl, fold together the rhubarb, sugar, cornstarch, water, and salt.
  2. On a lightly floured surface, roll out the chilled dough to just under ¼ in [6 mm] thick and about 12 in [30.5 cm] across. Rotate occasionally as you work but try not to handle the dough too much and try to keep the edges from cracking too deeply.
  3. Once it’s rolled out, gently wrap the dough around your rolling pin to transfer it to the prepared baking sheet. Spread the frangipane in the center of the rolled-out dough, leaving a 2 in [5 cm] border around the edges.
  4. Place the rhubarb filling on the frangipane layer and be sure to scrape the bowl with a spatula so you don’t miss anything. Arrange in an even layer, leaving a 2 in [5 cm] border around the edges. Fold the edges over in a rustic overlapping pattern so that the middle stays open and brush the crust’s surface all over with the egg wash.
  5. Bake for about 50 minutes, until the whole thing is bubbly and the crust is golden brown.
  6. Let cool before slicing (at least 15 minutes, ideally 1 hour). Serve plain or with extra pistachios.

find us on instagram and let us know what you made!

Psst… by the way, I wrote a whole cookbook of adaptable recipes like this one. It’s called A Dish for All Seasons!

Check it out for adaptable base recipes + ideas for seasonal (and evergreen!) variations.

Filed Under: every recipe, sweets Tagged With: pies, pistachio, rhubarb, spring

Creamy Caesar Dressing

August 1, 2025 by Kathryn Pauline Leave a Comment

creamy caesar dressing

This is not the kind of caesar dressing made with whole anchovies and egg yolks, stirred up table-side by candlelight in an old-timey steak house. Instead it’s a delicious homemade version of the kind from a bottle that you probably grew up with. It’s got a ton of Parmesan and a decent amount of garlic, and it’s delicious on hearty greens.

Jump to the recipe if you want to hit the ground running, or read on for some tips for success and ideas of ways to use it up.

creamy caesar dressing

Tips for success

1. Use a good amount of garlic.

This dressing relies on a generous amount of garlic, which is part of its charm. If you’re not a garlic fan, this might not be the one for you. But you’re also welcome to adjust the garlic up or down, based on your preference. But I think even garlic lovers will be satisfied with the 1 1/2 Tbsp in this recipe.

2. Make it ahead for easy prep.

It will last in the fridge for at least 5 days, so feel free to make it ahead for easy meal prep or entertaining.

3. Use the right grate of parm

You can use any finely grated parmesan or pecorino romano you’d like. It’s just important that it’s finely grated for it to blend smoothly into the dressing. You can buy it grated this way, you can use a food processor, or you can use a micro-planer (which is what I did while testing this recipe).

A micro-planer tends to grate up fluffier. If you’re weighing your ingredients, it’s all the same. But if you’re measuring in cups and tablespoons or eyeballing it (no judgment!), keep in mind that densely-packed cups of cheese or more densely-grated cheese measures differently. Since I tested this recipe with a micro-planer, that means you should use fewer cups if you’re using a denser grate of cheese.

4. Don’t just use it for caesar salads!

This dressing is great for dunking, drizzling, and dressing. See my list of ideas (the next section) for more ideas.

creamy caesar dressing

Ways to Use This Creamy Caesar Dressing

  • On roasted kale
  • Folded into a pasta salad
  • On a Caesar salad with crispy chicken
  • Make a simple dressed green salad with parmesan or pecorino romano shavings
  • Serve with crudités
  • Make smash burgers with lettuce, tomato, pickles, American cheese, and a drizzle of this dressing instead of your usual burger sauce
  • Dress a kale or cabbage slaw with this Caesar dressing
  • Use in your favorite potato salad recipe in place of mayo or vinaigrette
Print

Creamy Caesar Dressing

creamy caesar dressing
Print Recipe

5 Stars 4 Stars 3 Stars 2 Stars 1 Star

No reviews

  • Yield: 1¾ cups [420 g]

Ingredients

  • 1½ cups [85 g] finely grated parmesan or pecorino romano
  • ¾ cup [175 g] mayonnaise
  • ¼ cup [60 g] red wine vinegar
  • 2 Tbsp Worcestershire sauce
  • 1½ Tbsp water
  • 1½ Tbsp Dijon mustard
  • 1½ Tbsp pressed or minced garlic
  • ¾ tsp freshly ground black pepper
  • ¼ to ½ tsp salt

Instructions

  1. Combine the Parmesan, mayo, vinegar, Worcestershire sauce, water, mustard, garlic, pepper, and salt in a jar or mixing bowl. Whisk or shake together until smooth and creamy.
  2. Storage: This dressing lasts for about 5 days in the refrigerator in an airtight container.

find us on instagram and let us know what you made!

Psst… by the way, I love this recipe so much, I ended up including it in my cookbook, Piecemeal.

If you like this recipe as much as I do, you might like my book! It’s full of mix-and-match recipes and inspiration for fun and easy meals. There are recipes in it for roasted kale, antipasto pasta salad, and caesar salad with crispy chicken that all use this creamy caesar dressing.

Filed Under: dinner, every recipe, lunch, salads, sauces, vegetarian, weeknight Tagged With: garlic

  • « Go to Previous Page
  • Page 1
  • Interim pages omitted …
  • Page 24
  • Page 25
  • Page 26
  • Page 27
  • Page 28
  • Interim pages omitted …
  • Page 182
  • Go to Next Page »

Primary Sidebar

Kathryn Pauline smiling

Welcome! I’m Kathryn Pauline, cookbook author, recipe developer, and photographer.

Footer

read our privacy policy

© 2017 - 2026 Kathryn Pauline