• Skip to primary navigation
  • Skip to main content
  • Skip to primary sidebar
  • Skip to footer
Cardamom and Tea
  • Blog
  • Recipes
  • About
  • Cookbooks
    • Piecemeal
    • A Dish for All Seasons (my first cookbook)

chocolate chunk ghraybeh

March 18, 2018 by Kathryn Pauline 9 Comments

If you happen to have gone online or turned on a TV in the last few months, you probably already know about “The Cookies,” Alison Roman‘s delicious shortbread taking the world by storm. Homemade chocolate chip cookies with crispy edges and gooey centers will always be a favorite of mine, but there’s also something so wonderfully nostalgic about making these crunchy shortbread-style cookies at home.

The thing is, chocolate chunk shortbread remind me a little of the kind of chocolate chip cookies you eat from a sleeve, the ones that are programmed by food scientists to taste so delicious you can’t eat just one, the ones my mom used to pack for us in our school lunch boxes along with a PB&J sandwich. My mom is a fabulous cook who has always kind of hated baking, and so when it comes to childhood nostalgia, Chips Ahoy and Famous Amos tug at my heart strings a little harder than Nestlé Tollhouse. And that’s why, for me (and I’m guessing for many people who love them!), Roman’s cookies are magic.

But this post isn’t exactly about the cookies—it’s just about these cookies, my chocolate chunk ghraybeh, inspired by Alison Roman’s recipe. Ghraybeh is a Middle Eastern type of shortbread, made with clarified butter (AKA samneh in Arabic or ghee) instead of sweet cream butter. And since butter makes up so much of shortbread’s structure, this makes all the difference. With clarified butter, all of the water has been boiled off, and the milk solids have been separated out, leaving only butter fat, pure and simple. This means that, as long as you don’t introduce a bunch more water in your cookie dough, shortbread that’s made with clarified butter have a melt-in-your-mouth factor that’s off the charts.

Developing a recipe for ghraybeh that truly tastes like chocolate chip cookies presented a few puzzles, because I didn’t want to just make a batch of ghraybeh that happened to have chocolate chunks in them.

The most important puzzle is that ghraybeh absolutely must be made with powdered sugar, because there is no water present to dissolve grains of sugar as they bake. That means that you can’t use brown sugar, which is a real problem when you want something to taste like chocolate chip cookies. I might even argue that the brown sugar is a more essential ingredient to their iconic flavor than the chocolate chips. I mean, they’re obviously both important, but seriously, if you had to choose between a sugar cookie with chocolate chips in it, or a chipless chocolate chip cookie, which would you rather eat?? If you don’t say the latter, you should really spend some time reflecting on your life and your priorities.

So I solved the powdered sugar problem by adding a little bit of molasses to the dough, which adds the flavor of brown sugar, without any of the graininess. It’s important, however, not to add too much molasses, which could change the texture of the cookies and make them less melty by introducing moisture to the flour. But I found that exactly 1 1/2 teaspoons adds just the right amount of flavor, without sacrificing texture. And since vanilla extract is about 33% alcohol, a measly 1/2 teaspoon also won’t make much of a difference. So we’re good on moisture content, or lack thereof.

Salted butter, a key component of Roman’s cookies, is the second puzzle I encountered while adapting my recipe to hers. When clarifying butter, the salts rise and sink with the milk solids. So I opted for adding salt to the dough instead, which has the same overall effect, and ensures consistent batches.

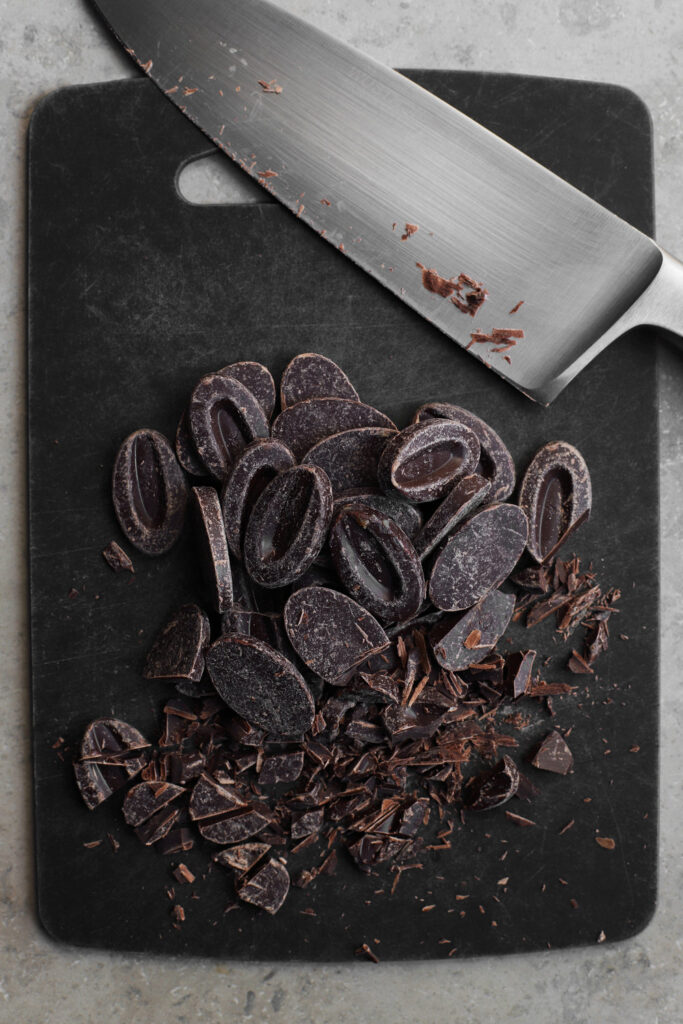
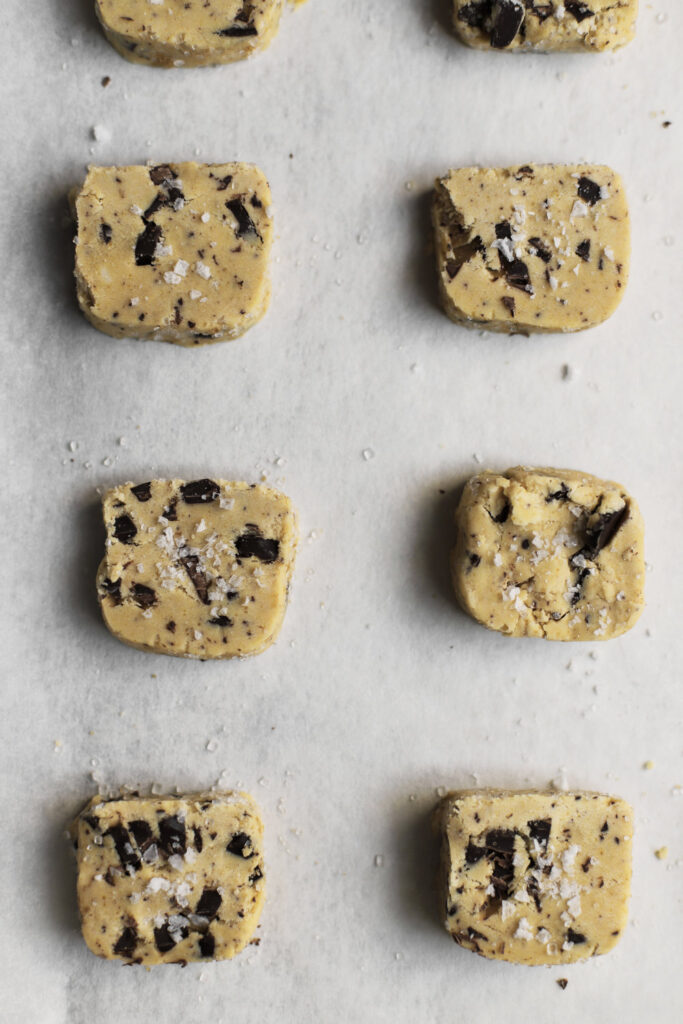
Finally, I ran into a slight problem slicing through before baking. Ghraybeh are incredibly delicate cookies, and so introducing chocolate chunks into the dough is like… throwing a bunch of chocolate chunk shaped wrenches in the works. But I have found an easy solution, which doesn’t mess with the ghraybeh’s integrity. First, chop your chocolate into small bits, not big chunks. Second, don’t chill the dough too little or too much before slicing. Too much and the chocolate gets chalky and difficult to chop through, but too little and the dough is too soft and crumbly. I found that exactly 45 minutes in the refrigerator does the trick. Third, even if you didn’t listen to my advice, and left your chocolate in big chunks, and refrigerated the heck out of it, all you need to do is just decisively! whack! through! the dough!

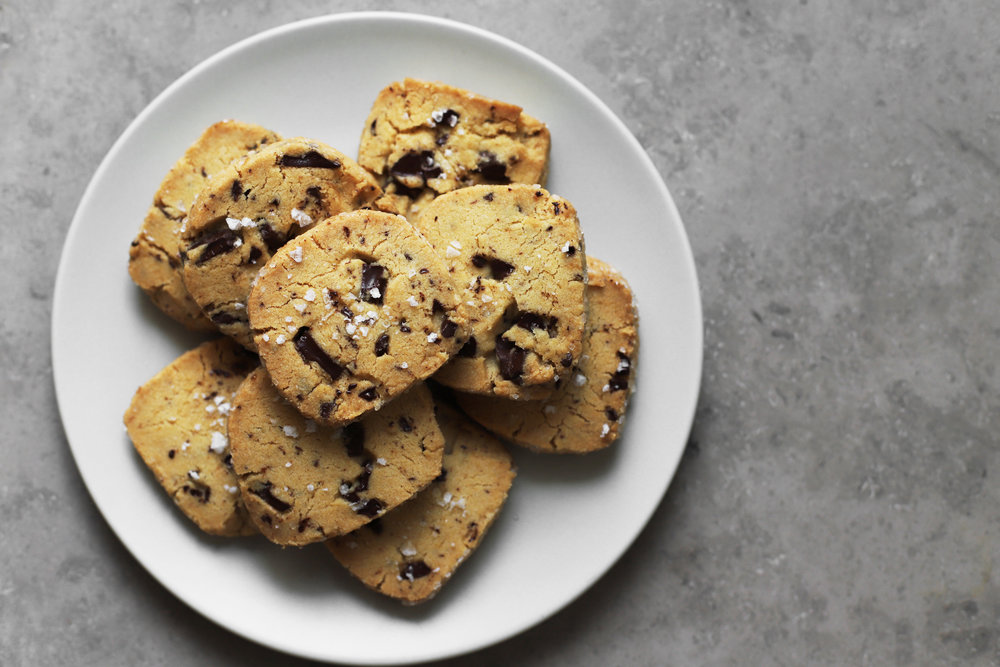
I prefer these cookies with decent-sized chocolate chunks (as you can see from the photos), and so I use this technique whenever I make them. Simply place the knife right above the log, and really whack down as fast as you can with your sharpest, heaviest knife (keep your non dominant hand behind your back for this). If you saw back and forth in a careful little mincing motion, your cookie dough will crumble apart. Instead, whack at them like you’re Julia Child having a bad day, and they’ll be just fine.

Print

chocolate chunk ghraybeh

Print Recipe

5 Stars 4 Stars 3 Stars 2 Stars 1 Star

No reviews

  • Prep Time: 45 minutes
  • Total Time: 4 hours 30 minutes
  • Yield: about 2 dozen cookies

Ingredients

To clarify the butter:

  • 227 grams (8 ounces / 2 sticks) unsalted butter*

To bake the cookies:

  • 180 grams clarified butter, at room temperature**
  • 125 grams powdered sugar (about 3/4 cup)
  • 3.5 grams salt (1/2 teaspoon)
  • 12 grams molasses (1 1/2 teaspoons)
  • 3 grams vanilla extract (1/2 teaspoon)
  • 305 grams sifted all purpose flour (about 2 1/2 to 3 sifted cups)***
  • 105 grams chocolate, chopped (don’t leave any large chunks)****
  • Flaky sea salt, for sprinkling

Instructions

  1. To clarify the butter: Melt the butter in a small saucepan over medium heat. Once the butter has completely melted, reduce the heat to medium-low and continue to simmer. Keep an eye on the temperature and adjust it as necessary, so that the butter solids don’t brown, and so that it doesn’t boil out of control. Within the first couple minutes, the white solids will separate from the yellow liquid (they will float to the top, and then some of them will sink to the bottom).
  2. Remove from heat as soon as the simmering has quieted down a bit, but before it goes silent—this should take about 7 minutes. Use a spoon to carefully skim off any curdled solids from the surface, and then slowly pour the liquid into a measuring cup, leaving behind any of the solids left at the bottom of the pot.
  3. Leave the butter at cool room temperature until it solidifies a bit (although it may still be runny). You can also give it a head start by placing it in the refrigerator for about 30-45 minutes, and then at room temperature.
  4. To bake the cookies: In the bowl of a stand mixer (or with a hand mixer), beat the butter with a paddle attachment for about 1 minute, until the butter becomes a little fluffier. Add the powdered sugar, salt, molasses, and vanilla, and continue to beat for about 3 minutes, until it’s light and fluffy.
  5. Add the flour and mix. Once there are a few dry flour spots, add the chocolate chunks and continue mixing until you can form the dough into a ball.
  6. Move the dough to a long sheet of wax paper, shape it roughly into a log, fold the wax paper over, and use an offset spatula or cutting board to apply pressure over the part where the two sheets of wax meet. Use this pressure to shape it into a round or rectangular log and place it in the refrigerator to solidify for 45 minutes. (Forming it into 2 separate logs will make this easier, if you’re having any trouble).
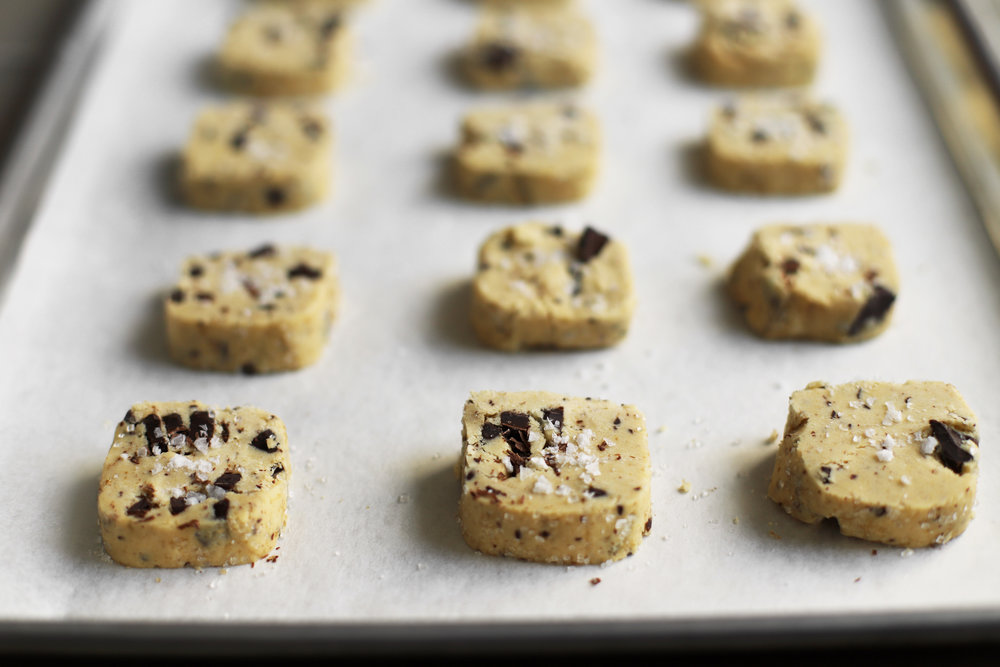
  7. Once the log is solid enough to hold its shape, slice off pieces that are between 1/4 and 1/2 inch thick, and place on parchment-lined baking sheets with some space between them (see above photo). Sprinkle with a little sea salt (gentry press it into the dough just a tiny bit).
  8. Preheat the oven to 325° F, and let the sliced cookies come to room temperature while you wait on the oven to preheat (this prevents cracks).
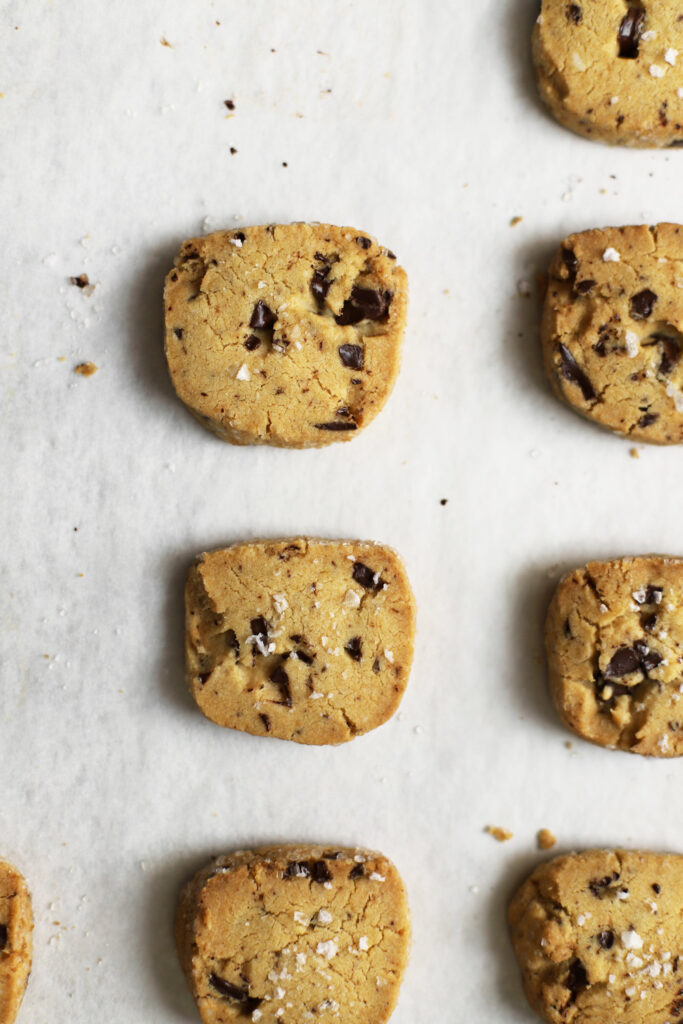
  9. Bake for about 25 minutes, before they start turning golden-brown. Cool on the parchment for about 10 minute before enjoying.

Notes

* I use European butter (because it’s most easily available where I live), which has less water. If you’re using American-style butter, use an additional 2 tablespoons, because yours might end up reducing more in volume.

** The melted clarified butter is 3/4 cup + 2 tablespoons volumetrically, in case you don’t have a scale.

*** If you weigh all your ingredients, you shouldn’t have any issues, but measuring with cups is less exact, so you need to be a bit more cautious if you don’t have a scale. Be sure to sift the flour before measuring 2 1/2 cups (I sift directly into the measuring cup with a flexible cutting board underneath to catch the spillover), and be sure to measure level cups by sweeping the tops with a straight edge (not packing it in). Too much flour will make the dough unable to stick together.

**** If you didn’t chop your chocolate chunks finely enough, it will be difficult to slice through the dough because it will start to crumble apart. If the first slice seems like it’s crumbling apart, have no fear—read the note above the recipe for troubleshooting.

***** A perfect ghraybeh dough will seem crumbly when you mix it together, but it will stick together into a ball when compressed in your hand. If you measure everything by weight, you won’t have an issue, but if you do have an issue, don’t sweat it: if the dough won’t stick together, simply add an additional tablespoon of softened butter and work everything together, adding another one if it really needs it.

find us on instagram and let us know what you made!

Filed Under: every recipe, sweets Tagged With: chocolate, clarified butter, cookies and bars

pomegranate molasses meringue pie

March 14, 2018 by Kathryn Pauline 2 Comments

I know it’s completely necessary when you’re baking a pie with a custard or no-bake filling, but I absolutely hate blind baking crust. Well, not blind baking per se, but blind baking with pie weights. Using pie weights has always felt like such a kludge, like some duct tape and rubber bands keeping the sink from leaking around the faucet base. I guess it technically does its job, but it’s an eye sore.

This leaves us with very few options. If you blind bake without pie weights, the crust will shrink down the sides and leave you with little room for your filling. I’ve tried freezing the crust right before baking, but it just shrinks down about 30 seconds later than it would have otherwise. And whenever I do use pie weights, the edge of the crust always browns way too early, and then I have to make one of those annoying foil collars to go all the way around the edges after removing the weights so that the bottom can catch up. But all of these inconveniences actually don’t bother me that much, because truth be told, I don’t mind one or two irritating cooking tasks.

At the end of the day, I’m in it for the food, and the thing that truly makes me want to leave pie weights behind forever is the final result. Since it’s so weighted down while it bakes, the crust has no room to develop those gorgeous flaky layers. I’m definitely not making puff pastry here (or even rough puff), but a little flakiness would be nice. That’s why I no longer use a pie pan for single-crust pies. Instead, I like to use a 9-inch tart shell, because with a tart shell, you can have it all.

There’s just one trick to making a tart shell work for you, which is something I learned from watching way too much Great British Bakeoff. You’ve got to trim the pastry after baking.

Here’s how it works: You roll out your dough to the right thickness, drape it over the tart shell, and let the edges fall into the center. Then you carefully press the dough into the corners so that there are no gaps, all the way around in a circle, while you flop the excess dough over the sides of the tart shell. Then you carefully press the dough into the fluted edges so that the dough is in contact with every square millimeter of the tart shell. And, most importantly, you do not cut the excess dough off before baking. You just let it hang there, like bangs that you’ve been trying to grow out (too short to pull into a pony tail, too long to see through). It’s ugly, but whatever, it’s going to work. Dock it, freeze it, bake it, and let it cool. Then use the pan as a guide to carefully shave off the very top ridge until those excess bits are just hanging on by a thread, and then snap off those perfectly ugly little shards, eating them as you go. You’re left with nothing but an exquisitely baked pie shell… in the shape of a tart… but who cares!

You could certainly make this recipe in a standard pie pan, especially if you have the kind with a really thin outer edge. If you have one of those big pyrex ones with handles and everything, you might not get away with this method, and might want to blind bake your crust with pie weights instead (it’ll be just fine).

And now I’ve gone on and on about crust, without one single word about this pie in particular, which is a pomegranate molasses pie topped with heaps of Swiss meringue. Why Swiss? Because it’s the kind of meringue you cook before beating, which makes it hold up incredibly well, and also makes it safe to eat if you’re worried about salmonella.

Pomegranate molasses is one of those ingredients that you can’t really cook Middle Eastern food without. It’s an essential component of many of the recipes on my website, and it’s also one of those things you can add to just about anything to make it tastier. It’s what makes lahm bi ajeen absolutely mouthwatering, instead of just a flattened burger on flatbread. It’s what makes muhammara not just red pepper purée, but a zesty, sweet and sour dip that you can’t seem to stop eating. And it’s insanely tart, which makes it perfect for a meringue pie, which needs a lot of tanginess to cut through all those dreamy billows.

pomegranate molasses meringue pie

active time: 1 hour
total time: 2 hours 30 minutes

the crust

  • 205 grams (1 1/4 cups) all purpose flour
  • 1/2 teaspoon salt
  • 2 teaspoons sugar
  • 8 tablespoons cold, unsalted butter
  • 3 to 4 tablespoons ice water
  1. Place the flour, salt, sugar, and butter in a stainless steel mixing bowl. Use your fingertips or a pastry cutter to blend the butter into the flour. Stop when there are still some tic-tac-sized lumps left. Chill for 30 to 45 minutes in the refrigerator.
  2. Once the dry ingredients are chilled, add 3 tablespoons of ice water and mix everything together with your hands, just until it comes together into a dough (add the final tablespoon only if you need it). Do not knead it—simply shape it into a ball, and let it rest in the refrigerator for 10 minutes.
  3. Place the rested dough ball on a clean, lightly floured work surface. Sprinkle a little bit of flour on top, and begin to roll it out with a rolling pin. Rotate and flip the dough as you go to make it an even circle. Once it’s large enough to fit a 9-inch tart pan (and about 1/8-inch thick), place it in the bottom of your tart pan, letting the sides fall in toward the center.
  4. Carefully work the dough up the sides by first working your way around and pushing the dough into the corners so that there are no gaps. Let the dough drape over the sides as you work. Next, carefully press the dough into the fluting. Do not trim the excess pastry from the top, but let it hang over the outside of the pan. This will keep the dough from shrinking as it bakes.
  5. Dock the dough with a fork several times on the sides and bottom and freeze for 30 to 45 minutes.
  6. Preheat the oven to 450° F convection* so that it’s ready when the pie comes out of the freezer.
  7. Move the tart straight from the freezer to the oven for about 14 minutes, just until it’s turning pale golden, and is cooked all the way through.
  8. Let it cool for 10 to 15 minutes in the pan. Once it’s cool, keep it in the pan and begin to carefully shave off the crust that pokes out over the top of the pan to separate the excess dough. Hold the knife almost parallel to the counter and shave away from the inside of the pie toward the outside (watch your fingers!). Use the lip of the tart pan as a guide for where to stop cutting. You’ll be left with some scraps from the outside and a perfect tart shell on the inside. Leave it in the pan until filling and topping.

the filling

  • 1/4 cup sugar
  • 1/2 teaspoon salt
  • 1/3 cup cornstarch
  • 1 cup water
  • 2/3 cup pomegranate molasses
  • 4 egg yolks (from large eggs), in a small mixing bowl (save the whites for the meringue!)
  • 2 tablespoons butter
  • 1/2 teaspoon lemon zest (from about 1 small lemon)
  • 1 tablespoon lemon juice
  1. Have all your ingredients measured and prepped before starting.
  2. In a small saucepan, whisk together the sugar, salt, cornstarch, water, and pomegranate molasses until there are no more lumps. Place over medium-high heat and bring to a simmer, stirring constantly. Once it reaches a simmer, reduce heat to medium and continue stirring constantly until the liquid suddenly thickens significantly. Once it’s thickened, remove from heat.
  3. Take a whisk-full of the thickened pomegranate molasses mixture and whisk it into the egg yolks in the small mixing bowl. Do this with two or three more whisk-fulls, whisking it totally smooth between additions. Then add the egg yolk mixture to the pomegranate molasses mixture in the saucepan, and immediately whisk everything together until there are no lumps. Return to medium heat and stir constantly while bringing the mixture to a bare simmer. Once it reaches a bare simmer, reduce the heat to low and continue stirring for a minute.
  4. Remove from heat, stir in the butter, lemon zest, and lemon juice (stir constantly until the butter melts). Once the butter melts and is fully incorporated, immediately pour the mixture into the pie shell and smooth out into an even layer. While it’s cooling, make the meringue.

the meringue

  • 6 carefully separated egg whites (from large eggs)**
  • 3/4 cup sugar
  • 1/4 teaspoon cream of tartar
  • pinch of salt
  • special equipment: an instant-read thermometer
  1. Bring water to a boil in the bottom of a double boiler. While you’re waiting on it, combine the egg whites, sugar, cream of tartar, and salt in the bowl part*** of the double boiler (off the heat). Stir with a spatula for about 30 seconds to dissolve some of the sugar.
  2. Once the water comes to a boil, reduce the heat to maintain a simmer and place the bowl on top. Stir it constantly, scraping the bottom and sides, while you wait for it to reach 170° F (about 5 to 10 minutes). Don’t stop stirring, and don’t let it go much over 170° F or the whole thing will over-coagulate and you won’t be able to whip it.
  3. Once it reaches 170° F, immediately move the bowl to the counter, and begin beating with a hand mixer or stand mixer.
  4. Beat to stiff peaks, but do not over-beat. The meringue will hold stiffer peaks as you continue to whip it—once it’s increased in volume and looks very fluffy, start checking on it every minute or two by removing the whisk from the meringue and observing what happens to the peak that forms at the end of the beater. At first the peaks will fall over, but eventually they will stick straight up and will bounce right back when you gently shake the whisk back and forth (stiff peaks). Do not beat past stiff peaks.
  5. Preheat the broiler for a few minutes.
  6. Cover the pie with the meringue and make swirls with a spoon or offset spatula (if you’re good at piping, feel free to pipe it instead).
  7. Once the broiler is hot, place the pie under it for about 1 or 2 minutes. Do not take your eyes off of it—it will go straight from white to burnt in just a few seconds. Pull the pie out of the oven when the peaks start to turn dark brown.
  8. Serve immediately, or within a few hours (next-day leftovers aren’t exactly company-worthy because you’ll get some beading between layers, but they’re still reeeally good).

* If you’re not using a convection oven, you may need to slightly increase the temperature and/or cook them just a minute or two longer.
** You can make this recipe with 4 egg whites if you don’t feel like dealing with the leftover 2 yolks. Simply use 4 egg whites, 2/3 cup of granulated sugar, 1/4 teaspoon cream of tartar, and a pinch of salt. I’ve simplified it a little, so the ingredient proportions are a little different than the above recipe, but I’ve tested it both ways, and this works great. You won’t have the same mound of meringue on top, but it’s still delicious with a more modest amount.
*** If you’re going to use a stand mixer to beat the meringue, use the mixer attachment for this.

Filed Under: Uncategorized

  • « Go to Previous Page
  • Page 1
  • Interim pages omitted …
  • Page 129
  • Page 130
  • Page 131
  • Page 132
  • Page 133
  • Interim pages omitted …
  • Page 183
  • Go to Next Page »

Primary Sidebar

Kathryn Pauline smiling

Welcome! I’m Kathryn Pauline, cookbook author, recipe developer, and photographer.

Footer

read our privacy policy

© 2017 - 2026 Kathryn Pauline