kadeh | roux-stuffed brioche

- Prep Time: 1 hour
- Total Time: 4 hours 15 minutes
- Yield: 2 loaves (cut into about 18 to 20 pieces total)
Ingredients
For the dough starter (khmira)
1 1/2 teaspoons yeast
1/2 teaspoon sugar
1 1/2 teaspoons vegetable oil
1/4 cup 115° F water
For the dough (leasha)
15 ounces flour (about 3 cups unsifted, 3 3/4 cups sifted)
3/4 teaspoon salt (add an extra 1/4 teaspoon if you prefer saltier kadeh)
1/4 cup sugar
9 tablespoons unsalted butter, melted (1 stick and 1 tablespoon)
1/4 cup + 3 T milk (115° F) (plus more, if necessary)
For the roux (martookhah):
10 tablespoons (divided into 1 stick + 2 tablespoons) unsalted butter
1 tablespoon sugar
1/4 teaspoon salt
3/4 cup flour
To assemble the loaves:
Cooled martookhah (above)
2 risen dough balls (above)
1 egg beaten with 2 teaspoons water
2 teaspoons sesame seeds
Instructions
- Make the starter: Combine the yeast, sugar, vegetable oil, and water and mix to dissolve.
- Cover and let it sit for 15 to 20 minutes, until it’s very foamy.
- Make the dough: Sift together the flour, salt, and sugar.
- Make a well in the center of the flour mixture, add the butter, 1/4 cup milk, and starter/khmira, and stir together to combine. As it starts to come together, add one more tablespoon of milk at a time until it comes together into a soft, flexible dough. Knead by pulling the sides of the dough into the center of the bowl. If it looks a little dry, add another tablespoon of milk, let it sit for 5 minutes, and then continue kneading until it comes together into a pliant dough. Knead until it’s elastic and smooth.
- Cover the dough and let it rise for 1 hour and 15 minutes while you make the roux/martookhah.
- Make the roux/martookhah: Melt the stick of butter with the sugar and salt in a small saucepan over medium heat.
- As soon as the bubbling becomes a little quieter (about 3 minutes after the butter melts), immediately add the flour and whisk continuously for about 5 to 10 minutes.
- The martookhah might be clumpy in the beginning, but it should thin out after a few minutes of cooking. Once it thins out, determine whether to add the extra 1 or 2 tablespoons of butter. The martookhah should thin-out into a slow-flowing viscous liquid that is thick enough that you can leave a trail with a spoon. If it is clumping together, it needs more butter. Add the additional one or two more tablespoons of butter if you need to, and continue cooking.
- The martookhah is ready once it is golden-brown (according to your preference); make sure you pull it off the heat when it’s about a shade lighter than you’d like it to be; it will continue to cook for another minute or two.
- Let the martookhah cool while the dough finishes rising.
- Assemble and bake the loaves: Once the dough has risen, divide it into two equal pieces and shape each piece into a smooth ball. Let the dough balls rest, covered with plastic wrap, for 30 minutes.
- Once the dough balls have rested for 30 minutes, preheat the oven to 350° F.
- Roll each ball of dough out into a circle with a thickness between 1/8 and 1/4 inch. ** Try to make the circles as symmetrical as possible by lifting the dough and rotating it as you work, and let them rest for about 3 to 5 minutes if they’re really stretchy and difficult to roll out.
- Move the rolled-out discs to a sheet pan.
- Divide the cooled martookhah evenly between the circles of dough. Smooth it out so that the martookhah is covering half of each disc, with a margin of about 1/4 to 1/2 inch around the edges. Brush a light layer of the egg wash along the border around the martookhah.
- Fold the dough over like you’re making a calzone and press down around the edges to start to seal them shut.
- Finish sealing the edges either by crimping the dough with the back of a fork or your fingers, or by folding it over on itself as you work your way down the edge.
- Dock the dough with a fork. Pierce all the way through to the bottom and over the entire surface of the filled part of the dough. After you fully dock the dough, gently pat the surface to make sure that all the air bubbles have been pressed out.
- Brush the surface of each loaf with a light layer of eggwash.
- Sprinkle each loaf with a teaspoon of sesame seeds.
- Let the loaves sit for 10 minutes.
- Bake for about 25 to 30 minutes, until the surfaces are golden brown and the loaves have puffed up and cooked through.
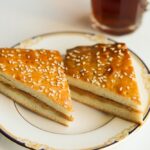
- Let the loaves cool for at least 30 minutes before slicing. To cut traditionally, follow the pattern pictured above. First slice it into about 5 pieces vertically, and then cut each vertical piece in half diagonally, so that you end up with a bunch of trapezoids (and a few triangles toward the ends). Or you can cut it up however you’d like, if you don’t want to go the traditional route. Store at room temperature for up to 12 hours, or the freezer for up to 3 months.
Notes
* If you overcorrect by adding too much butter, you’ll see a lot of butter pooling on the surface. Simply catch the problem toward the beginning, and add 1 or 2 more tablespoons of flour. The measured amounts in the ingredients list are tested, so you should be fine with just 10 tablespoons of butter and 3/4 cup of flour. But always trust your common sense more than ingredient quantities.
** if you’ve kneaded the dough into a smooth ball, you should not need any flour to do this, since it will be both buttery and glutinous.
Find it online: https://cardamomandtea.com/282/kadeh/