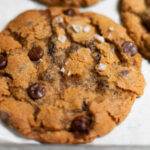
Eggless Chocolate Chip Cookies (chewy-crisp)

- Yield: 27 large cookies
Ingredients
- 2 sticks [225g] cool room temperature butter
- 1 cup [200g] packed brown sugar
- 1 cup [200g] granulated sugar
- 1 tsp [5g] table salt
- 1/4 cup [60g] whole milk
- 2 tsp [10g] vanilla extract
- 3 cups [390g] all purpose flour
- 3/4 tsp [4g] baking soda
- 1 1/4 tsp [5g] baking powder
- 1 1/2 cups [250 g] chocolate chips
- Sea salt for sprinkling (optional)
- Extra chocolate chips for decorating
Instructions
- Place the butter, brown sugar, granulated sugar, and salt in the bowl of a stand mixer fitted with the paddle attachment.* Beat together at medium-high speed until very light and fluffy, about 2 minutes.
- Add half the milk to the butter/sugar mixer and beat at medium speed for about 15 seconds, just until incorporated. Add the other half of the milk and continue mixing until very light and fluffy, about 30 more seconds. Scrape down the sides and bottom of the bowl with a flexible spatula. Add the vanilla extract and beat for another 10 seconds, just to combine.
- Add the flour, baking soda, and baking powder to the bowl and mix everything together at low speed, just until it forms a uniform dough (about 15 to 30 seconds). Scrape the bottom of the bowl to make sure it is fully incorporated, but do not over-mix.
- Let the dough rest** in the fridge for 30 minutes, up to 48 hours.
- Preheat the oven to 350°F [180°C] while your dough chills, and line a few sheet pans with parchment.
- Roll the dough into 50g balls (a scant 1/4 cup, or a size 1.75 oz/size 24 disher).
- Space the balls evenly on the prepared sheet pans. Smash them slightly with the heel of your hand, just so toppings will not roll off. Add a few extra chocolate chips to the outside to make sure some are visible. Sprinkle with sea salt.
- Bake for about 12 to 13 minutes***, working in batches. They’re done when the edges are set and the centers are still very soft but not liquid. Slide the parchment onto the counter to cool.
Notes
*: If you do not have a stand mixer, you can use a hand mixer with the egg beaters attached.
**: It doesn’t matter whether they actually chill through—the key here is resting time. Thirty minutes makes a difference, but longer is even better. During resting, the flour and sugars hydrate, which results in cookies with a bakery-quality texture. If you skip this step, your cookies will turn out fine, but they won’t quite live up to their potential.
***: 14 minutes will yield cookies that are crisp at the edges and chewy in the center after cooling. If you like your cookies well-done (crisp throughout with a snap), let them go for another minute or two. If you do not measure your dough balls carefully or if your oven is not well-calibrated, your bake time might be different, so keep an eye on the first batch.
Video note: If you don’t see the video for this post after scrolling up, please disable ad block and try reloading the page.
Find it online: https://cardamomandtea.com/92031/eggless-chocolate-chip-cookies/