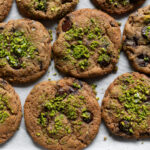
Pistachio Chocolate Chip Cookies (the greenest)

A note on freezing: These bake beautifully after freezing in individual balls. Just shape into balls, smash slightly, decorate with toppings (make sure they adhere by patting them), place on a sheet pan, and freeze solid. Then move them to a freezer bag. Bake right from frozen, adding an extra 90 seconds to the bake time (or as needed).
- Yield: 30 large cookies
Ingredients
- 2 sticks [225g] cool room temperature butter
- 1 cup [200g] packed brown sugar
- 1 cup [200g] granulated sugar
- 1 tsp [5g] salt
- 2 large room temperature eggs
- 2 tsp [10g] vanilla extract
- 1/2 tsp almond extract (optional)
- 3 cups [390g] all purpose flour
- 3/4 tsp [4g] baking soda
- 1 1/4 tsp [5g] baking powder
- 1 2/3 cups [250g] chocolate chunks*¹
- 1 1/4 cups [125g] coarsely chopped roasted salted pistachios
- Sea salt for sprinkling*²
- Raw green pistachios,*³ ground finely for sprinkling
- Extra chocolate chunks or chips for decorating
Instructions
- Place the butter, brown sugar, granulated sugar, and salt in the bowl of a stand mixer fitted with the paddle attachment.*⁴ Beat together at medium-high speed until very light and fluffy, about 2 minutes.
- Add one egg to the butter/sugar mixer and beat at medium speed for about 15 seconds, just until incorporated. Add the other egg and continue mixing until very light and fluffy, about 30 more seconds. Scrape down the sides and bottom of the bowl with a flexible spatula. Add the vanilla extract and almond extract (if using) and beat for another 10 seconds, just to combine.
- Place the flour, baking soda, and baking powder in a fine mesh sieve or sifter. Sift directly into the stand mixer. Add the chocolate chunks and coarsely chopped pistachios, and mix everything together at low speed, just until it forms a uniform dough (about 15 to 30 seconds). Scrape the bottom of the bowl to make sure it is fully incorporated, but do not over-mix.
- Let the dough rest*⁵ in the fridge for 30 minutes, up to 48 hours.
- Preheat the oven to 350°F [180°C] while your dough chills, and line a few sheet pans with parchment.
- Roll the dough into 50g balls (a scant 1/4 cup, or a size 1.75 oz/size 24 disher).
- Space the balls evenly on the prepared sheet pans. Smash them slightly with the heel of your hand, just so toppings will not roll off. Add a few extra chocolate chunks or chips to the outside to make sure some are visible. Sprinkle with sea salt and pistachio bits.
- Bake for about 14 minutes*⁶, working in batches. They’re done when the edges are set and the centers are still very soft but not liquid. Slide the parchment onto the counter to cool.
Notes
*¹ You can use milk, semisweet, or dark—whatever kind of chocolate you prefer in your cookies. Pistachio classically goes with dark chocolate, but I think it’s equally good with milk chocolate. You can also use chocolate chips instead, but if you do, use 1 1/2 cups [250 g].
*² I love Maldon and other flaky sea salts for sprinkling on cookies, but you can use whatever sea salt you prefer. Fine sea salts dissolve as the cookies bake, so they don’t yield the best texture. And coarse salts are easy to accidentally over-use. Flaky sea salts are just right. But any will work.
*³ If you don’t have raw green pistachios, you can just use more roasted salted. Read more about them here. Your cookies will not look bright green like the ones in these photos in that case, but they’ll still turn out great. You can find raw green pistachios at Indian and Iranian/Persian markets. To grind them finely, chop by hand until they’re the texture of sand. Or do what I do and use a food processor, but be careful not to process them too long or they’ll turn into pistachio butter. Just grind them until they look like sand, and stop immediately.
*⁴ If you do not have a stand mixer, you can use a hand mixer with the egg beaters attached.
*⁵ It doesn’t matter whether they actually chill through—the key here is resting time. Thirty minutes makes a difference, but longer is even better. During resting, the flour and sugars hydrate, which results in cookies with a bakery-quality texture. If you skip this step, your cookies will turn out fine, but they won’t quite live up to their potential.
*⁶ 14 minutes will yield cookies that are crisp at the edges and chewy in the center after cooling. If you like your cookies well-done (crisp throughout with a snap), let them go for another minute or two. If you do not measure your dough balls carefully or if your oven is not well-calibrated, your bake time might be different, so keep an eye on the first batch.
Video note: If you don’t see the video for this post after scrolling up, please disable ad block and try reloading the page.