sumac thyme cake

- Prep Time: 1 1/2 hours
- Total Time: 10 hours
- Yield: 10 large or 16 small pieces
Ingredients
For the candied thyme:
Fresh thyme (about 15 to 25 sprigs)
1 egg white (pasteurized, if you are concerned about eating raw eggs; save the yolk for the curd)
Sugar for sprinkling
For the sumac lemon curd:
4 large eggs
2 large egg yolks
1 cup sugar
1/3 cup lemon juice
1/4 teaspoon salt
2 tablespoons sumac
1/2 teaspoon lemon zest
1 cold stick of unsalted butter, cut into pieces (4 ounces, or 1/2 cup)
For the thyme cake layers:
Butter for greasing the cake tins
22 ounces cake flour *
1 tablespoon baking powder
1 teaspoon lemon zest
1 1/2 tablespoon fresh thyme leaves (1 tablespoon chopped)
2 1/4 sticks softened unsalted butter, at cool room temperature (9 ounces)
2 1/2 cups sugar
1/4 teaspoon salt
3 large eggs at room temperature
3 large egg yolks at room temperature (save the whites for making buttercream)
1 1/4 cup whole milk at room temperature
To assemble the cake:
3 layers of thyme cake, completely cooled to room temperature (above)
1 batch of sumac curd (above)
3 to 4 cups of your favorite unflavored, plain frosting, at room temperature ****
candied thyme (above)
Instructions
- Candy the thyme: Gently bend the thyme sprigs so that they are very slightly rounded (or skip this step for a more jagged, less circular look). The candied thyme will eventually form a wreath around the frosted cake, so use your cake pan as a guide, nesting them inside the pan along its edge.
- Beat the egg whites for 1 minute to get a homogenous consistency.
- Wet the tips of your fingers with the egg whites and brush a very thin layer onto the thyme sprigs. Or you can dip the sprigs in the egg whites and wipe off the excess (dipping will create a chunkier look, different from the photos).
- Place the sprigs on parchment paper. Sprinkle sugar over them and gently roll them around to coat evenly.
- Let them dry, uncovered, for about 6 hours (up to overnight), until they’re crispy.
- Make the sumac lemon curd: Beat the eggs, egg yolks, and sugar for about 2 minutes, until the sugar starts to dissolve and the color lightens a little.
- Whisk in the lemon juice, salt, sumac, and lemon zest.
- Cook over medium-low heat for about 10 minutes, whisking constantly (do not stop whisking!). Turn off the heat once the mixture thickens.
- Immediately add the butter all at once, and whisk constantly until the butter has been completely incorporated into the mixture.
- Chill completely before frosting the cake.
- Bake the cake layers: Preheat the oven to 350° F convection. **
- Butter 3 8-inch round cake pans, cover the bottoms in parchment rounds, and then butter the exposed sides of the parchment rounds. ***
- Sift together the cake flour and baking powder.
- Finely mince together the lemon zest and thyme leaves.
- Use a hand mixer or stand mixer to cream the butter and sugar together for about 3 to 5 minutes, until the mixture is light and fluffy.
- Add the salt, thyme, and lemon zest and combine.
- Crack the eggs and yolks into a liquid measuring cup. Add the eggs to the batter 1 at a time. Each time you add an egg, mix it in completely (about 30 seconds), and make sure that the mixture smooths out before adding the next one.
- Add the whole milk and mix together for about 30 seconds, until the batter smooths out.
- Carefully mix in the cake flour mixture. Immediately stop mixing as soon as the batter comes together and there are no raw flour pockets.
- Divide the cake batter equally among the 3 cake pans (I use a scale to make sure they’re even). Smooth out the tops with a spatula.
- Bake for 25 minutes, until the tops are golden brown and a toothpick inserted in the middle comes out clean, with just a few crumbs.
- Run a knife around the pans, staying very close to the side of the pan. Remove the cakes by inverting, and then let them cool flat-side-down on wire racks.
- Assemble and decorate the cake: Once the cakes are completely cool, use a long serrated knife to level the cakes if they have humps. Save the scraps for cake pops or freeze them for another day’s snack. If it looks level, use the ridge at the top edge of the cake as a guide, and cut off the hump jutting out above it.
- Once the cakes are level, place the first one cut-side-up on a rotating cake tray with a cardboard cake round underneath. If you don’t have a turntable or a cardboard cake round, simply place the cake on the tray or the plate you will use to serve it.
- Dole out about half the chilled sumac curd, spreading it out over the first layer, leaving a border of about 3/4 of an inch around the curd (it will spread as the cake settles).
- Place the next layer cut-side-up over the curd-covered first layer. Spread the remaining curd on this layer in the same way, holding a little back if it looks like too much (serve any extra on the side).
- Place the final layer cut-side-down over the middle curd-covered layer.
- Inspect the cake to make sure each of the layers line up perfectly.
- Let it chill in the refrigerator for about 15 minutes to make sure the lemon curd settles in and sticks everything together.
- Top the cake with about 2/3 of the frosting and start smoothing it out with an offset spatula, rotating the turntable instead of moving your spatula around, or smoothing it out as best you can if you don’t have a turntable. As the frosting starts to drip over the sides, start to smooth it out over the sides.
- Continue to smooth out the top, working the frosting down the sides, until everything is covered in a thin layer of frosting.
- Add another blob of frosting to the top of the cake and smooth it out, being careful not to pick up any of the layer beneath as you work. The top should be smooth and crumb-free.
- Place the edge of your offset spatula up against the side of the cake at a 45 degree angle. Rotate the turntable, grazing the surface with your spatula, exposing the side of the cake.
- Using quick motions, lightly smooth the upper edge into the center of the cake to get rid of the big ridge you just made. Smooth out the top gently and carefully if necessary.
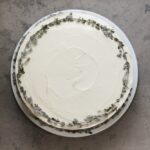
- Move the cake to a cake display or plate. Place the candied thyme in a wreath around the top and base of the cake.
- Enjoy immediately or keep it chilled for a few hours before serving.
Notes
* It’s fine to use all purpose flour, but the cake won’t be quite as tender. In either case, be careful not to over-mix once you add the flour to the wet ingredients.
** If you’re not using a convection oven, you may need to slightly increase the temperature and/or cook them just a minute or two longer.
*** You can use a 9-inch pan or another size. The cook time will be shorter with a wider pan and the finished cake will be shorter and wider (and you might need a touch more frosting, since most of it ends up on top).
**** If you’re going for home made, I suggest a half-recipe of Brave Tart’s Buttercream. It’s my go-to, it’s truly magical, and it’s pictured in this post. Just be sure not to add vanilla bean or any extracts for this recipe, and not to buy vanilla-flavored buttercream if you’re going the store-bought route—vanilla would be a very distracting flavor in this recipe. You can get away with 3 cups of frosting here, but more like 4 cups will give you a little more leeway. It’s nice to have extra for covering up crumbs on the top of the cake and filling in gaps on the sides. Plus, you can make cake pops out of any extra cake shavings and frosting.
Find it online: https://cardamomandtea.com/523/thyme-cake/