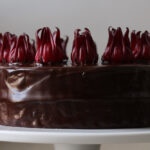
chocolate cake with hibiscus curd

- Prep Time: 1 hour 15 minutes
- Total Time: 3 hours
- Yield: about 10 medium pieces, or 14 small pieces
Ingredients
For the hibiscus curd
- 4 large eggs
- 2 egg yolks
- 1 cup sugar
- 1/3 cup lemon juice *
- 1/4 teaspoon salt
- 20 seeded fresh hibiscus calyxes (or 1/4 cup dried hibiscus) **
- 1/2 cold stick of butter, cut into pieces (2 ounces, or 1/4 cup)
For the chocolate cake:
- Butter for greasing the cake tins
- 15 ounces cake flour *** (about 4 cups sifted)
- 1 teaspoon baking powder
- 3/4 teaspoons baking soda
- 4 ounces cocoa powder (about 1 cup + 2 T sifted)
- 6 tablespoons softened unsalted butter, at room temperature (3 ounces)
- 1/2 cup olive oil (plain, not extra virgin, or use another neutral-flavored oil)
- 1 2/3 cups sugar
- 1/4 teaspoon salt
- 2 large eggs at room temperature
- 2 large egg yolks at room temperature
- 1 cup whole milk at room temperature
For the ganache:
- 9 ounces dark chocolate
- 1 cup + 3 tablespoons heavy cream
- 1 pinch of salt
To assemble the cake:
- Optional: 10 to 15 hibiscus calyxes
- 2 layers of chocolate cake, completely cooled (above)
- 1 batch of hibiscus curd (above)
- 1 batch of ganache (above)
Instructions
- Make the hibiscus curd: Beat the eggs, egg yolks, and sugar for about 2 minutes, until the sugar starts to dissolve and the color lightens a little.
- Whisk in the lemon juice and salt, and then stir in the hibiscus.
- Cook over medium-low heat for about 10 minutes, whisking constantly (do not stop whisking!). Turn off the heat once the mixture thickens significantly.
- Immediately add the butter all at once, and whisk constantly until the butter has been completely incorporated into the mixture.
- Blend the hibiscus curd with an immersion blender or food processor.
- Chill completely before filling the cake.
- Bake the cake: Preheat the oven to 350° F convection. ****
- Butter 2 8-inch round cake pans, cover the bottoms in parchment rounds, and then butter the exposed sides of the parchment rounds. *****
- Sift together the cake flour, baking powder, baking soda, and cocoa powder.
- Use a hand mixer or stand mixer to cream the butter, oil, sugar, and salt together for about 3 minutes, until the mixture lightens in color and texture.
- Crack the eggs and yolks into a liquid measuring cup. Add the eggs to the batter 1 at a time. Each time you add an egg, mix it in completely (about 30 seconds), and make sure that the mixture smooths out before adding the next one.
- Gradually add the whole milk while you continuously mix, until the batter smooths out.
- Carefully mix in the cake flour. Immediately stop mixing as soon as the batter comes together and there are no raw flour pockets.
- Divide the cake batter equally among the 2 cake pans (I use a scale to make sure they’re even). Smooth out the tops with a spatula.
- Bake for about 20 to 25 minutes, until a toothpick inserted in the middle comes out clean, with just a few crumbs (in my oven, set to 350° F convection, this takes 23 minutes every time, but your oven might be very different).
- Run a knife around the pans, staying very close to the side of the pan. Very carefully remove the cakes by inverting, and then let them cool flat-side-down on wire racks (it’s easiest to do this by putting a plate over the cake tin, flipping the whole thing over, placing a cooling rack on the upside-down plated cake, and then carefully flipping it again without squeezing everything together).
- Make the ganache: Heat the heavy cream in the microwave or on the stove over medium heat.
- Once the milk comes to a simmer, pour over the chocolate and salt, and let it sit for 3 minutes. Whisk together until everything smooths out. If there are any chunks of chocolate left, microwave for about 15 seconds and then continue to stir (repeat until there are no chunks left).
- To glaze a cake with ganache, you have to make a little extra, which will drip off onto a tray below. To use up the leftovers: combine the extra room temperature ganache with the cake scraps, roll into balls, coat with tempered chocolate, and let it set (enjoy as cake truffles). Or cut the ganache amount in half, and let it drip partway down the sides, for a semi-naked cake look.
- Assemble the cake: If using, trim the stem end of the hibiscus calyxes and pull out the seeds. You’ll be left with a crown-shaped pod.
- Once the cakes are completely cool, use a long serrated knife to level the cakes if they have humps. Save the scraps for cake truffles or freeze them for another day’s snack. If it looks level, use the ridge at the top edge of the cake as a guide, and cut off the hump jutting out above it.
- Once the cakes are level, place the first one cut-side-up on an 8-inch cake round (if you don’t have one, no worries—just be super careful when you eventually move it), and place it on a wire rack over a sheet pan.
- Dole out about 1/3 to 1/2 of the chilled hibiscus curd, leaving a border of about 1/4 to 1/2 of an inch around the curd (it will spread a little as the cake settles).
- Place the next layer cut-side-down over the curd-covered first layer.
- Make sure the ganache is at pouring-consistency (it should be somewhat viscous, but not gloopy. It should easily pour, but it shouldn’t be too thin). Microwave it for about 10 seconds at a time to thin it out, or let it sit at room temperature for a few minutes to thicken it.
- Pour the ganache over the top of the cake and use an offset spatula to smooth out the top and allow it to drip down the sides.
- The glaze will start to set almost immediately. Once it has started to set a little (about 1 to 5 minutes after glazing), decorate the top with the (optional) hibiscus calyxes.
- Move to a cake display or plate, and enjoy with extra hibiscus curd on the side.
Notes
* If possible, use a reamer, not a squeezer. Most of the lemon’s flavor is in the zest, and squeezing the whole lemon adds too much lemon flavor to the curd, which overshadows the hibiscus. Here, you want acidity with as little lemon flavor as possible.
** I used fresh hibiscus in the photos above, but I’ve also tested the recipe with dried and it works great. In fact, dried hibiscus will give you a much stronger hibiscus flavor than fresh. But using dried won’t get you the same bright pink color; it will be a little more on the purple side. You can find dried hibiscus in the tea section (cut the tea bags open!), in spice shops, at most Asian and some Middle Eastern markets, and at very well-stocked supermarkets.
*** It’s fine to use all purpose flour, but the cake won’t be quite as tender. In either case, be careful not to over-mix once you add the flour to the wet ingredients.
**** If you don’t have a convection oven, you might need to cook the cakes a couple minutes longer.
***** You can use a 9-inch pan or another size. The cook time will be shorter with a wider pan and the finished cake will be shorter and wider (and you might need a touch more ganache, since most of it ends up on top).